While you might love your Samsung Galaxy S9, you might just feel that you do not have any use of many of the pre installed apps. However, you might not be able to delete these apps, no matter how frustrating that may sound.
Rooting Samsung Galaxy phones gives you total control over the phone. You can remove pre-installed apps and run third party apps. Rooting also increases storage space and battery life by managing processes. You can get latest updates of Android on Galaxy after rooting. It also enables you to customize custom ROM administrative rights. Actually, you have many valid reasons to root your Samsung Galaxy S9/S9 Plus. And to successfully and smoothly root your device, you shouldn't begin the rooting process unless you are fully prepared.
How to root Samsung Galaxy S9/S9 Plus?
After getting everything essential done, you need to get a professional Android rooting software at your hand. In this part, you will learn several useful tools which you can use to root your Samsung Galaxy S9/S9 Plus. Best of all, these are totally free and can be downloaded from the internet.
1. Kingo Root
Kingo Root is a simple program to root your Galaxy S9 in just one click. Kingo Root speeds up your phone and also boosts the battery life.
Official link –https://www.kingoapp.com/
Download - https://download.cnet.com/KingoRoot/3000-2094_4-76407821.html

Step 1 - After downloading install the program on a Windows computer. Then plug your Samsung Galaxy using the cable.
Step 2 - The program identifies and scans your device. You may have to activate USB debugging if asked by the tool. The
interface will show a Root button. You should click it only after reading the instructions.
Step 3 - The rooting gets over in a short while. After that you have to click the Finish button to reboot the phone.
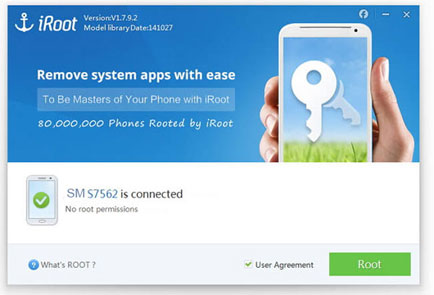
2. iRoot
No technical knowledge is required to use this easy rooting tool. It supports many Android devices and performs safe and successful roots.

Step 1 - Connect the Samsung Galaxy S9 after downloading and installing the tool on your computer.
Step 2 - After the software automatically detects your Samsung phone, it will ask you to click on a User Agreement.
Step 3 - Then select the Root option located at lower right corner of the program. Wait till the root finishes and your phone boots up.
3. Samsung Odin
It is a time taking process and involves some work. You have to download Odin from Samsung and Chainfire’s auto root file.
Odin official link and download - https://odindownload.com/
Chainfire: https://download.chainfire.eu/929/CF-Root/CF-Auto-Root/CF-Auto-Root-herolte-heroltexx-smg930f.zip

Step 1 - Access developer options on Galaxy and enable OEM Unlock.
Step 2 - Unzip the Odin and Chainfire files. Unzip the Chainfire files to find tar.md5 extension.
Step 3 - Put your phone in download mode and get Samsung drivers on PC. Launch Odin, connect your phone and Odin will display Added message.
Step 4 - Select AP tab in Odin and choose the tar.md5 extension. Then click start to begin rooting.
Words in The End: Useful backup tips
Here are some of the useful backup tips that will help you to do more with your Samsung Galaxy S9.
> It is recommended to create proper backups before you root your phone.
> You can make backups to Google, cloud or use professional assistant to transfer it to a PC.
> If you forget to make backup, there are some tools which can recover lost or deleted data such as Coolmuster Lab. Fone for Android.
The Samsung Galaxy S9 is one of the better phones out there. Whether it comes to RAM or the display or even the graphic processing abilities, you have a behemoth there. Why not use it in the best way, and ensure that you root your phone when it is needed?
Related Articles:
How to Root Nexus 10 Step by Step
How to Root Samsung Galaxy Tab
[Odin Mode Android] How to Get Out of Odin Mode on Samsung Devices?