
How to Back Up Android Phone to SD Card [4 Simple Methods]

Seeing as these days, we can do almost everything on our mobile phones, such as listening to music, watching movies, sending & replying to text messages, saving hundreds of contacts, playing different apps, surfing the internet, and so on. Beyond the doubt that you will save most of the important data on your Android you can't imagine what you would do if you lost them someday. Hence, regularly backing up data is of great importance. Serving as a convenient and practical storage solution, SD cards offer Android users a straightforward way to back up their data. This article will guide you on how to back up your Android phone to an SD card, ensuring the safety of your information.
Are you looking for the simplest solution to back up all your Android data to an SD card? Coolmuster Android Assistant is your answer. It enables you to back up all your Android data to a Windows or Mac computer, or any other storage device, such as an SD card, without requiring any technical expertise.
Key features of Coolmuster Android Assistant:
Do you want to follow us to see how to back up Android data to an SD card with Android Assistant?
01The first step is to simply download and install Android Assistant on your computer. Once the installation has finished, you can run it and see its easy-to-navigate interface. At this point, connect your Android device to the same computer via a USB cable.
02After you finish the USB debugging, you can go to your device screen to tap the "Allow" option. Then, the parameter information of your device, including phone model, system version, and storage space size will be shown in the main interface.
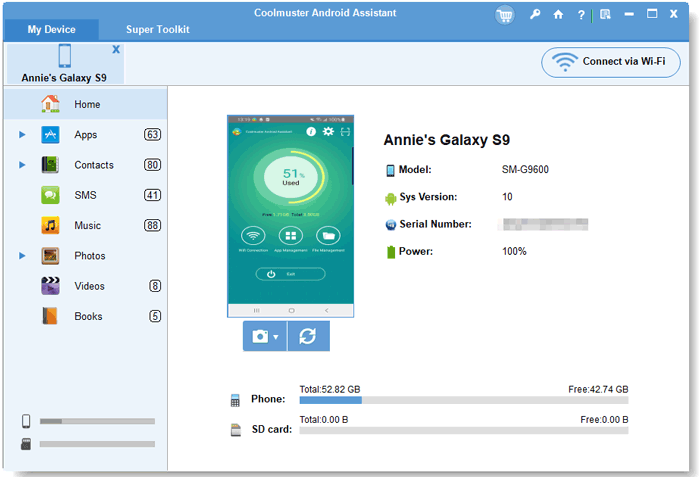
03All the scanned-out Android data will be shown in categories on the top, including photos, videos, music, contacts, SMS, apps, etc. Just open each category, preview contained files, and tick off the data you want to back up on your SD card.
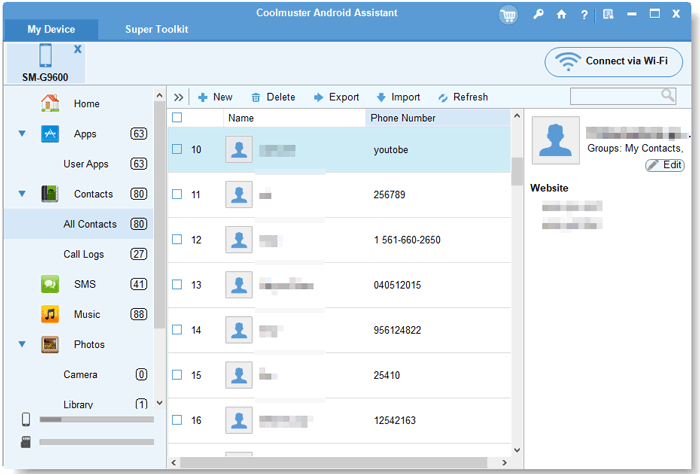
04Now you can connect your SD card to the same computer. Click the "Export" button, choose the SD card as the destination location, and then all the selected Android files will be transferred to the SD card automatically.
The native backup feature on Android phones allows users to back up important data to an SD card, especially suitable for those who prefer not to download third-party software. Through the phone's built-in settings, you can choose to back up photos, videos, contacts, apps, and more. Although this method is relatively straightforward, it only works for certain types of files and cannot back up apps or system settings. Here is how it works:
Step 1. On your Android phone, open the Settings app.
Step 2. Locate and tap on the "Storage" option. In the storage settings, select the SD card as the destination.
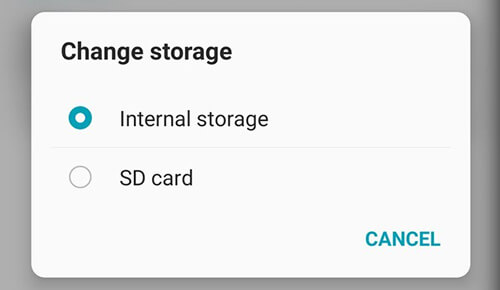
Step 3. Choose the types of data you wish to back up, such as photos, videos, music, and documents.
Some Android devices allow you to enable automatic backup options to regularly back up data to the SD card. For manual backups, simply select the files and copy them to the SD card directory.
If you wish to back up your phone data to an SD card in a more stable manner, you can connect your phone directly to the computer using a USB cable. This method allows for a comprehensive backup of all types of data onto the SD card. However, it requires a computer as an intermediary and involves relatively complex steps. Here's how you can do it:
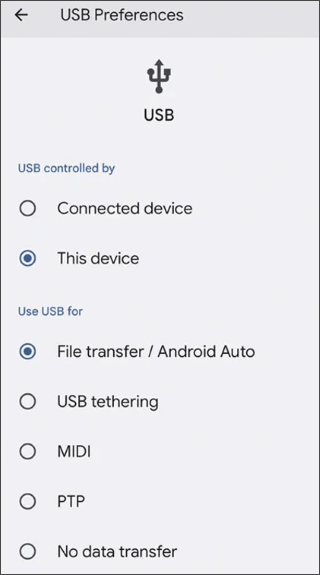
Step 1. Connect your Android phone to the computer via a USB cable.
Step 2. Ensure that your phone is in the "File Transfer" mode. Depending on your device, you may need to select "File transfer" or "Media Device (MTP)" on your phone.
Step 3. Launch the file manager on your computer and navigate to the connected Android device.
Step 4. Browse through the files on your phone's storage and choose the data you wish to back up (such as photos, videos, app data, etc.).
Step 5. Transfer the selected files to the SD card directory on your computer. If you're using an SD card adapter, you can insert it directly into the computer and proceed with the operation.
"Files by Google" is a common file management application on Android devices. Besides assisting users in managing files on their phones, it also supports backing up data to SD cards. This method is convenient and doesn't require installing additional third-party applications, making it suitable for backing up individual files or small datasets. If you have a large amount of data to back up, you'll need to use other methods.
How to back up Android phone data to an SD card via Files by Google?
Step 1. If your device doesn't come pre-installed with Files by Google, you can download and install it from the Google Play Store.
Step 2. After opening the Files by Google app, under "Categories", select a category (such as images, videos, documents, etc.).
Step 3. Locate the files you want to move or copy. In the top right corner, click on "More" and select "Move to".
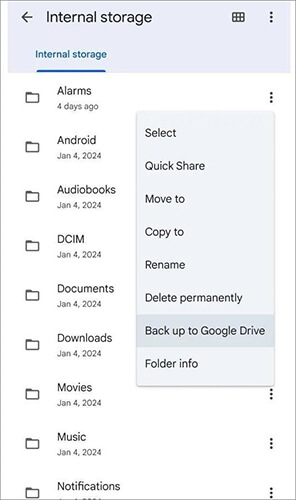
Step 4. Tap on the SD Card.
Step 5. If you want to move or copy files to a new folder: Select the location where you want to create the new folder and then click on "Add new folder".
Enter the folder name in the pop-up window. Tap on "Move to folder" or "Copy to folder".
Step 6. If you want to move or copy files to an existing folder: Select the folder where you want to move or copy the files. Tap on "Move here" or "Copy here".
By backing up Android phone data to an SD card, you can effectively safeguard your important information and avoid the risk of data loss. Above, we discussed several different backup methods, each with its unique advantages but also some limitations.
In summary, we highly recommend using Coolmuster Android Assistant. This tool not only comprehensively backs up phone data but also easily restores it to the phone, supports the backup of more file types, and is simple to operate with high efficiency. If you want more control and flexibility in data backup, this will be your ideal choice.
Related Articles:
How to Transfer SD Card to Computer? 3 Faster Methods
How to Fix: Can't Delete Files from SD Card Android? 7 Solutions
How to Move Pictures to SD Card on Android without Trouble [4 Ways]
How to Transfer Data from SD Card to Android Phone [Top 4 Picks]


