Samsung Galaxy is a high-end Android smartphone that packs a lot of features and functionalities. It is equipped with a powerful camera, a stunning display, and a large storage capacity that can hold all your photos, videos, and other important data. However, no matter how advanced and reliable your device is, it is still susceptible to data loss due to accidental deletion, software glitches, or hardware failure.
Therefore, it is essential to regularly back up your Galaxy S9 data to ensure that you can easily recover your valuable files in case of any unforeseen events. In this article, we'll guide you on how to back up your Samsung Galaxy data in a few simple steps.
People Also Read:
Transfer Text Messages from Phone to Computer
Copy Contacts from Samsung Galaxy to Computer
In case of losing data due to accidental deletion, data corruption, virus attack, etc., you should back up your Galaxy S9 phone data to other places regularly, such as computer, Samsung Cloud, Google Account and so forth. In the following article, we will tell you how:
Way 1: 1-Click to Back Up Galaxy S9 to Computer with Android Assistant
Way 2: Back Up Samsung Galaxy S9 Data to Computer with Android Backup Manager
Way 3: Back Up Samsung Galaxy S9 to Samsung Cloud
Way 4: Back Up Samsung Galaxy S9/S9 Plus to microSD Card/USB Memory
Thankfully, there are many tools available for you to back up your data on your Samsung Galaxy S9. Here we will recommend a safe and effective application - Coolmuster Android Assistant or Coolmuster Android Assistant for Mac. It is a reliable solution with several useful features that you can use to manage your Galaxy S9 data.
> Back up Samsung S9 contacts, SMS, photos, videos, music, app, etc. on PC or Mac;
> Import contacts, SMS, photos, videos, music, apps, etc. from PC or Mac to Android phones;
> Delete and edit Galaxy S9/S9 Plus data on computer;
> Apply to various Android brands: Samsung Galaxy S23/S22/S21/S20/S10/S9/S9 Plus/S8/S7/S6/S5, Galaxy Note, Google Pixel, HTC, Huawei, etc.
Steps to Back Up Samsung Galaxy S9/S9 Plus with Android Assistant:
Step 1: Connect Galaxy S9 to computer
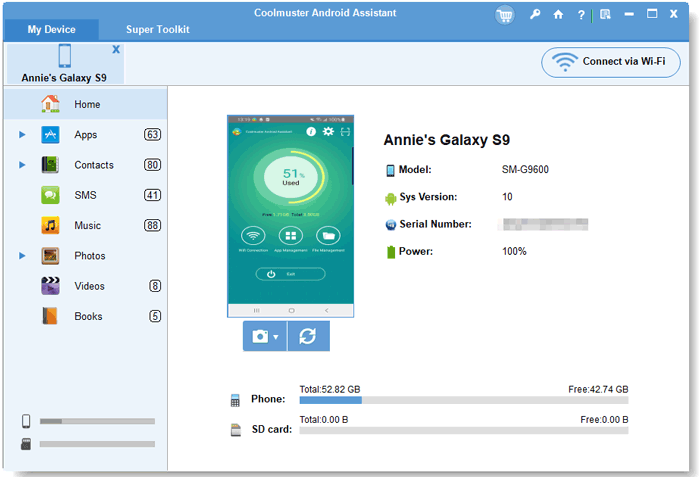
Download Android Assistant on your computer and then launch it. Then, connect the Samsung Galaxy S9 or S9 Plus to the computer via a USB cable. Make sure you have enabled USB debugging on your phone first.
Step 2: Select files for backup
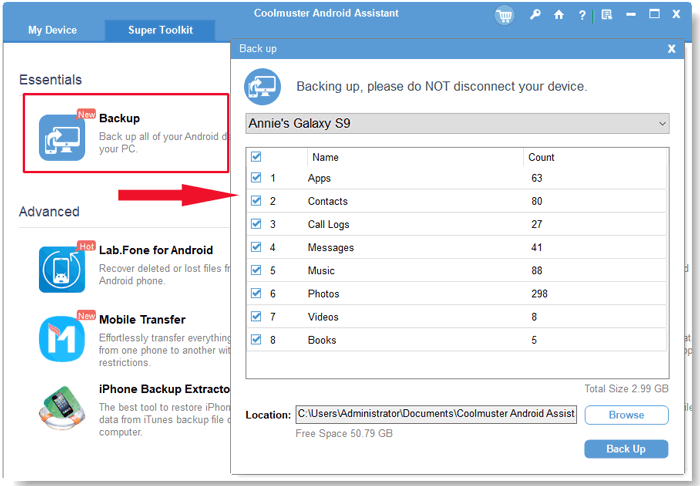
Click "Super Toolkit" from the top menu and then choose "Backup" option. Then, all the phone content are displayed in the list. You can check the categories that you would like to back up, such as contacts, SMS, photos, videos, and so on.
Step 3: Back up Samsung Galaxy S9 data
After you have selected all the data you want to back up, you can click on the "Backup" button to move these selected files to computer. You can select a location to store the backed up data by clicking on the "Browse" button.
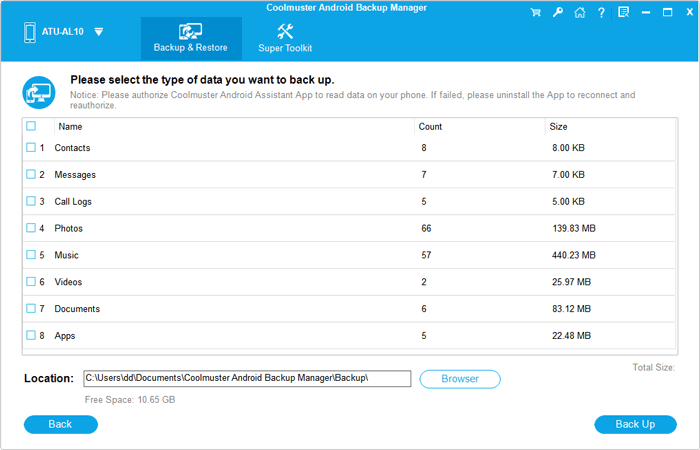
Here is another tool to help you transfer Samsung Galaxy S9/S9 Plus data to computer for backup -- Coolmuster Android Backup Manager. This useful backup program enables you to back up files like music, photos, videos, contacts, SMS, apps and more from Samsung Galaxy S23/S22/S21/S20/S10/S9/S9 Plus/S8/S7/S6, Galaxy Note 10/9/8/7/6/5/4, etc. to computer. Android Backup Manager also empowers you with the ability to restore backups to any Android phones. The Android backup and restore process is smooth and fast with this tool.
Step 1: After you downloaded and installed the Android Backup Manager on your computer, launch it and connect your Samsung Galaxy S9 to the computer. The program will detect the connected Galaxy S9 soon.
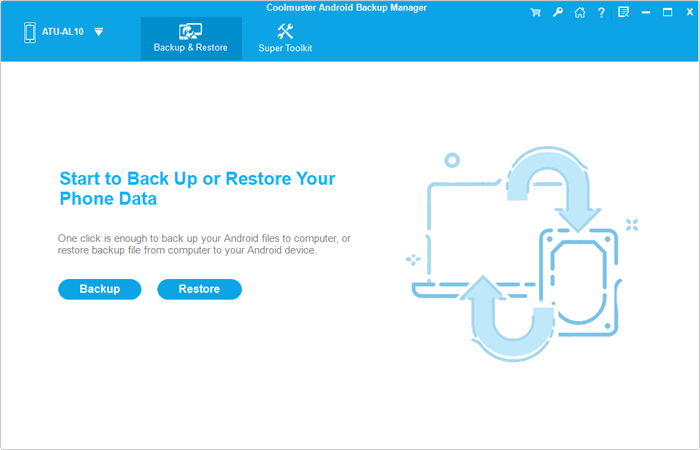
Step 2: Choose the "Backup" option from the main interface and then select the file types you want to back up. You can save the backups to wherever you want on your PC. After selection, click the "Back Up " button.
Apart from computer, you can also back up Samsung Galaxy S9 data to other places, such as Samsung Cloud and Google Account.
You can keep your sensitive information, app data and settings in Samsung Cloud securely and access them later. For this, you have to sign in to your Samsung account to back up data. Just follow the steps below (please note that some data can not be backed up with Samsung Cloud):
Step 1. Go to the Settings option and tap "Cloud and accounts" > "Samsung Cloud".
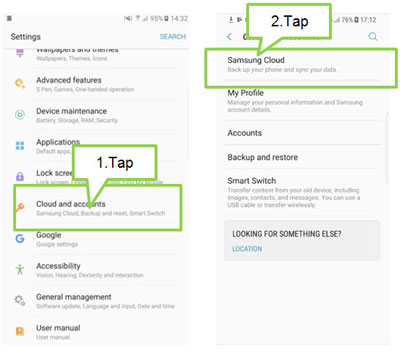
Step 2. Then, click "Back up my data" and tap the switches next to the data types you want to back up.
Step 3. After you have activated all the items you want to back up, you can tap "BACK UP NOW " to initiate the backup process.
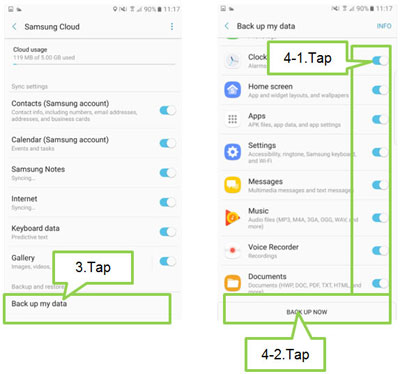
After above operations, you can back up contacts, calendar, gallery, phone logs, app data, ringtones, SMS, MMS, Music, documents, voice recordings and many more from Samsung Galaxy S9 to Samsung Cloud.
In addition to computer and Samsung Cloud, you can also back up data, such as photos, contacts, text messages and apps from Samsung Galaxy S9 to external storage, including microSD card and USB memory. But before you proceed with this way, you must check if your memory cards are FAT32 and exFAT file system because using an incompatible card may damage your Galaxy S9 and corrupt the data.
Step 1: On your Galaxy S9, insert the ejection pin into the hole on the tray to loosen the tray and pull out the tray gently from the tray slot.
Step 2: Put a memory card on the tray 2 with the gold-colored contacts facing downwards. Make sure the card is fixed firmly into the tray and then insert the tray into the tray slot.
Step 3: Plug the USB connector to the USB power adaptor and plug the USB memory into an electric socket.
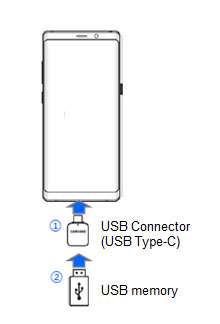
Step 4: Then, go to your Galaxy S9 and tap Settings > Cloud and accounts > Smart Switch > More > External storage transfer > BACK UP.
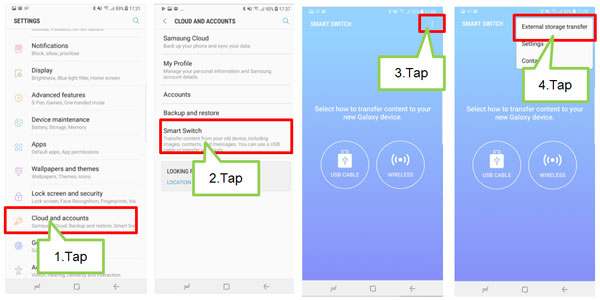
Step 5: Choose the files you want to back up and activate the "Back up" option.
After the backup process is finished, you can check the backed up data in My Files > SD card > SmartSwitchBackup folder.
OK, those are the different methods to help you back up your Samsung Galaxy S9 data on computer, Samsung Cloud and external storage devices. Just make a comparison and pick out your favorite one.
Related Articles:
How to Have Samsung Backup Photos in 7 Simple Solutions
Samsung Messages Backup: 7 Ways to Back up Samsung SMS Easily
How to Transfer Photos from Samsung to Mac for Backup? 4 Ways in 2023


