Dropbox is among the most popular cloud storage services for end users. It is easy to use and most important it helps you to work while automatically backing up your work. In order to use Dropbox on your Android phone, download and install Dropbox from Google Play Store. You will need your email address to sign up for a Dropbox account during the setup process. The account comes with at least 2 GB free storage. Once you have your account, you can follow the tips below to learn how to use Dropbox on Android device, and get the most out of it.
> Tips on Using Dropbox on Android: Share Files and Folders
> Tips on Using Dropbox on Android: Backup Android Apps, Photos, Docs
> Tips on Using Dropbox on Android: Access Files Online or Offline
> Tips on Using Dropbox on Android: Protect Private Files with Passcode
Whether you are a student, worker, or business person, you will want to share files from time to time. It allows you to share files and folders to make your collaboration much easier. To share your files and folders on Dropbox, you can do either of the following:
1. Sharing Via Links
This happens to be among the most popular way to share Dropbox files and folders on various platforms. You can share files using links to other apps such as Skype, Facebook, Twitter, WhatsApp, Viber, and Line. All you need is to have the apps installed in your smartphone, and Dropbox will do the rest.
Step 1: Find the Files You Want to Share
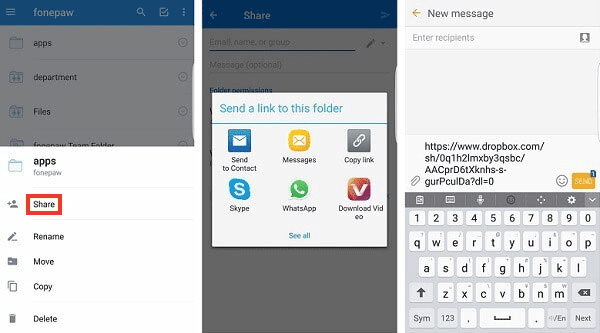
Once you have found the files or folders you wish to share, tap on the down arrow. That will reveal several options, among them the "Share" option. Choose the "Share" option and a pop-up will appear.
Step 2: Create Link
In the pop-up that appears, select the create link option, then choose the app that you want to send the link to. The messaging apps in your phone will be listed for you choose one. You may also to choose to copy the link created.
Step 3: Send as a Message
If you choose to use the conventional messaging app in your phone, the link will be automatically pasted in the message box. You will then have to enter a recipient or recipients of the link. Once you click send, the recipient will be able to view the file when they click on the link.
2. Share File or Folder with Members through Invites
The second most popular alternative is to invite members to a shared file or folder. You may either permit them to view and edit the file or just view it. Members that you invite will have an option to leave a comment that can be viewed by all.
Step 1: Navigate to the file or folder you want to share.
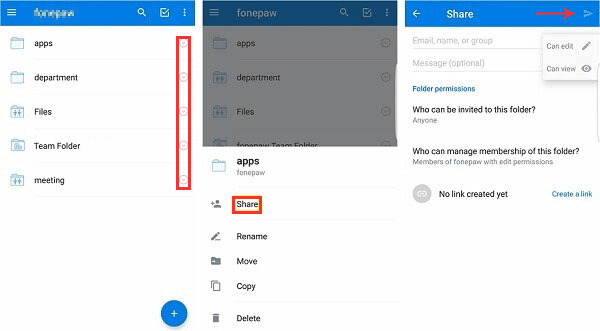
Once you find it, tap on the down arrow and choose the "Share" option.
Step 2: Choose the Receiver
You will then have to type the name of the receiver, and a list of possible contact will come up. Choose the right contact that you want to invite.
Step 3: Edit Permissions
The next step that will come up will be the one that allows you to choose whether the receiver will just view or will be able to edit the file or folder contents.
Only choose edit if you have a copy of the same file elsewhere. Otherwise, make a copy first to avoid disappointments later.
Step 4: Send the File.
The last option is for you to send the invite to the receiver.
The above option works only if you use the contact that the receiver uses to access their Dropbox. If you do not have one, then it is best to use the first sharing option.
See Also:
Android File Transfer Alternative for Mac
Alternative to Kies for Samsung
It is always a good idea to backup important files in Dropbox. That allows you to retrieve them in case you lose your phone (Coolmuster Lab.Fone for Android can recover deleted files on your Android phone). You may even accidentally delete your files, and having a backup will save the day in such times.
Step 1: Open Dropbox
The first step is to open Dropbox and go to the "Files" option in the menu.
Step 2: Upload Files or Folders
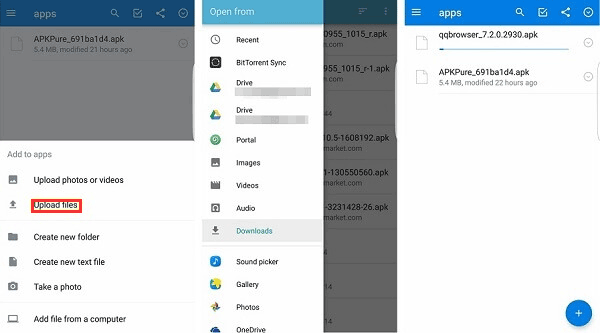
The next step is to click on "+" icon to add the folders or files you want to backup. You will see and option to "upload videos or photos" or "upload files".
Step 3: Choose the file type to upload.
You will have to select the type if files to upload. This can be audio, docs, videos, or even .apk files. You will choose the .apk file if you want to back up your apps.
Once the files are backed up, you may choose to delete them from your device to save space. In the case of apps, uninstall the app. You may reinstall it from the .apk file saved in Dropbox.
Dropbox allows you to view files when you are online and offline. That feature comes in handy when you are offline but you still want to access work files. The feature supports only files that are located in the "Offline" folder.
Step 1: Identify the file you want to make available offline.
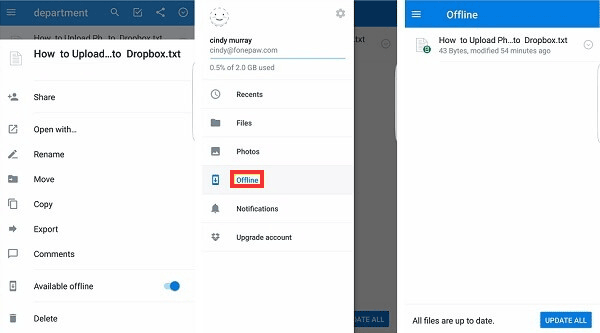
Step 2: Turn on "Offline" feature by clicking on the arrow down icon, and toggle the available offline button.
Step 3: Now navigate to the offline folder, and you should be able to see the file.
The alternative is to choose the "Save to device" option and you will also be able to access that file when you are offline.
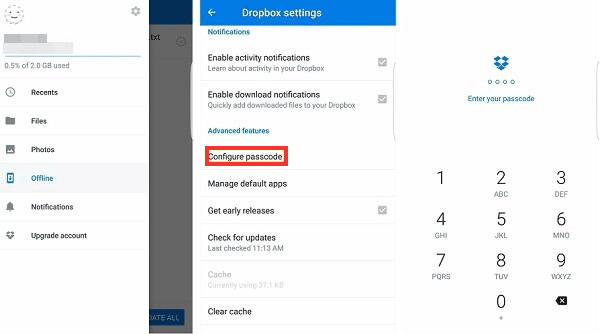
In the past, privacy was a major concern when people shared their files on Dropbox. To address those concerns, Dropbox now provides a password feature to protect your shared files. Follow the steps below to activate the feature.
Step 1: Go to the advanced features by clicking on “Settings” and choosing "Advanced features".
Step 2: Select the "Turn passcode ON" and enter four digits that you will be using as your password. You need to enter the password two times.
Step 3: Secure your files by enabling "Erase data" to make sure that your data gets erased after a wrong passcode is entered over 10 times.
Overall, Dropbox has become popular because it is easy to use, and offers numerous features. You can backup your files, share them, and control to access them at all times on your Android devices. We hope that you found this guide on how to use Dropbox on Android to be informative, and you will make good use of it.
Related Articles:
Alternative to Wondershare Dr.Fone for Android
Android SMS Manager - Manage Android Text Messages
Top 5 Android Storage Managers to Free up Space