
How to Convert HEIC to JPG on Google Drive? [4 Effective Ways]

Some time back, Apple invented the HEIC image file format and made it a default storage format on iOS 11 and later devices. Since then, Google has followed the trend and begun supporting the HEIC file format to allow iOS users to back up their pictures on Google Drive.
However, when you download a HEIC file from Google Drive, it will be saved in the original HEIC format, thus creating compatibility problems. To solve this, you must convert HEIC to JPG on Google Drive, but how? Is it possible? Luckily, this guide comes to your rescue. We will show you how to convert HEIC to JPG on Google Drive in simple ways.
In fact, you can't directly convert HEIC to JPG in Google Drive. Even though there is an option to download pictures, the service usually lets users only download them in the original format they were uploaded in.
Though converting files in Google Drive seems impossible, you can easily achieve that with a few workarounds. Despite Google Drive having limitations, it can still come in handy when converting between HEIC and JPG. Keep reading to learn how converting HEIC to JPG in Google Drive can be achieved.
Although you can't directly convert HEIC to JPG in Google Drive, there are three methods that can help you achieve this indirectly.
When you use the download feature of Google Drive to download an image, your picture will be saved in its original HEIC format. But, with this built-in Save As feature, it makes the otherwise deemed impossible task possible. Even if the image was earlier saved as a HEIC file, it will be downloaded as JPG. Here is how to convert HEIC to JPG on Google Drive:
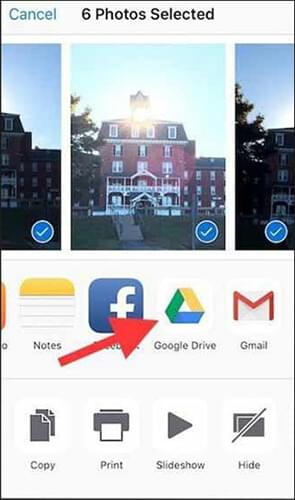
Step 1. Start by opening the Photos application on your iPhone. Choose the pictures you want to convert, then press the Share button at the lower left corner. Select Google Drive and enter the Gmail account to sync the HEIC photos. Once done, click the Upload tab to finish the photos syncing process.
Step 2. Next, switch on your computer and open Google Drive through a web browser, then log into your Google account, where you synced the HEIC pictures.
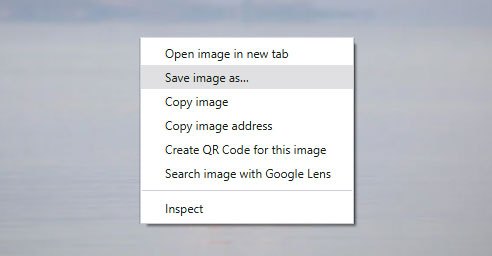
Step 3. Find the HEIC image and right-click on it. Choose the Save images as option from the popup menu.
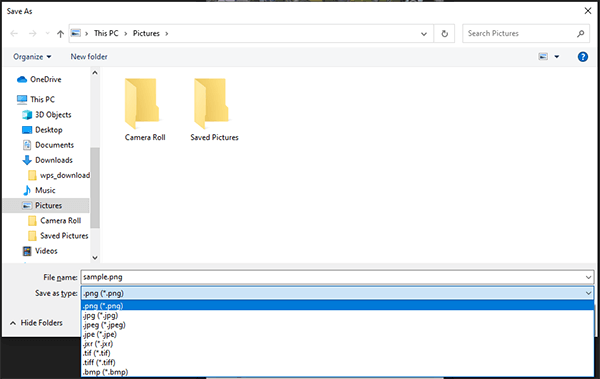
Step 4. Lastly, choose the location on your computer where you wish to store the picture. After that, choose .jpg as output and tap the Save icon to finish the conversion process.
The catch with using Google's Save As feature to convert HEIC to JPG is that you can convert your HEIC without downloading other apps. Besides, you can use any device, such as Android, Mac, and Windows.
Note: The only downside is that this option only downloads images in a resolution user view. Therefore, even though it can help users convert HEIC to JPG in Google Drive, they can't save the images in maximum resolutions. Also, it needs a stable connection, and you can only convert a single image at a time.
Another viable option for Google Drive to convert HEIC to JPG is emailing yourself the HEIC files. It's not only convenient but also safe. If you have several email accounts and don't want to install different tools to convert your HEIC files to JPG in Google Drive, this solution can come in handy.
When you send HEIC images through email, the Gmail application automatically converts them to the universal format for easier accessibility. Here are steps to turn HEIC to JPG in Google Drive through Email:
Step 1 . Open Google Drive on your device. Locate, then download the pictures you wish to change from HEIC to JPG format.
Step 2. Send the pictures you downloaded to yourself as attachments through the Gmail application.
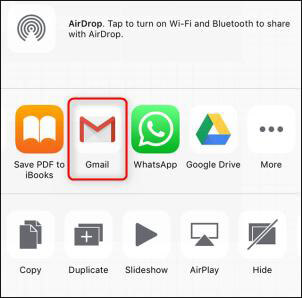
Step 3. After that, open the email you sent the photos and download them. The pictures will be downloaded in JPG format, and you can now upload them to Google Drive.
Note: One key thing to note with this option is that if your photos are too large, it'll be tricky for users to upload them. For example, Gmail has a file size limit of 25MB. Additionally, this method will be time-consuming, and it's a hassle to download the HEIC files to JPG from Google Drive in maximum resolution one at a time.
There are lots of online tools that are reliable for turning HEIC images into JPG in Google Drive. Tools like CloudConvert can help change HEIC to JPG, and it does its job decently. You don't need to download any programs. You can choose the file to convert from a PC or cloud storage such as Google Drive, Dropbox, etc.
This makes it possible to download the Google Drive pictures as JPG directly. Of course, if you already downloaded the pictures to a PC, you can also convert them to JPG online. Here are the steps on how to convert HEIC to JPG on Google Drive:
Step 1. Head to the CloudConvert website on a web browser, tap the drop-down button next to Select File, and choose From Google Drive.
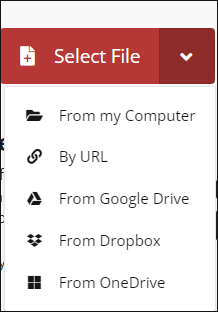
Step 2. Log into your Gmail account, then enter your login credentials. From the home page, select the Google Drive option again. Now, choose the HEIC photo you wish to convert and tap Select.
Step 3. Set to Convert to JPG, then press Convert. Tap the Download button and preview the converted file.
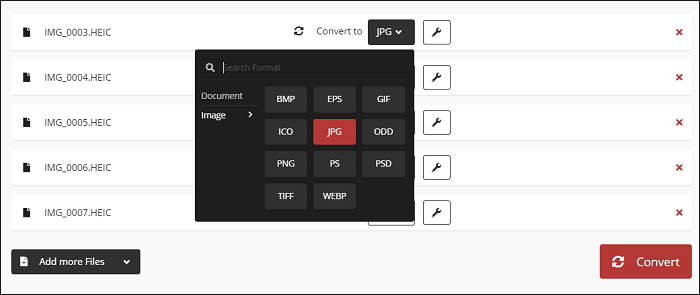
Step 4. Press the Download tab at the upper right corner and download the Google Photos as JPGs to the PC. From there, head to the Downloads folder to check the file.
Most of the methods we mentioned above can only convert one photo at a time, which is very time-consuming. Imagine having hundreds of HEIC files that need to be converted, and you can only convert a single file or a few of them at a time. It can be a real headache.
Coolmuster HEIC Converter is a powerful converter that supports converting HEIC pictures to file formats like JPG/JPEG and PNG in batch without compromising quality. With the batch conversion function, it will take you only a few minutes to convert hundreds of HEIC photos.
Key Features:
Here are the steps to convert HEIC to JPG on Google Drive using Coolmuster HEIC Converter:
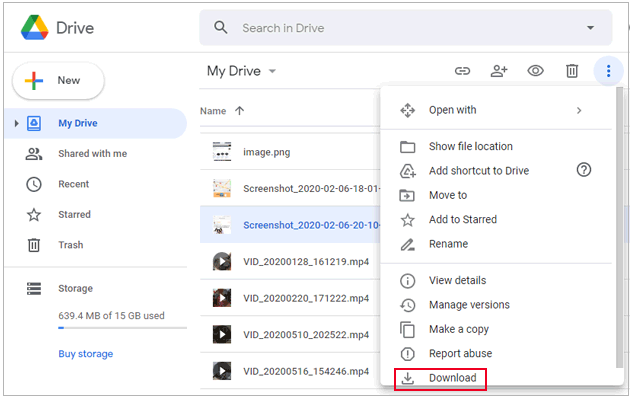
01Visit the Google Drive website and log in to your account, select the HEIC photo you want to convert to JPG, right-click on the photo, and choose Download to save it to your computer.
02Download the HEIC Converter on the PC, install it, and launch it.
03Start adding HEIC files by tapping the Add HEIC button, or drag and drop them into the tool and tap the Drop and drop here icon.
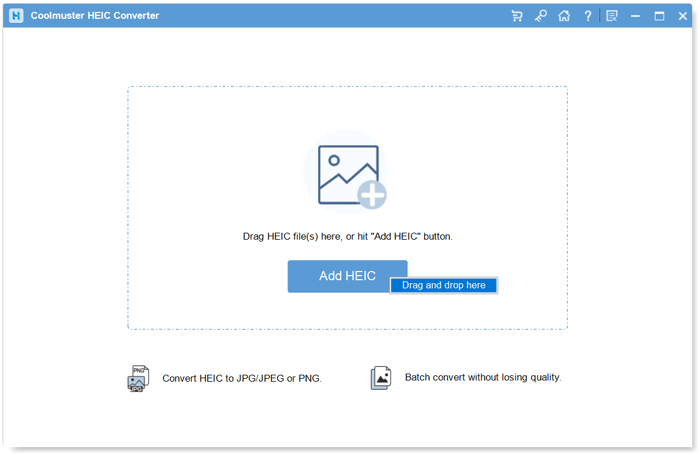
04Now, choose JPEG/JPG as the output file format. Enable the Keep Exif Data option to save the original file info of the photos. Set Output Folder to save the converted files.
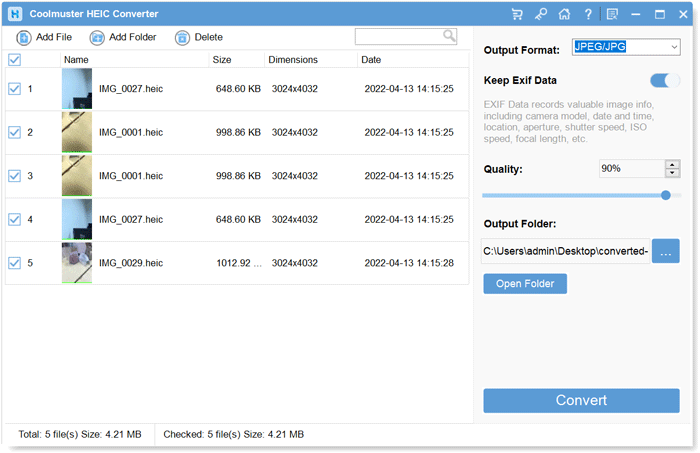
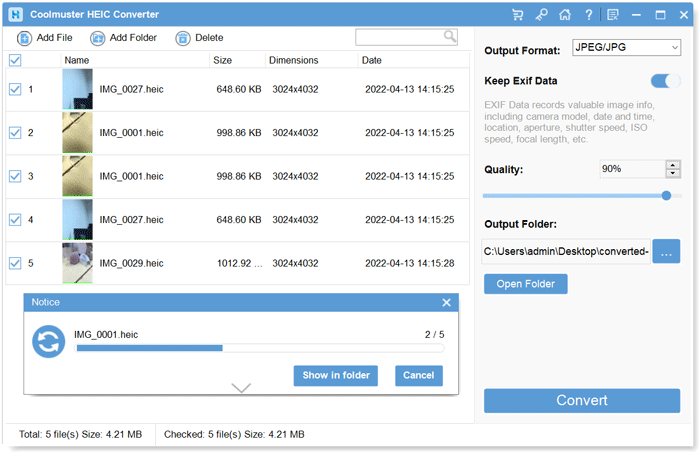
05Click on the Convert tab, and your HEIC files will instantly turn into JPGs.
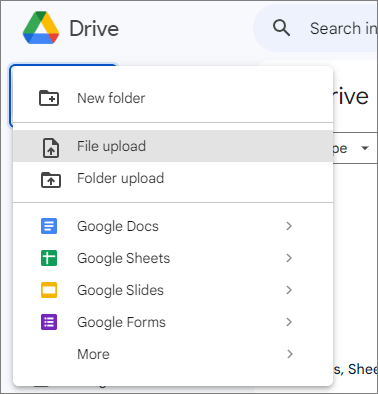
06Return to the Google Drive website, click the New button and then select File upload. Proceed to upload your JPG file to your Drive storage.
Video Tutorial:
That's all on how to download HEIC as JPG from Google Drive. With the Save As function in Google, you can easily download any HEIC file as a JPG. Additionally, you can email your HEIC images and download them as JPGs. Online tools can also be a lifesaver. However, most of them can only convert a photo at a time. Therefore, we highly recommend Coolmuster HEIC Converter. The batch mode and its ability to maintain the quality of photos make it the best.
Related Articles:
[Solved] 5 Ways to Convert HEIC to JPG in Google Photos
[Solved] How to Open HEIC Files on Mac Computers in Simple Ways
[Comprehensive Review] Top 12 HEIC Viewers on Computer in 2024
Top 12 Best HEIC to JPG Converter on Windows/Mac/Online [Latest Update]