The data on an iPhone is extremely important for users, whether it's to prevent loss or damage to the device or to transfer data when upgrading to a new device. Mastering the skills of backup and restore can help you make a seamless transition. This article will detail various methods to back up and restore iPhone data, ensuring that your information is secure in any situation.
If you don't want to rely on iTunes to back up and restore your iPhone, here are three ways you can use to do it.
Coolmuster iOS Assistant is a professional iOS data management tool that helps users back up various data from their iPhone to a computer and allows for easy restoration of these backups to the device at any time. Compared to iTunes, Coolmuster iOS Assistant is more flexible, supporting selective backups, with a user-friendly interface that doesn't require iTunes or iCloud, making both backup and recovery very convenient.
Key features of Coolmuster iOS Assistant:
Download this tool on your computer and follow the step-by-step guide below to back up and restore your iPhone with one click.
01Connect your iDevice to the computer and launch the software. After the program detects your phone, switch to the "Super Toolkit" section.
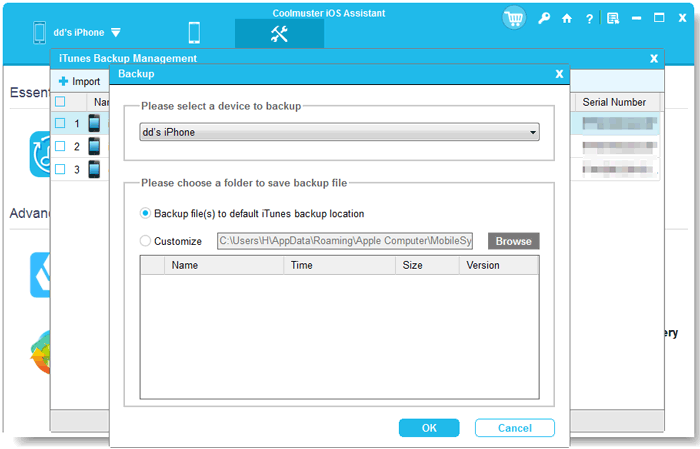
02On the main interface, tap on the "iTunes Backup & Restore" > "Backup" button.
03Select a location to save the new backup files. You can either save them on the default iTunes backup location or any other location on your PC. To save in another location, tap the "Browse" icon and then hit the "OK" button to begin the backup process.
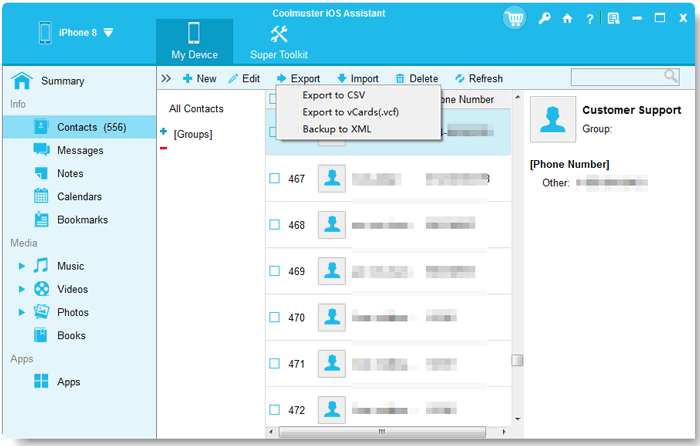
If you want to selectively back up your iPhone data to the computer, once the software detects your device, click on a file type in the left panel, preview and select the specific data you want in the right panel, and then click the "Export" button to transfer files from your iPhone to your PC/Mac.
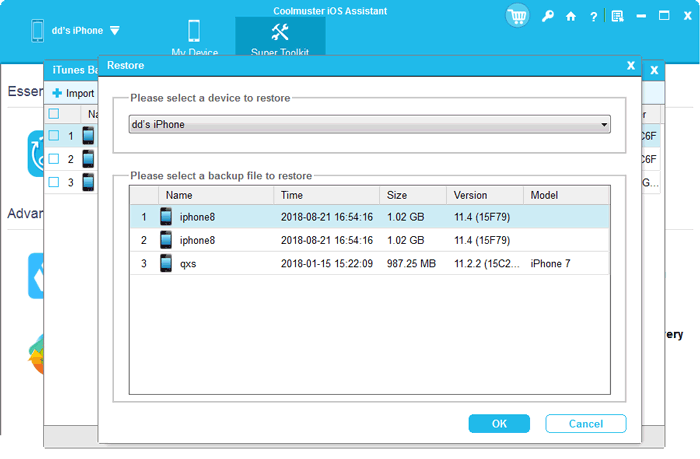
01Tap the "Super Toolkit" option and then click the "iTunes Backup & Restore" button, and then click the "Restore" option on this app.
02From the drop-down menu, select the iDevice to restore iTunes backup. From here, choose a backup file to restore to your phone. The file can be selected from the list and then hit the "OK" button.
03After reading the notes on the popup window, tap the "OK" button to start restoring iTunes backup to iDevices.
Video Tutorial:
iCloud is Apple's official cloud backup service that allows users to back up data from their iPhone to the cloud via Wi-Fi. This method doesn't require a computer, making it ideal for users who want automatic backups and easy access to their data at any time. iCloud backups store photos, app data, device settings, and more, but it's important to ensure you have enough iCloud storage space. (iCloud storage is full?)
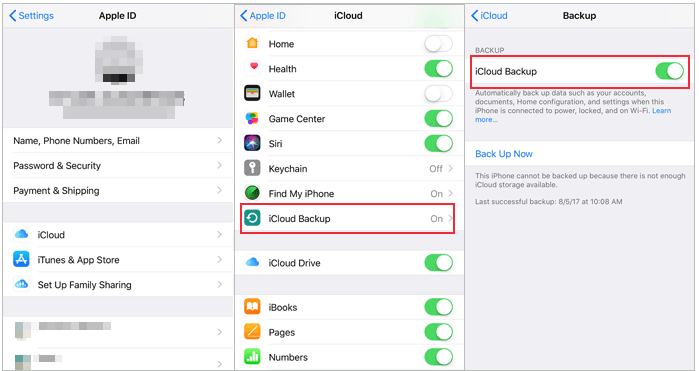
Step 1. Open the "Settings" app on your iPhone and tap your "Apple ID" profile at the top.
Step 2. Go to the "iCloud" option, find "iCloud Backup", and tap to enter.
Step 3. Turn on the "iCloud Backup" switch, then tap the "Back Up Now" button, ensuring your device is connected to a Wi-Fi network.
Step 1. Make sure your iPhone is connected to a stable Wi-Fi network.
Step 2. If you're restoring an existing device, go to "Settings" > "General" > "Transfer or Reset iPhone" > "Erase All Content and Settings". This will prepare your iPhone for the setup process.
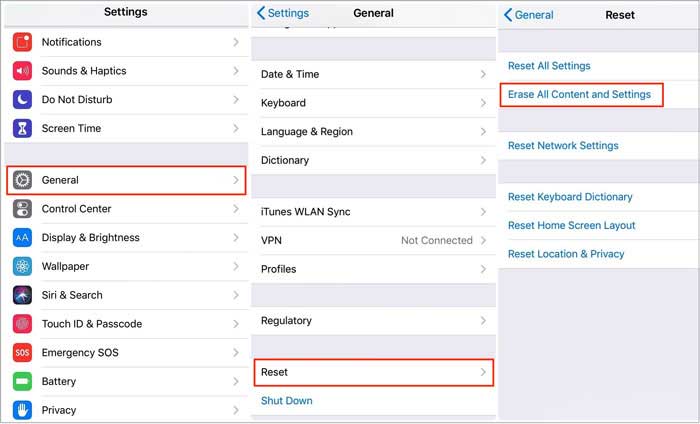
Step 3. After the device restarts, follow the on-screen instructions to set it up. When you reach the "Apps & Data" screen, select "Restore from iCloud Backup".
Step 4. Enter your Apple ID and password to sign in to your iCloud account. Once signed in, you'll see a list of available backups. Select the most recent backup or the one you want to restore.
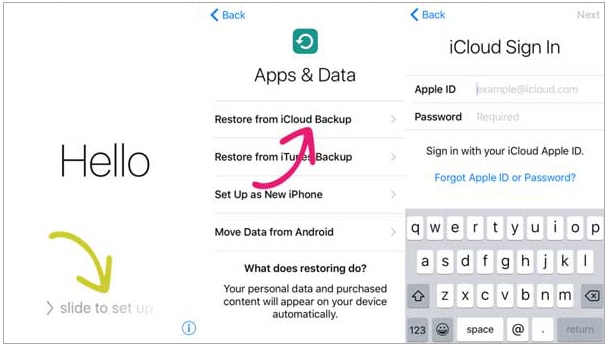
Step 5. Your iPhone will begin restoring from the selected backup. This may take some time, depending on the size of the backup and your Wi-Fi speed.
Note: If you want to restore your iPhone from iCloud backup without reset, you can click here to read this article to learn how to do it.
For users with macOS Catalina or later, Finder has replaced iTunes for managing device backups and restorations. This method is suitable for those who already have a Mac and want to back up and restore iPhone data locally using their computer. (How to back up iPhone to Mac?)
Step 1. Connect your iPhone to your Mac using a USB cable.
Step 2. Open Finder and you'll see the connected iPhone device in the sidebar.
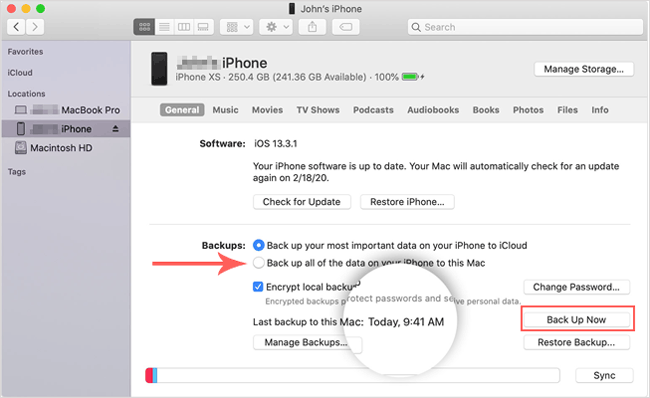
Step 3. Click on the device name, and under the "Backups" section, select "Back up all of the data on your iPhone to this Mac".
Step 4. Click "Back Up Now" and wait for the backup to complete.
Step 1. Connect your iPhone to your Mac using a USB cable.
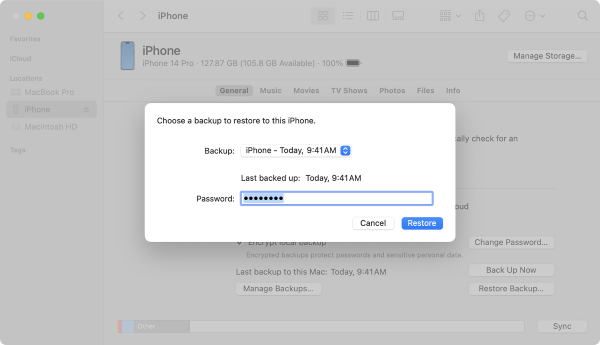
Step 2. In Finder, select the iPhone device and click "Restore Backup".
Step 3. Choose the backup file you want to restore, click "Restore", and wait for the process to complete.
Although Apple has replaced iTunes with Finder on the Mac, iTunes remains a common tool for backing up and restoring iPhones for Windows users and those using older versions of macOS. iTunes allows users to back up all iPhone data to their computers, making it suitable for those who prefer traditional methods.
Step 1. Download and install the latest version of iTunes on your Windows PC or older Mac.
Step 2. Connect your iPhone to the computer using a USB cable and open iTunes.
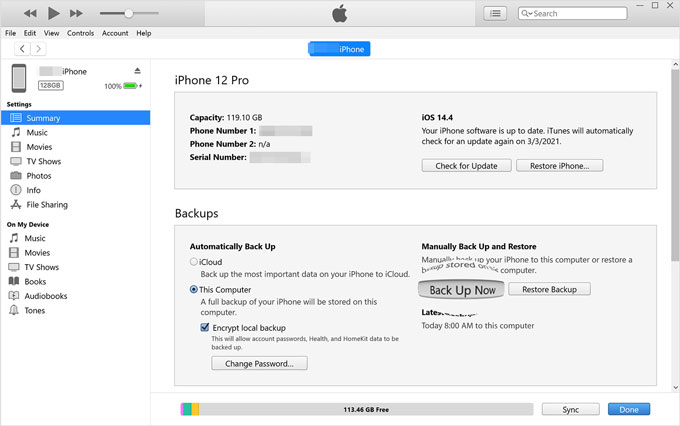
Step 3. Click the device icon in the iTunes interface to access the device "Summary" page.
Step 4. In the "Backups" section, select "Back Up Now" and wait for the backup to complete. (iTunes Back Up Now greyed out?)
Step 1. Connect your iPhone to the computer and open iTunes.
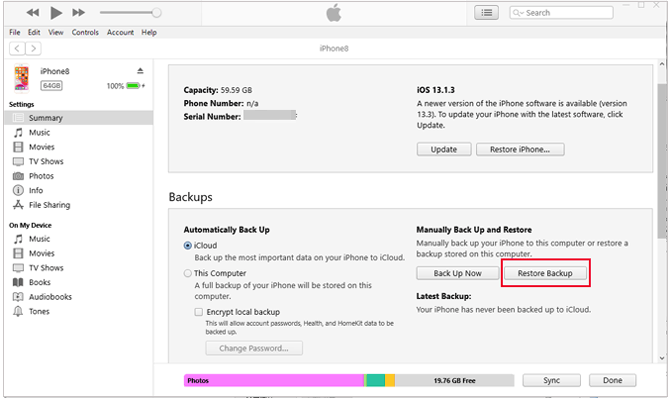
Step 2. Click the device icon to access the device "Summary" page. (iTunes doesn't recognize your iPhone?)
Step 3. In the "Backups" section, click "Restore Backup".
Step 4. Select the desired backup file, click "Restore", and wait for the restoration to complete.
When it comes to backing up and restoring an iPhone, users can choose the method that best suits their needs. If you want more flexibility and prefer not to rely on iTunes or iCloud, Coolmuster iOS Assistant is an excellent option. It supports backing up and restoring various data types, is easy to use, and doesn't take up cloud storage space. If you prefer simple wireless operation, iCloud is a good choice, while using iTunes or Finder is more suitable for traditional local backup users.
Related Articles:
How to Restore iPhone 15/16 from Backup Efficiently? [4 Techniques]
How to Recover Data from iPhone Effectively [With or Without Backup]
What Happens If I Restore My iPhone? Everything You Need to Know
5 Methods to Back Up an iPhone without/with a Computer (Step-by-Step)


