
[Complete Guide] How to Get Videos Off iPhone to Your Computer?

Wondering how to get videos off iPhone to your PC? With the increasing quality and resolution of smartphone cameras, iPhones have become one of the most popular devices for capturing and storing videos. However, transferring videos from an iPhone to a Windows or Mac computer can be exhausting for many people, especially those who are not tech-savvy. Fortunately, there are several ways to get videos off an iPhone and onto a computer, and in this passage, we will introduce some of the most effective methods. Read on!
Whether you want to free up some space on your iPhone, edit your videos on a computer, or simply keep a backup of your precious memories, the methods below will help you transfer your videos quickly and easily and you can use them on a Windows computer or your Mac.
Whether you're a Mac user or a Windows user, just give Coolmuster iOS Assistant a try if you're looking for the fastest and easiest way to get videos off your iPhone. iOS Assistant is a software that offers a quick and easy way to transfer data from iPhone to computer, and vice versa. This software provides a user-friendly interface that makes it quite easy for users to navigate through the transfer process.
This software comes with many awesome features that make it stand out from other iOS management tools, take a look:
Here's how do I get videos off my iPhone to PC or Mac:
01Download and install Coolmuster iOS Assistant on your computer. Once installed, connect your iPhone to your computer using a USB cable. The software will automatically detect your device and display its information, including the available storage space, device name, and iOS version.

02To transfer videos, select the "Videos" option on the left-hand menu. Here, you will see a list of all the videos stored on your iPhone, organized by category. You can choose to transfer all videos or select specific ones by checking the boxes next to their names.
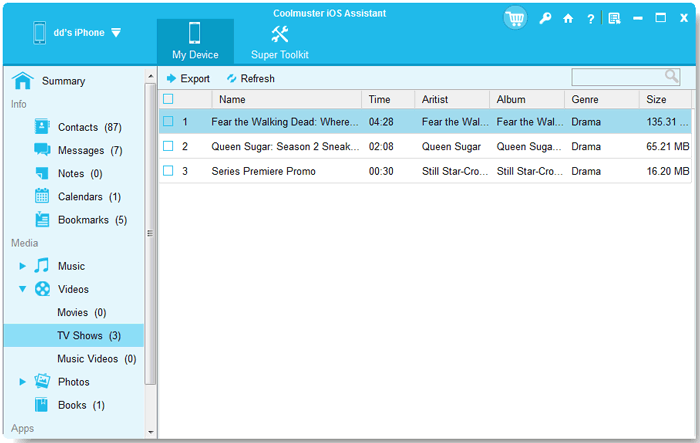
03After selecting the videos you want to transfer, click on the "Export" button at the top of the screen. Choose the location of the folder where you want to save the videos on your computer and click on "OK" to start the transfer process. The progress bar at the bottom will show you the status of the transfer.
Video Guide:
iCloud is a cloud storage and synchronization service offered by Apple that allows you to access and manage your content across multiple devices. One of its many features is allowing you to automatically back up videos and photos from your iPhone to the cloud, making them easily accessible from any device with iCloud installed.
Below comes a step-by-step guide on how to get videos off phone using iCloud:
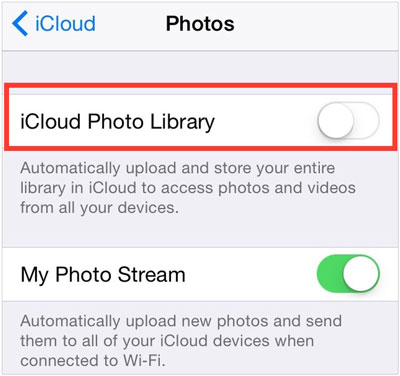
Step 1. Before the start, ensure that you have iCloud set up on your iPhone, the storage space of your iCloud is enough, and that it is set to automatically back up your videos. To check this, go to "Settings" on your iPhone, tap your Apple ID at the top of the screen, and then tap "iCloud". Here, make sure that "Photos" is turned on and set to "iCloud Photos Library" or "My Photo Stream".
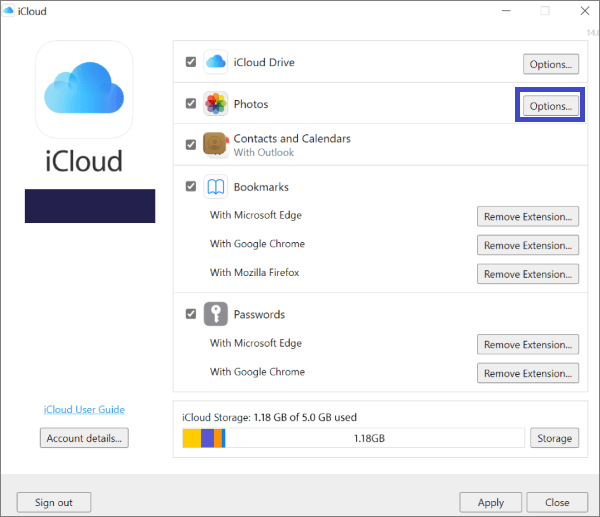
Step 2. On your iCloud Windows application, sign in to your iCloud account using your Apple ID and password. Select "Options" next to "Photos" and ensure that "iCloud Photos Library" or "My Photo Stream" is selected. After this, your iCloud photos and videos will be synced with your PC. You can access them by opening the iCloud Photos folder in File Explorer. Here, you will see all the photos and videos synced from your iPhone.
Step 3. To transfer videos from your iPhone to your PC, simply select the videos you want to transfer and copy and paste them to a folder on your PC.
iCloud provides mere 5GB of free storage space. If you need more space, you will need to upgrade your iCloud storage plan, which comes at a cost. You can also find more solutions in this guide:
What if There is Not Enough iCloud Storage?Here're also some easy-to-achieve solutions on Windows, check them out:
Getting videos off an iPhone and onto a Windows PC can be a bit difficult, but one of the simplest ways to do it is through File Explorer. This method requires no additional software or tools, as it utilizes the built-in functionality of Windows to access the files on your iPhone.
Step 1. For starters, connect your iPhone to your Windows PC using a USB cable. You may need to unlock your iPhone and enter your passcode to give your computer access to your device.
Step 2. Once your iPhone is connected, open File Explorer on your PC. You should see your iPhone listed as a device. Double-click on your iPhone to open it.
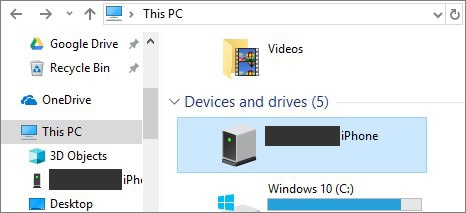
Step 3. Navigate to the "Internal Storage" or "DCIM" folder on your iPhone. This is where your photos and videos are stored. If you have multiple videos, they will be organized by date and time in separate folders.
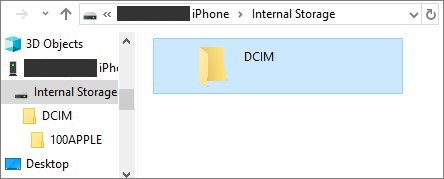
Step 4. Select the videos you want to transfer and copy and paste them to a folder on your PC. You can also drag and drop them to the desired location.
Note: It's worth noting that transferring videos this way may take a bit longer than other methods, especially if you have many videos to transfer. Additionally, you may need to manually select the videos you want to transfer, which can be time-consuming if you have many videos stored on your device.
The Photos app on Windows is a built-in tool that can be used to transfer videos from your iPhone to your PC. This method is simple and requires no additional software or tools as well, making it a great option for those who want to easily transfer videos without any hassle.
Step 1. Connect your iPhone to your Windows PC using a USB cable. You may need to unlock your iPhone and enter your passcode to give your computer access to your device.
Step 2. Once your iPhone is connected, click at the "Start" button and select "Photos" to open the Photos app. You should see your iPhone listed as a device under "Devices and drives". Click on your iPhone to open it.

Step 3. Select the videos you want to transfer and click on "Import > From a connected device". You can choose to import all the videos on your iPhone, or select specific videos to transfer.
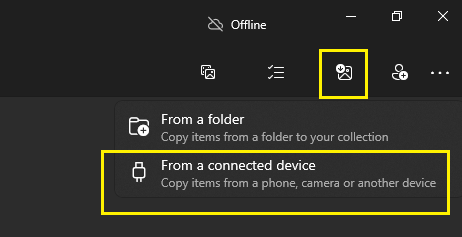
Step 4. The Photos app will automatically transfer the selected videos to your PC and save them to the "Pictures" folder. You can access them by opening the File Explorer and navigating to the "Pictures" folder.
Note: The Photos app may not recognize all video formats, which can limit the types of videos you can transfer. And if you're looking for a more versatile transfer method, you may want to consider using other solutions above like Coolmuster iOS Assistant or iCloud.
It could be easier for those who use Mac to get iPhone videos to PC comparing to the situation of Windows users. Let's see:
AirDrop is a built-in feature on Apple devices that allows you to wirelessly transfer files as photos and videos from your iPhone to your Mac.
Just follow the steps below to learn how to get video off iPhone with AirDrop:
Step 1. Make sure both your iPhone and Mac are connected to the same Wi-Fi network and that AirDrop is enabled on both devices. On your iPhone, open the "Photos" application and select the video you want to transfer. Then tap on the "Share" button and then the AirDrop icon.
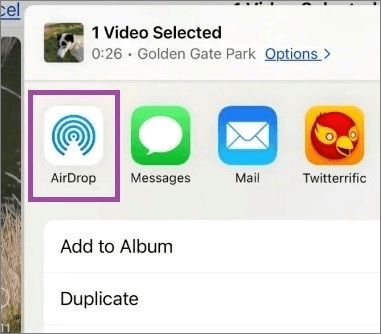
Step 2. Select your Mac from the list of available AirDrop devices. Your Mac should receive a notification prompting you to accept the file transfer.
Step 3. Once you accept the transfer on your Mac, the video will be saved to your Downloads folder by default. You can access it by opening Finder and navigating to the "Downloads" folder.

Note: AirDrop is a relatively fast transfer method, but the speed may depend on the size of the video file and the strength of your Wi-Fi network. Additionally, older Mac models or iPhones may not support AirDrop, so you'll need to use a different transfer method in those cases.
The Photos app on Mac is a built-in tool that can be used to transfer videos from your iPhone to your Mac. This method is very simple as well. But likewise, the Photos app may not recognize all video formats, which could limit the types of videos you can transfer.
See the steps below to learn how to pull video from iPhone to your Mac:
Step 1. Connect your iPhone to your Mac using a USB cable. You may need to unlock your iPhone and enter your passcode to give your computer access to your device. Once your iPhone is connected, open the Photos app on your Mac. You should see your iPhone listed as a device under "Import".
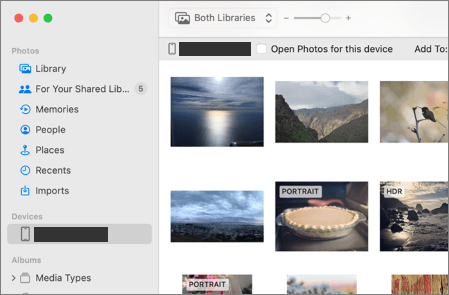
Step 2. Select the videos you want to transfer and click on the "Import Selected" button. You can choose to import all the videos on your iPhone, or select specific videos to transfer.
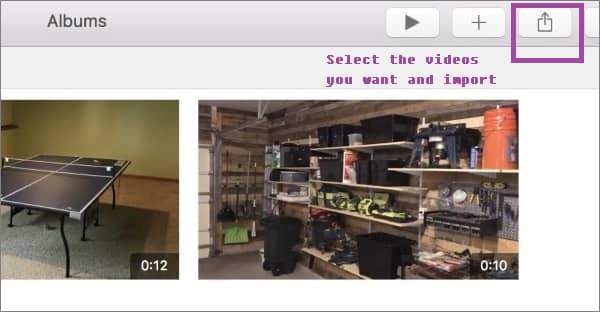
Step 3. The Photos app will automatically transfer the selected videos to your Mac and save them to the "Photos" app. You can access them by opening the Photos app and navigating to the "Imported" album.
That's all the we want to share with you! Each method has its own pros and cons, so it's up to you to choose the one that suits your needs the best. Whether you want a fast and easy transfer or advanced features (We strongly recommend to use a tool as Coolmuster iOS Assistant - this can save you much efforts and time), there's a solution for everyone. Go ahead and give it a try!
We hope that this guide has been helpful in teaching you how to get videos off your iPhone and onto your Windows or Mac computer. If you got any other ideas to share, please leave a comment below.
Related Articles:
Simple Way to Transfer Music Songs from iPhone to iCloud
Top 6 iPhone SMS Transfer Software


