Backing up your iPhone is a crucial step in safeguarding your valuable data, ensuring that you don't lose important photos, contacts, messages, and more. While iCloud may be the primary method for many iPhone users to back up their devices, iCloud storage is limited, so you might want to create an iPhone backup on Mac. Then, how to back up iPhone to Mac? Follow this full guide to do it easily.

Coolmuster iOS Assistant offers the ultimate solution to back up iPhone to Mac. With it, you can back up your iPhone to your Mac in one click. You can create multiple backups without erasing the previous one. The backup location is customizable, enabling you to have better control over the backup files. Moreover, if you have only a few files to back up, you can use iOS Assistant to export the specific file you want from iPhone to Mac.
Key features of iOS Assistant:
How do I back up my iPhone to my Mac using iOS Assistant? Follow the steps below:
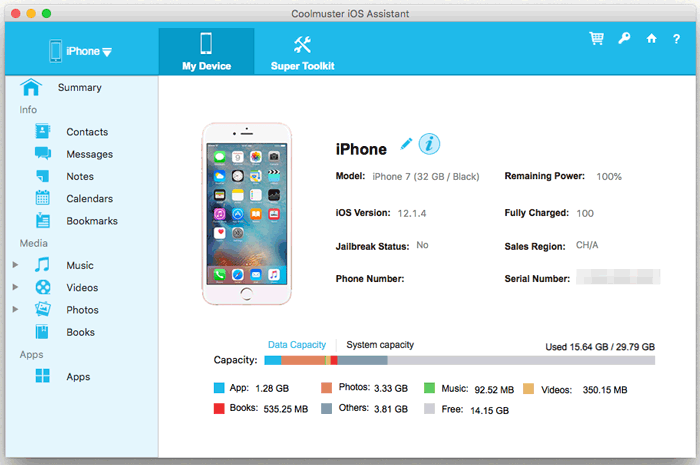
01Install and run iOS Assistant on your Mac and connect your iPhone to your Mac using a USB cable. Unlock your iPhone and tap "Trust" on it if required. After it recognizes your iPhone, you will see the main interface of this tool.
02Click "Super Toolkit" > "iTunes Backup & Restore" > "Backup", then select your device from the drop-down menu. Select a location to store your backup file and hit "OK" to begin to back up your whole iPhone to Mac.
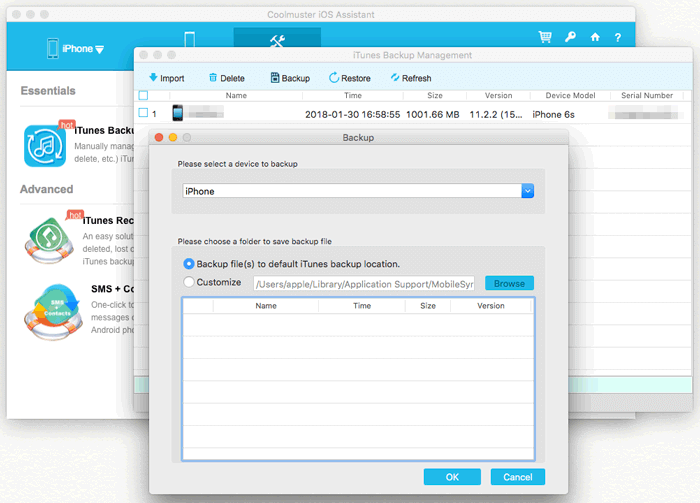
If you only want to back up specific data to your Mac, click the file type you want to back up, and then browse and select the files. After selecting, click "Export" on the top menu to save the files to your Mac for a backup.
Video Tutorial:
iTunes is the default option for users to back up their iPhones to a PC or Mac. Apple has retired iTunes in Mac with macOS Catalina 10.15. Therefore, how do you back up an iPhone on a Mac without iTunes? The answer is that the backup function goes to Finder now. You can follow the below instructions to finish the task.
Here is how to back up iPhone to Mac Air via Finder:
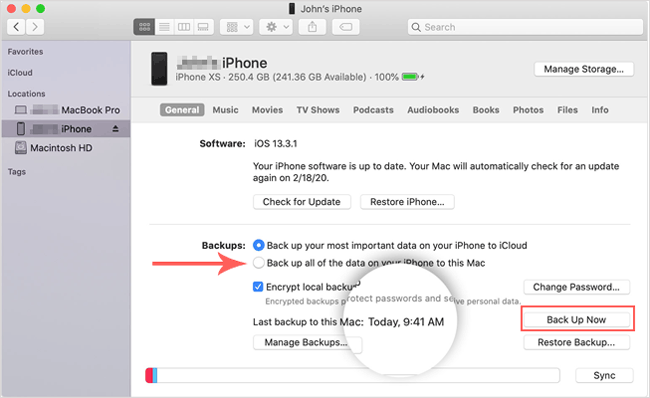
Step 1. Connect your iPhone to your Mac and open Finder. You may need to enter your device passcode or tap "Trust" when asked "Trust This Computer?".
Step 2. Locate your iPhone under "Locations" on the left sidebar.
Step 3. Select "General" in the button bar.
Step 4. Under the "Backups" selection, select "Back up all of the data on your iPhone to this Mac".
Step 5. Encrypt the backup if you want (an encrypted backup also saves Health and Activity data from your device), then hit "Back Up Now".
If your Mac runs macOS Mojave 10.14 or earlier, you can use iTunes to get the job done. Remember to update your iTunes to the latest version to avoid errors during the backup process.
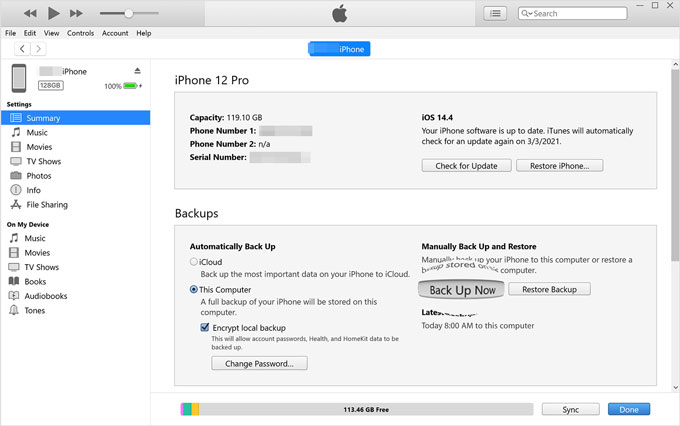
Here is how to back up iPhone to iTunes on Mac:
Step 1. Plug your iPhone into your computer using a USB cable and open iTunes.
Step 2. Click the iPhone icon in the top left of the iTunes window and head to "Summary". (iTunes doesn't recognize your iPhone?)
Step 3. Under the "Backups" section, select "This Computer" > enable "Encrypt local backup" if you like > click "Back Up Now".
Can't back up your iPhone to Mac using iTunes because the iTunes Back Up Now button is greyed out? Don't worry. You can read this article to learn how to fix it.
How to Fix iTunes Back Up Now Greyed Out? - Solutions Unveiled!We have talked about how to back up iPhone through Mac. If you prefer to back up your iPhone without using a Mac, you can choose iCloud backup. iCloud allows wireless backups and enables you to restore data on any device with an internet connection.
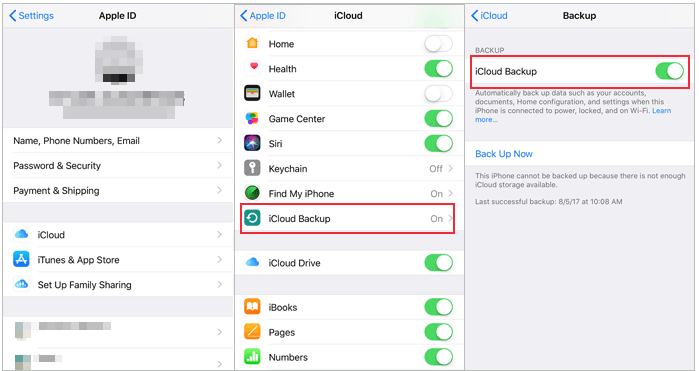
Here is how to back up your iPhone to iCloud:
Step 1. Open "Settings" on your iPhone, then tap "Apple ID" > "iCloud".
Step 2. Go to the "iCloud Backup" option and turn on "iCloud Backup".
Step 3. Tap "Back Up Now" and wait for the backup to complete.
Q1. Where are iPhone backups stored on a Mac?
iPhone backups are stored in a specific folder on your Mac. The default location is "~/Library/Application Support/MobileSync/Backup/".
Q2. What should I do if my iPhone backup is taking too long?
If your iPhone backup takes too long, here are some solutions (How long does it take to back up an iPhone?):
Q3. What happens if I interrupt the backup process?
If the backup process is interrupted, it may result in an incomplete backup. Ensure a stable connection and avoid disconnecting your iPhone until the backup is complete.
Q4. What should I do if my iPhone is not recognized by my Mac during backup?
That's all about how to back up iPhone to Mac. If you want to use Apple's way, you can use iTunes or Finder, depending on the macOS version. As you can see, Coolmuster iOS Assistant makes the backup process more straightforward. It allows you to back up your iPhone to a Mac in one click. You can also preview the files and selectively export files from iPhone to Mac. The interface is intuitive without a complex menu; you can easily manage, transfer, and back up your files using it.
Download this tool now to make your iPhone backup easier and more secure!
Related Articles:
How to Back Up iPhone to External Hard Drive on Windows or Mac
How to Back Up iPhone Without Passcode? Solved in 2 Easy Ways
How to Fix iPhone Backup Not Enough Space on Computer Issue (Proven Tips)


 Free Download for Mac
 Free Download for PC

