Creating contact groups on an iPhone is a great way to sort out people in your contacts list. A contact group is also essential when sending the same text chat to multiple contacts. Maybe you want to invite people to a party, or it's just a discussion about a trip.
Even though iOS does not allow you to create a contacts group directly, you may still do so using iCloud or a third-party app. The best part about having a contacts group is that people in the group can still reach out to you even when your iPhone device has the "Do Not Disturb" mode on.
Are you ready to master this technological magic of seamlessly forming contact groups on your iPhone? It doesn't matter if you are doing this for vacation or just for connecting with your family and close people and being in touch easily daily. Make use of contact groups for the ultimate convenience. Follow this guide to learn how to create a contact group on iPhone with simple steps.

The only official way of managing contact groups is through iCloud. So, whether you have an iPhone or iPad, managing your contacts on iCloud will become very easy. Still, you can create a contact group with iCloud, which is pretty easy. Since iOS users sync their data with iCloud, it's possible to group contacts with iCloud.
Step 1: Enable iCloud Contacts Settings on iPhone
To do this, navigate to the Settings app on your iPhone, click on your name, and click iCloud. Toggle on the slider for Contacts.
Step 2: Visit iCloud
Open any browser on the computer and proceed to iCloud. Sign in with your Apple ID and the right passcode.
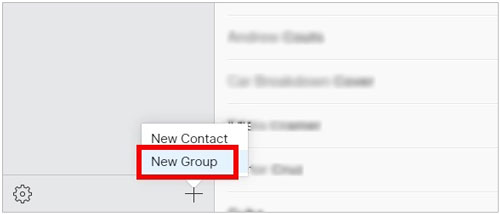
Look for the Contacts option and tap the + symbol at the bottom right. Choose New Group and name the group. Once done, save by clicking on the outside of the text box.
Step 3: Add your Preferred contacts to the Created Group
Navigate to All Contacts at the top left corner and tap to drag the individual contacts, and drop them in the newly created group. Still, you may tap and hold the CMD icon on the Mac and Ctrl key on Windows as you select every contact you want to add to the new group. After that, drag and drop them into the new group.
Step 4: Check the Group
Ensure the new group is showing on the iPhone. You can go to the Messages application and start a chat. Once you type the group name, it should show on the screen. Send a message to check if it's working.

See also: Open this guide to learn transferring photos and videos from iOS to a Dell PC without a hitch.
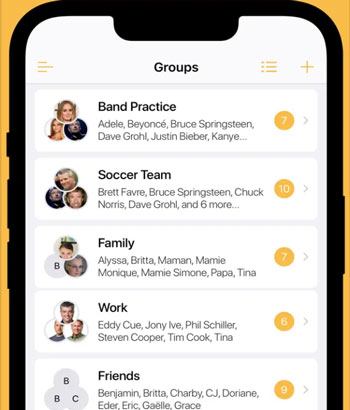
You'll find many applications on the App Store that can enable you to create groups on an iPhone easily. These apps are helpful if you don't have a computer since you just install them directly onto your devices, like the Contact Groups app. This app can help you make contact groups on an iPhone and manage contacts easily.
Step 1: Install the Contacts Group application on your iPhone and open it as you grant the needed permissions. Now click on the + icon from the upper right corner.
Step 2: Type the group's name and click the Add Contacts button to add those contacts you want to the group. Then choose the specific contacts you wish to add to your group and click Save to save them.
Step 3: Select the group to see the group details, send a text message/email, or share the group.

Read more:
3 Ways to Copy Music from iPhone to Computer without iTunes
Complete Guide on How to Transfer PDF to iPhone
If you are looking for a convenient way to add groups to your iPhone via a computer with a large screen, look no further than Cooolmuster iOS Assistant. This is a professional iPhone contacts manager with plenty of advanced features. It not only allows you to edit contacts freely from the computer, but you can also add contacts groups, delete contacts as well as export the contacts from your iPhone to a computer and vice versa. It is an excellent and safe tool to make contact groups in a few clicks without stressing you much.
Significant features of Coolmuster iOS Assistant:
* Create contact groups directly on your computer for your iPhone.
* Add, remove and edit iOS contacts on your computer easily.
* Eliminate the groups you don't need from your iPhone on the computer.
* Save your contacts on your computer in the CSV/VCF/XML format.
* Fast import your contacts from your computer to your iOS device.
* Compatible with almost of models of iPhone, including iPhone 14 Pro Max/14 Pro/14/13/12/11/XS/X/8, iPad Pro, iPad Air, iPad mini, etc.
Download this iPhone contact manager below.
How to group contacts on an iPhone via this software:
01Launch the Software on the Computer
After downloading Coolmuster iOS Assistant on the computer, install it. Use a USB cable to connect the iPhone to the same computer.
02Establish a Connection
The software will detect the device automatically. Click on Trust if asked to trust the device to the computer. Afterward, tap the Continue icon to proceed further. The program will scan your iPhone data and list them by category.

03Create Contact Groups
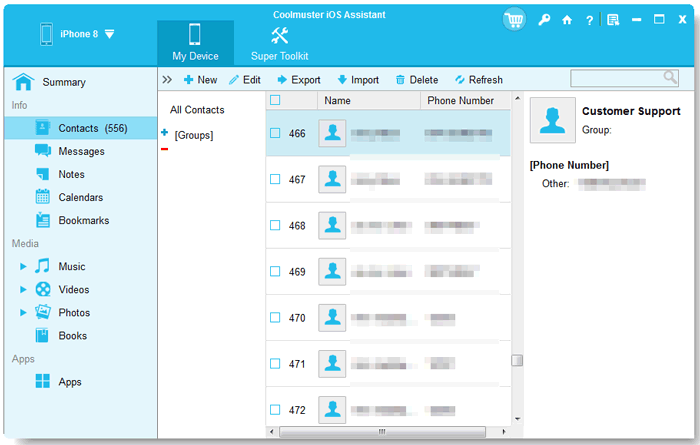
Tap on the Contacts folder from the screen's left panel. Add new groups of your contacts to your iPhone by clicking on the + button beside the [Groups] icon. Then select and put your desired contacts into the group.

Hopefully, you can now create a contacts group without much hassle. You can use iCloud or apps and still be able to create groups on your iPhone. But, the easier way will be using Coolmuster iOS Assistant as you will spend less time and effort making your contact groups.
Related Articles:
3 Proven Ways to Restore Deleted Contacts on Android Phone & SIM Card
How to Transfer Notes from iPhone to iPhone [5 Easy Ways]
How to View iPhone Backups on Windows 11/10/8/7 and macOS Monterey/Big Sur? (4 Ways)
How to Transfer Photos from Flash Drive/USB/Thumb Drive to iPhone 14/13/12
9 Ways to Fix the Bookmarks on iPhone Disappeared Issue (iOS 16 Supported)
How to Transfer from HTC to iPhone Effortlessly (7 Effective Ways)