
Top 5 iPhone File Transfer Apps to Transfer Files from iPhone to PC/Mac

Are you looking for an easy-to-use iPhone file transfer app? We've all been there: your iPhone storage is running out, and you can't find a good way to transfer large files to your computer. Don't worry, this article is just for you! We're going to introduce you to 5 top-notch iPhone-to-computer transfer software that will help you effortlessly manage file transfers. Whether you need to free up storage space or quickly back up your data, these apps have got you covered. Let's take a look at these amazing tools!
This is a brief overview of 5 iPhone file transfer apps:
| iPhone File Transfer App | Transfer Speed | Limitations |
| Coolmuster iOS Assistant | Super-Fast | Nothing |
| iTunes | Medium | Slower when transferring large files |
| iCloud | Depend on the network speed | Limited free storage space; additional storage purchase required |
| File Explorer | Medium | Only supports transferring photos and videos |
| AirDrop | Fast; suitable for small files | Limited to transmission between Apple devices |
Coolmuster iOS Assistant is a file management tool designed specifically for iOS devices. It seamlessly transfers data between iOS devices and computers, such as photos, videos, contacts, messages, and music. Additionally, it supports direct iPhone-to-iPhone transfers and allows for batch transfers, saving significant time. It is considered the best software to transfer files from iPhone to PC.
Key features of iOS Assistant:
Follow the steps below to transfer files from iPhone to computer using iOS Assistant:
01Download and install this software on your Windows or Mac computer. Then, launch it and connect your iPhone to your computer using a USB cable.
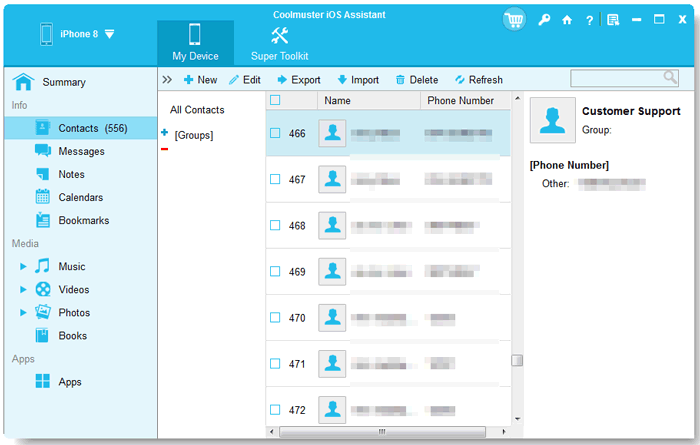
02Tap "Trust" on your iPhone and "Continue" on your computer when asked. Once connected successfully, you will see the interface as below.

03Choose the file type you want to transfer on the left panel, select and preview the items on the right panel, and then tap "Export" to start the transfer process.
Video Tutorial:
Another iPhone file transfer software is iTunes. It is Apple's official file transfer tool. Through iTunes, you can sync your iPhone with a computer. However, iTunes sometimes encounters slow transfer speeds when handling large files. Here is how to transfer files from iPhone to computer using iTunes:
Step 1. Open iTunes on your PC.
Step 2. Connect your iPhone to the computer and select your device.
Step 3. Navigate to the "File Sharing" option on the left side.
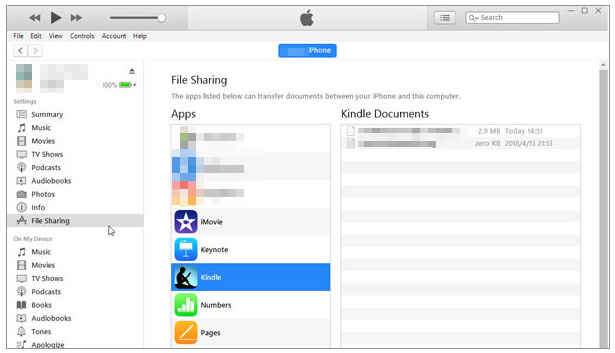
Step 4. Choose the applications or files you wish to transfer and save them to your computer.
iCloud is the third app to transfer files from iPhone to PC. Through iCloud, users can upload files to the cloud and synchronize them across different devices. The advantage of iCloud lies in its ability to transfer files without the need for physical device connections—only an internet connection is required. However, iCloud's free storage space is limited, and users may need to purchase additional storage to meet their needs.
Here is how to do it:
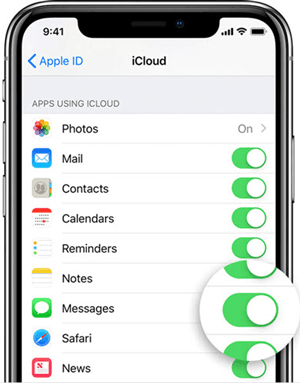
Step 1. On your iPhone, go to "Settings" > Tap your "Apple ID" > "iCloud" > Enable options based on the files you want to transfer.
Step 2. On your PC, open a web browser and go to iCloud.com > Sign in with your Apple ID linked to your iPhone > Choose the files you wish to download to your PC.
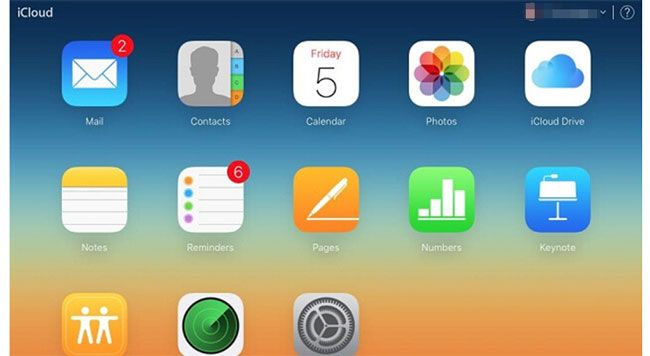
If your iCloud storage is not enough, you can read this article to learn how to fix this issue.
iPhone Says Not Enough iCloud Storage But There Is? Find the Fix Here!For Windows users, File Explorer is also a commonly used iPhone-to-Windows file transfer app. Once you connect your iPhone to the computer, you can directly access and transfer photos and videos through File Explorer. While this method is straightforward for multimedia files, it cannot handle transferring other data types like contacts and messages. Here are the steps:
Step 1. Connect your iOS device to your PC using a USB cable. Unlock your iPhone and establish trust between the device and the computer.
Step 2. Open File Explorer, go to "This PC", and locate your iPhone under "Devices and drives".
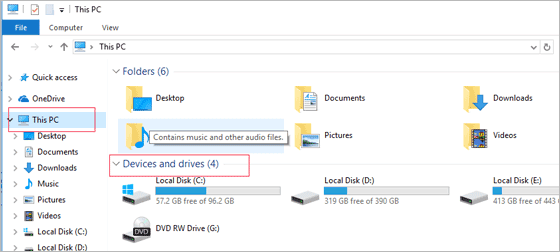
Step 3. Access "Internal Storage", then navigate to the "DCIM" folder and open the "100APPLE" folder.
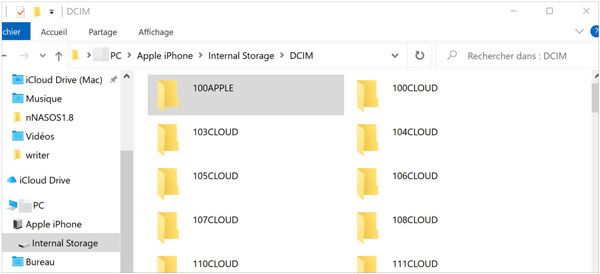
Step 4. Select the photos and videos you want to transfer from your iPhone and copy them to your PC.
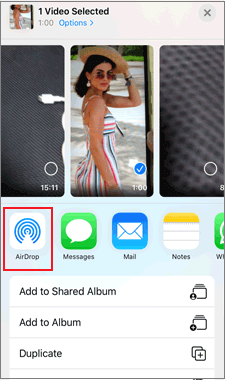
Similarly, for Mac users, AirDrop is also a great option. AirDrop is a tool for fast file transfer between Apple devices. With AirDrop, you can wirelessly transfer photos, videos, documents, and more between iPhones and other Apple devices. It offers fast transfer speeds and easy operation—simply open AirDrop and select the target device to complete the file transfer. However, AirDrop is limited to transferring files between Apple devices and cannot share files with non-Apple devices. Here is how to transfer files from iPhone to Mac via AirDrop:
Step 1. On your iPhone, swipe up from the bottom of the screen and tap "AirDrop". Select "Contacts Only" or "Everyone" based on your preferences.
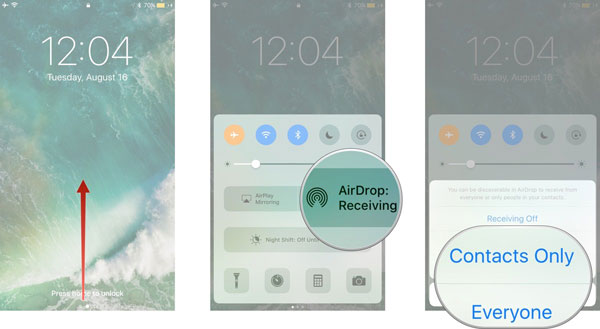
Step 2. On your Mac, open a Finder window and choose "AirDrop". Set your visibility to "Contacts Only" or "Everyone".
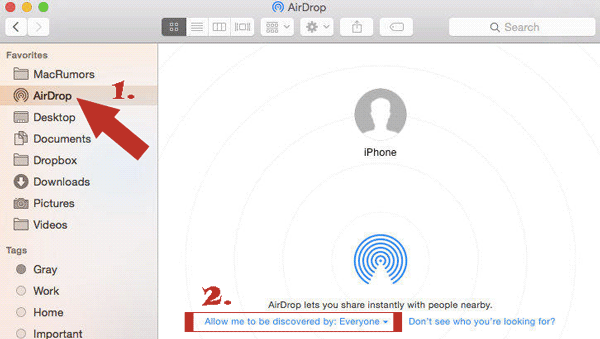
Step 3. Select the files on your iPhone that you want to transfer, such as photos, and tap the "Share" icon. You'll see your Mac's name—tap it to share the photos via AirDrop to your Mac.
We have listed five iPhone file transfer apps, including iPhone-to-Windows file transfer software and iPhone-to-Mac file transfer software. Among the many file transfer tools, Coolmuster iOS Assistant stands out as the best iPhone-to-PC transfer software.
It not only supports transferring various file types but also offers batch transfer functionality, making it ideal for users who frequently transfer and manage iPhone data. Moreover, it supports both Windows and Mac operating systems. Download it now to give it a try!
Related Articles:
Top 8 Best iPhone Transfer Software You Can't Miss in 2025
From iOS to Android: The Best iPhone to Android Transfer App [Top 9]
Best App to Transfer Data from Android to iPhone [Latest Update as of 2025]
Discover the Best File Sharing Apps: 11 Tried and Tested Winners


