Recording screen had been not easy for iPhone or iPad and usually you need to use a third-party software or your Mac to help you capture your iOS device's screen. However, with iOS 11, you don't need to rely on the other devices or software to record iPhone screen any more. This article is going to show you how to record iPhone screen in iOS 11 without outside help and get to know what's going on your iPhone 14/13/12/11/X/8 Plus/8/7/6 and etc.
Part 1. How to Enable Screen Recording Feature on iOS 11 Device
Part 2. How to Capture iPhone/iPad Screen on iOS 11
Part 3. How to Edit Screen Recording Videos on iOS 11
Firstly of all, please make sure you are running iOS 11, or update to iOS 11 by going to "Settings" > "General" > "Software Update". Before capturing iPhone display, you might need to enable Screen Recording feature on Control Center of your device. You can follow the steps as below.

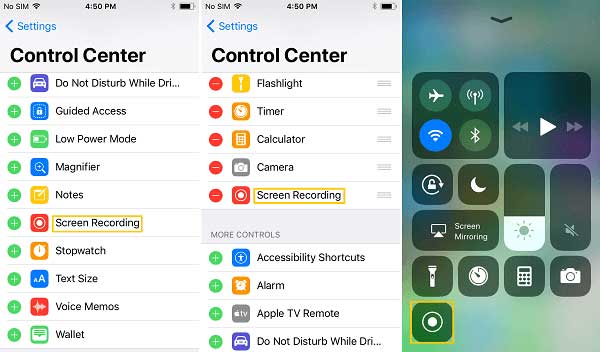
Step 1. Unlock your iPhone and go to "Settings" > "Control Center".
Step 2. Tap "More Control" option, then you might see the "Screen Recording" feature here.
Step 3. Tap the green plus icon before the "Screen Recording" option to add it to Control Center panel,
Step 4. Then you can find the Screen Recording icon on Control Center by swiping up from the bottom of iPhone screen.
See Also: Guide to Download iCloud Videos (Movies, TV Shows, Music Videos, Recorded Videos, etc.)
Once you have enabled Screen Recording feature on iOS 11 device, you can start to capture screen on iPhone/iPad Pro/Air/Mini that runs iOS 11. Please follow the instructions as below.
#1. Begin to Capture iPhone Screen on iOS 11

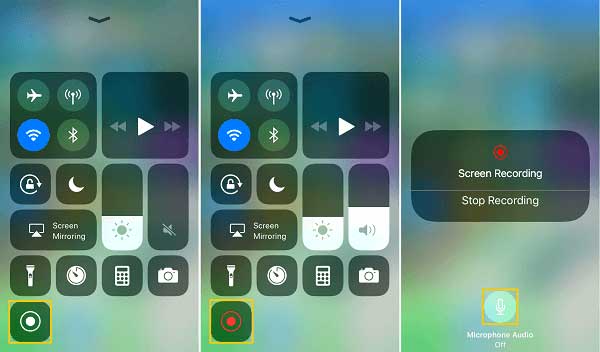
Step 1. Swipe up on the screen to open Control Center.
Step 2. Tap "Screen Recording" icon to turn on it. When the icon becomes red, thee screen recording is on.
Step 3. To record iPhone screen video with sound, please press and hold the Screen Recording icon and then tap on the microphone icon to turn it on.
#2. Stop Screen Recording on Your iPhone

When you finish recording your iPhone screen, you have three different ways to stop the recording
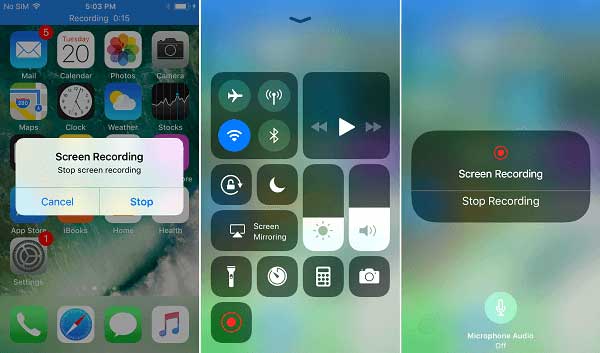
Way 1. Tap the blue recording indicator on the top of screen. When a pop up window appears, tap "Stop" option to finish recording iPhone screen.
Way 2. Swipe up to access Control Center, and tap the Screen Recording icon again to disable it and stop recording.
Way 3. Open Control Center, 3D touch on the Screen Recording icon, and tap "Stop Recording" option.
After completing the screen recording process, you can check your recorded iPhone screen videos on "Photos" app on your device.
See Also: How to Transfer/Download Videos from Computer to iPhone?
After recording your iPhone screen, you might want to edit your screen recording videos to make it more attractive before sharing them to Instagram, YouTube, Snapchat or other social media. For example, you might want to cut the video and delete the unwanted part, like the beginning that capture how you start to record.

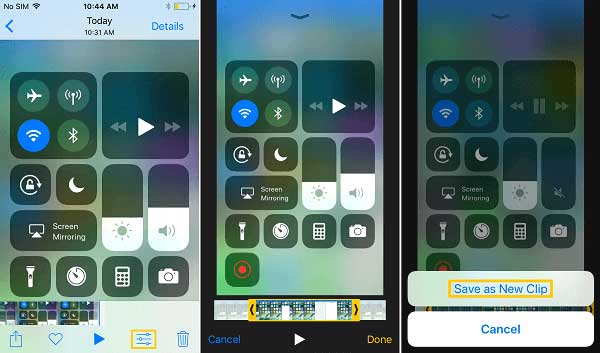
Step 1. Tap "Photos" app on your iPhone and select the recording video that you want to edit.
Step 2. Tap Editing icon on the bottom.
Step 3. Then you can move the black arrow to adjust the beginning and ending of the video, saving the middle part.
Step 4. After adjusting or trimming the video, please tap "Done" option and tap "Save as New Clip" option to save it on your device.