
How to Sync Videos to iPhone [Keep Original Formats and Quality]

Apart from photos and music, video file formats are also given enough attention by third-party application developers and Apple. As such, various ways that can sync videos to iPhones are available on the app market.
Watching movies using an iPhone is a great experience and a way of spending leisure time. You can play any movie on the iPhone almost anywhere at any time, even when you're on a plane or train trip. You don't need to carry around a laptop. Thus, read this guide to get 6 powerful ways to sync your videos.
iTunes is an excellent way of syncing videos to an iPhone. It does not only take care of iOS music but also syncs your videos, including movies and TV shows to an iPhone. You can view or play the videos without any issues. It is a very stable and fast way of transferring movies.
Here's how to sync videos to an iPhone via iTunes:
Step 1: Download and Install iTunes
Download and install the latest iTunes application on your computer. If your computer has iTunes installed on it already, ensure that it is updated. Now connect the device to sync videos from the computer with a USB cord, then launch it on the computer.
Step 2: Choose Your iPhone Device
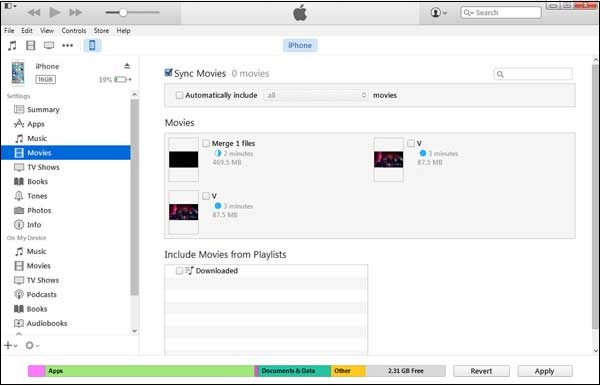
The iPhone's icon is located at the upper left corner of your iTunes interface. Then click on the content you wish to sync under the settings menu on the left side of your iTunes window. Tick on the box next to Sync to turn on syncing mode for the Movies content.
Step 3: Select Desired Movies to Sync and Apply
Choose the movies you wish to sync to an iPhone by ticking the boxes next to each item. To effect the changes, click on the Apply button at the bottom-right corner of the iTunes interface. Click on the Sync button if the syncing process does not start automatically.
Read also: 5 Easy Ways on How to Transfer Video to iPad without iTunes
iCloud is a service by Apple that is available for all Apple devices. All the data related to your device and the information related to your contacts, calendars, and, most importantly, videos can be stored in iCloud. Nowadays, this service is being used by a lot of iPhone users because it's very easy to use and offers a variety of benefits.
Sync iMovie videos on your iPad/iPhone using iCloud:
Step 1: Download the Latest iOS Application
Start by downloading and installing the latest iMovie iOS application into your iPad/iPhone devices. After that, launch the iMovie iOS application on the iPhones.
Step 2: Turn on iCloud
To turn on iCloud, you have to open the Settings application, navigate to iCloud, and turn on the iCloud feature. Doing this will automatically sync all the iMovie videos to iCloud. Now you can share the videos the way you want.
Step 3: Share the Videos
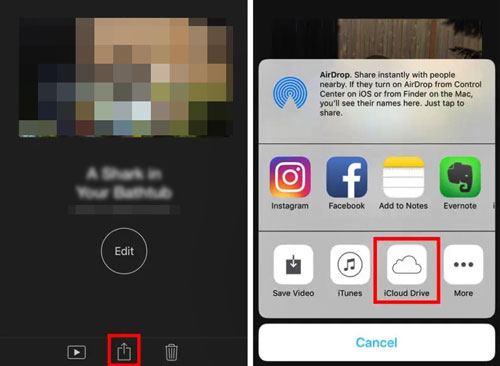
Tap on the iMovie video you wish to share and select the Share option. After that, click on the iCloud sharing button. Then enter the description of the videos that you want to share. Finally, select the iCloud contacts that you want to share the video with and share.
Learn more: Want to transfer your iTunes backup to an Android device? Then please follow this tutorial.
SHAREit is a free application that allows you to transfer content from one mobile device to another. With it, you can easily transfer videos from one phone to an iPhone. Also, you can use it to send pictures, songs, etc. It allows you to send data via the hotspot it provides, and is faster than Bluetooth.
Learn how to use SHAREit to transfer videos to an iPhone:
Step 1: Download and Install SHAREit on Both Devices
Please download and install this app on both mobile devices. The first device should be the source device, and your iPhone should be the destination. Then launch the SHAREit application on both devices. Ensure that the two devices are connected to the same Wi-Fi.
Step 2: Select Videos
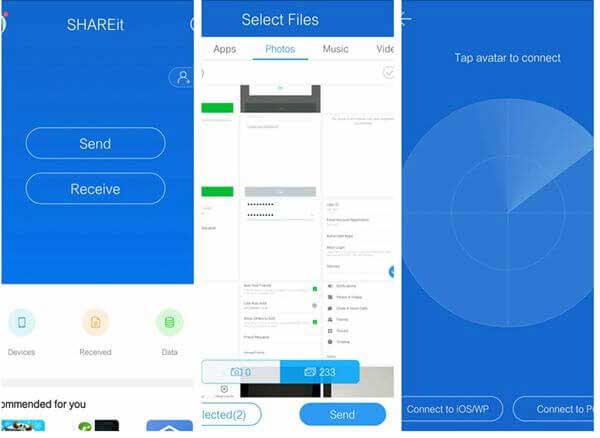
Initiate the sending process by tapping the Send button on the source device and the Receive button on the iPhone.
Next, tap the VIDEO tab on your source device to select the videos you want to send. Hit on the OK button to send the files.
Step 3: Select Your iPhone as the Destination Device
Your source device will detect all the devices with SHAREit ready to receive the files and connected to the same network. Now select your iPhone on the screen that looks like a radar.
Step 4: Accept Videos on iPhone
Finally, click on the Accept button on the iPhone when prompted to start receiving videos. The videos will be stored on the camera roll album of your iPhone.
Perhaps you need: What if you want to recover deleted videos from an iPhone? In this case, you can refer to this recovery guide.
Gmail is a Google service that has a lot of benefits. You may use it to send any file to an iPhone (or any other Apple device). Also, it is a fast and easy way of sending files. But it can only send files within 50MB every time.
To send videos to iPhone via Gmail, follow these steps:
Step 1: Sign Into Gmail
Open your sending device with the videos you want to send, and sign into your Gmail account using a browser.
Step 2: Compose an Email
On the upper left side of your device's screen, click/tap the Compose button, and a new draft email will appear.
On the text field named To, enter the recipient's email. You can also add a description of the email on the text field called Subject.
Step 3: Attach the Videos
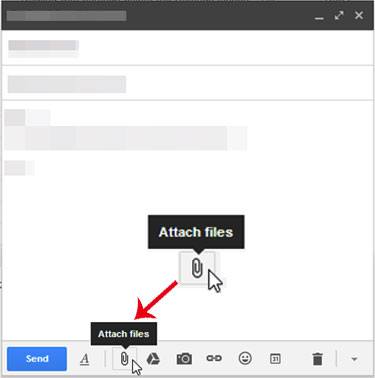
Attach the videos you want to send to the email by clicking on the paperclip icon at the bottom of the email interface. Navigate to the location where your videos are located and select them.
Wait for the videos to finish uploading. After that, click on the Send button.
Step 5: Download the Videos on Your iPhone
Finally, sign into your Gmail using your iPhone using a browser of your choice. Click on the Inbox button, and you will see a new email with the attached videos. Download them from there.
Can't miss:
How to Transfer Videos from iPhone to Android Effectively [Solved]
Securely Transfer Videos from iPhone to iPad in 5 Ways
Dropbox is an excellent tool for backup and synchronization. It's also a secure online storage system that saves video files. It allows only 2GB of free storage space, but you can upgrade to a bigger memory at a cost. With it, you can sync your videos between different devices without a hitch.
Follow these steps to use Dropbox to send videos to an iPhone:
Step 1: Install the Dropbox
Begin the process by installing Dropbox on both devices. The first device should be the source device, and your iPhone should be the destination device.
Step 2: Launch Dropbox
Your source device can be any device compatible with Dropbox, e.g., Android, Mac, Windows, iOS, etc. Launch the Dropbox application and sign into your Dropbox account.
Tap on the + icon in the bottom-right corner. Click on the Upload photos or videos option and highlight the videos you wish to share. After that, click the Upload button to upload all the selected videos into your Dropbox account.
Step 3: Save the Videos on the iPhone
Log into the Dropbox application using the same login details. After logging in, you can access the video files you uploaded on Dropbox.
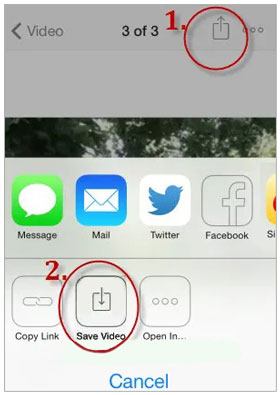
Select the videos that you want to save, tap on the Share button and finally, click on the Save Video button to keep them on your phone's Camera Roll.
Are you looking for a more convenient way of syncing videos to your iPhone? Look no further. This iOS Data Transfer is a professional tool designed for that purpose. In fact, it's an all-in-one tool for transferring multiple files, including videos, music, contacts, and more. It is an easy-to-use application that allows you to sync files securely and efficiently.
Key features of this transfer software:
* Directly transfer videos from one device to an iPhone without cloud space.
* Fast transfer videos from a computer to an iPhone and vice versa.
* Restore your iTunes videos to your iPhone without difficulty.
* Support various file types on your iOS device.
* Work well with the latest iOS versions.
* Secure, stable, and simple process.
* Help you manage your iPhone data on a computer.
Download this iOS video transfer software.
Follow the below guide to learn how to sync videos on iPhone in 1 click:
01Launch the Program
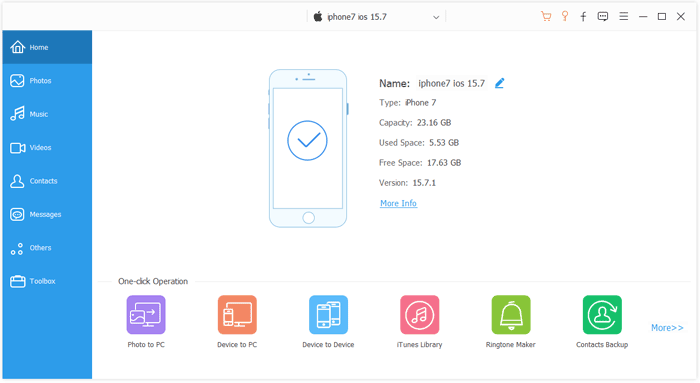
Install and launch the iPhone data transfer software. Connect your iPhone device to the computer and click on the Trust option when prompted.
02Go to the Videos Tab
The program will start to detect your device, and all files will be displayed on the screen on the left panel. Choose the Videos folder from the category.
03Transfer the Videos to Your iPhone
Select the videos you want on the list, and tap the Add icon to import your videos from the computer to your iPhone. Then wait for the transfer process to end.
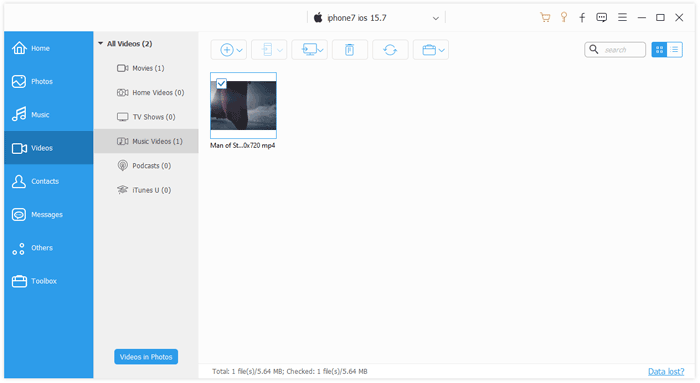
Tips: If you want to copy your videos from one phone to your iPhone, you can select the "Export" icon to make it. Or open the link to get a full guide here.
The above are some ways of syncing videos to an iPhone. Among the methods discussed in this article, the iPhone Data Transfer tool is a fast and easy solution that allows you to transfer as well as manage your iOS data with no hassle. Also, it can quickly export other files to your iPhone without delay, like messages, contacts, songs, and so on.
Related Articles:
Top 5 Ways to Transfer Videos from iPhone to Mac (Can't-Miss)
How to Sync Android Phone with Tablet (iPad & Android Tablets)?
How to Recover Deleted Videos from Android Phone without Root
How to Convert iPhone Video to MP4 without Quality Loss in 7 Ways?
17 Optional Methods to Find the Videos Disappeared from iPhone Back
How to Recover Deleted WhatsApp Videos from Android or iPhone? (8 Methods)


