iPad makes it easy to edit your documents at work or during a class, and view photos or videos during your leisure time. When you need to transfer files from Mac to iPad, iTunes may be the first solution that comes to your mind. However, you may encounter some problems while using iTunes, for example, only transfer limited file types or data on devices will be wiped out. However, don't need to panic. This article shows how to transfer files from Mac to iPad with or without iTunes.
If you want to transfer files from a Mac to an iPad via USB, the following two methods are worth trying.
If you want to transfer files from Mac to iPad without iTunes, a third-party tool called Coolmuster iOS Assistant you can't miss. It is the best way to transfer files from Mac to iPad. Besides transferring files from Mac to iPad, you can also transfer files from iPhone/iPad to Mac freely. It is an ideal iTunes alternative with an intuitive interface.
Key features of Coolmuster iOS Assistant:
Here is how to transfer files from MacBook to iPad without iTunes:
01Download and run the iOS Assistant on your Mac and connect your iPad to your Mac with a suitable USB cable.
02Follow the instructions on the screen, and hit the "Trust" option on your iPad. Once your iPad is detected by the program, you will see the main interface below.
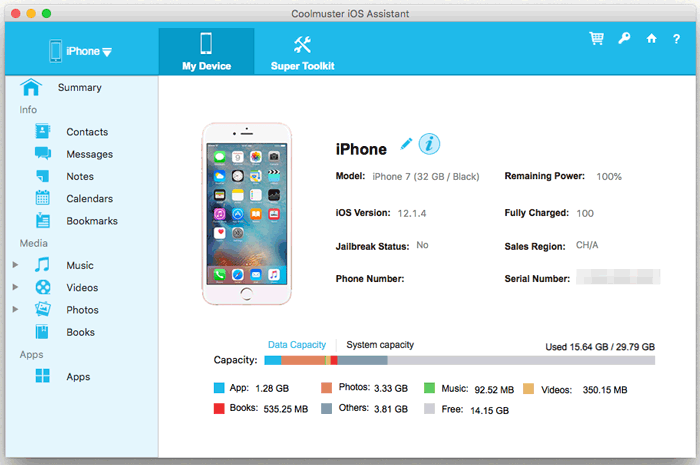
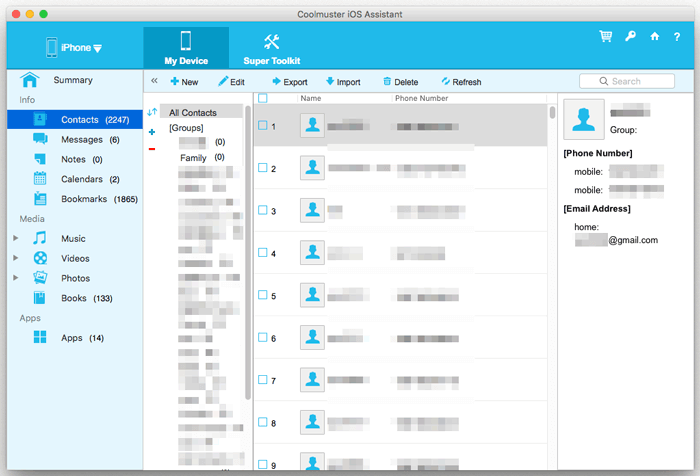
03Select a category from the left panel, click the "Import" button on the top of the interface select the required files from your Mac, and transfer them to your iPad.
Using iTunes or Finder is the official Apple solution for how to transfer files from Mac to iPad with a cable. However, as mentioned earlier, this may result in existing files being overwritten. To make sure that you can sync files smoothly, you should check if your iTunes on your Mac is the latest version. Here we will show you two ways to transfer files from Mac to iPad via iTunes:
Step 1. Connect your iPad to your Mac via a USB cable. Open iTunes on your Mac if it doesn't open automatically.
Step 2. Click the device icon on the top-left of the interface. (iTunes not recognizing your iPhone/iPad?)
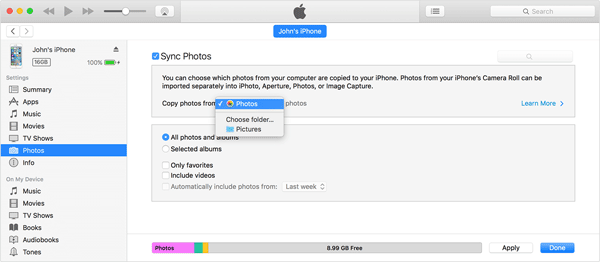
Step 3. Select the file type such as Music, Movies, TV Shows, Photos, etc. on the left menu as you want. Here we select "Photos" as an example.
Step 4. Click the "Sync Photos" checkbox on the right then click "Apply" to confirm.
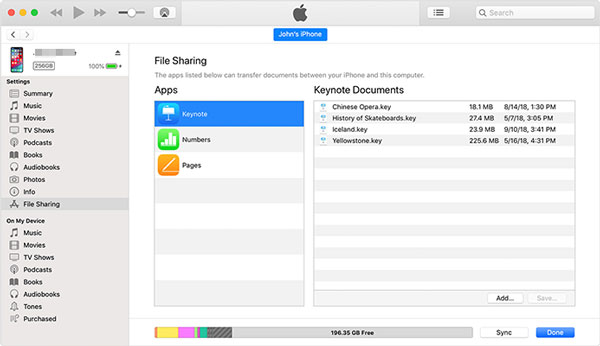
With File Sharing on iTunes, you can transfer files between your Mac and apps that support file sharing on your iPad. Follow the steps below to transfer files from Mac to iPad:
Step 1. Open iTunes on your Mac.
Step 2. Connect your iPad to your Mac with a USB cable and click the device icon in iTunes.
Step 3. Click "File Sharing" in the left sidebar, you will see the file-sharing apps displayed under the "Apps" section. Select the app that you want to use to transfer files to iPad, for example, Keynote.
Step 4. Click "Add" in the "Documents" list and select the desired file from your Mac.
Step 5. Open the Keynote app on your iPad and you will see the file transferred from your Mac.
Transferring files from a Mac wirelessly is very convenient but it may not be as quickly as using a USB cable. It mainly depends on your Wi-Fi condition and the file size. In this part, we will introduce two ways for you to transfer files from Mac to iPad wirelessly.
AirDrop is a handy tool for transferring files between Apple devices. To use this method, please ensure that Wi-Fi and Bluetooth on your device are on.
Here is how to transfer files from iMac to iPad via AirDrop:
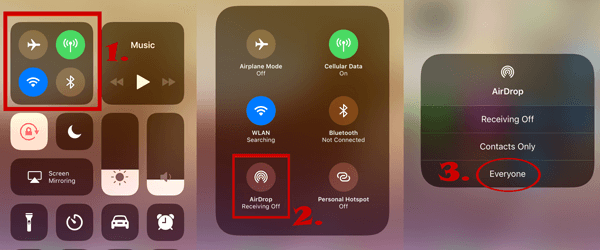
Step 1. On your iPad, open the Control Center and tap "AirDrop", then select "Everyone" or "Contacts Only". (AirDrop not working on iPhone/iPad?)
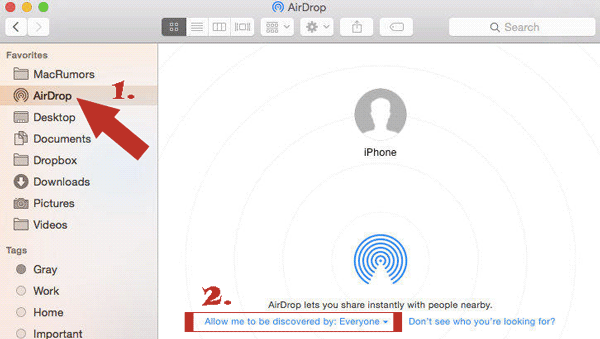
Step 2. On your Mac, open the "Finder" window and select "AirDrop". Set up allow me to be discovered by "Contacts Only" or "Everyone".
Step 3. On your Mac, locate the file you want to transfer, right-click the file, and select "Share" > "AirDrop".
Step 4. In the pop-up window, select your iPad device.
Step 5. On your iPad, tap "Accept" to receive the file.
You can use iCloud to back up your iOS data and access the data across devices or from iCloud.com. It can also be used to copy files from Mac to iPad wirelessly.
How do I transfer files from Mac to iPad via iCloud Drive? Follow the steps below:
Step 1. On your iPad, go to "Settings" > "iCloud" > enable "iCloud Drive".
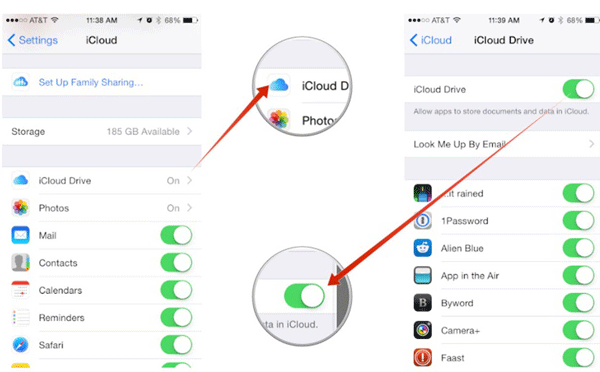
Step 2. On your Mac, go to "System Preferences" > "iCloud" > turn on "iCloud Drive".
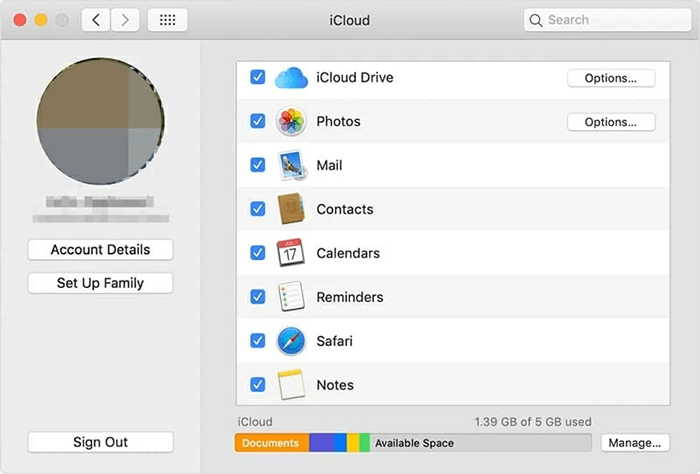
Step 3. Open the iCloud Drive folder on your Mac, then drag and drop the files that you want to move to your iPad to the iCloud Drive folder.
Step 4. Open the iCloud Drive app on your iPad, now you can check the files that were transferred from your Mac.
If you want to transfer files from Mac to iPad wirelessly, you can choose AirDrop or some cloud services like iCloud Drive, Google Drive, or Dropbox. When it comes to how to transfer files from Mac to iPad with a USB cable, Coolmuster iOS Assistant is here for you. It is easier to use compared to iTunes and will not wipe your data on your device while transferring.
Related Articles:
How to Transfer Videos from Mac to iPad? (Step-by-step Tutorial)
How to Transfer Photos from Mac to iPad with or without iTunes?
How to Transfer Files from PC to iPad with or without iTunes?


