
[Easy Guide] How to Transfer MP3 Files to iPod with or Without iTunes

iPod revolutionized the way we listen to music, providing a sleek, portable device that can store thousands of songs. It allows users to carry their favorite music with them wherever they go. However, for those who are new to iPod or unfamiliar with digital music players, how to transfer MP3 files to iPod becomes a difficult problem.
This guide simplifies the music transferring process, providing step-by-step instructions that anyone can follow. Whether you are an experienced iPod user or a novice to the world of digital music, you can confidently transfer their MP3 files to their iPod and enjoy their favorite music anytime, anywhere.
Apple's iPods are designed to work seamlessly with iTunes, Apple's music management software. However, it's common for users to want to copy MP3 files to their iPods without using iTunes. Maybe you have a different music player and want to use your iPod to listen to your music library, or perhaps you prefer to use a different music management software. In this part, we'll walk you through how to copy MP3 files to your iPod without iTunes.
If you're looking to transfer MP3 files to your iPod, one of the easiest and most efficient ways to do so is by using iOS Music Transfer. This software is specifically designed for transferring data between iOS devices and computers, or switching data from one iOS device to another, making it the perfect solution for those who want to manage their music library on their iPod.
Key Features of iOS Music Transfer:
Here's a step-by-step guide on how to transfer MP3 to iPod from PC using iOS Music Transfer:
01Download and install iOS Music Transfer on your computer. Connect your iPod to your computer using a USB cable.
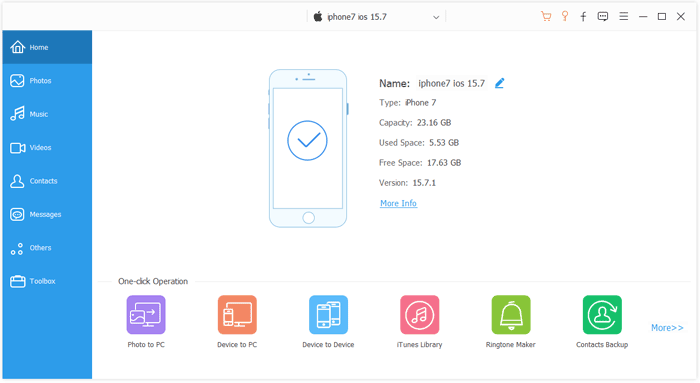
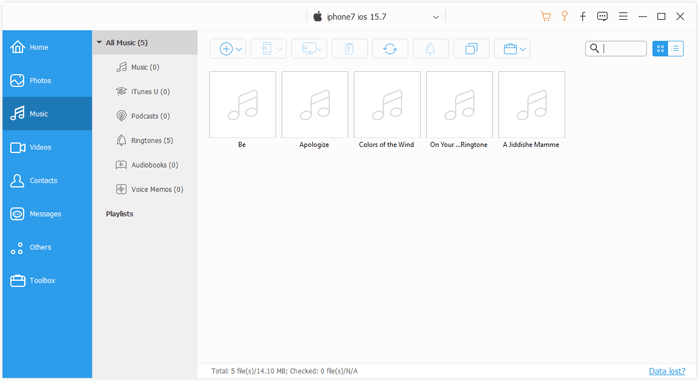
02Click on the Music tab on the left-hand side of the interface.
03Click on the Add button and select the MP3 files you want to transfer from your computer.
Further Reading: How to Put Audiobooks on an iPod Touch with/without iTunes?
Finder is a built-in tool on Mac that allows you to manage files and folders on your Mac and connected devices. Here's a step-by-step guide on how to transfer MP3 to iPod using Finder on a Mac.
Step 1. Connect your iPod to your Mac using a USB cable.
Step 2. In the Finder on your Mac, select the device in the Finder sidebar.
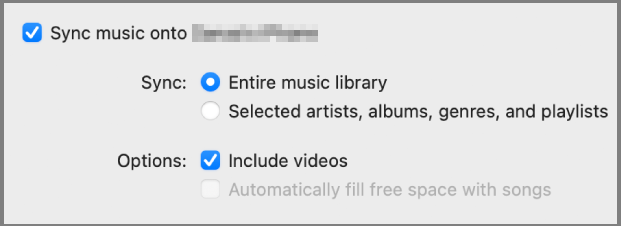
Step 3. Click Music tab in the button bar.

Step 4. Select the Sync music onto... checkbox to turn on syncing of your music. With the checkbox selected, syncing is set to transfer all your music to your device.
Learn More: Top 3 Ways to Sync iPad to New Computer without Erasing Data
This music management software is a popular alternative to iTunes and supports a wide range of file formats, including MP3. MediaMonkey also offers features like automatic tagging and playlist creation. Here's a step-by-step guide on how to transfer MP3 to iPod using MediaMonkey:
Step 1. Open MediaMonkey on your computer.
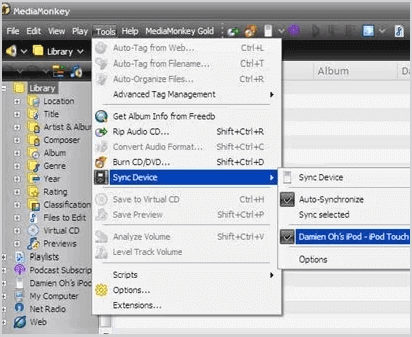
Step 2. Go to Tools and choose Sync Device.
Step 3. Then select your iPod to move the MP3 file to your iPod.
Also Read: How to Add MP3 to iPhone in 4 Ways
iTunes is one of the most common and easiest ways to transfer MP3 files to an iPod. It includes the ability to play and organize digital audio and video files, manage and sync media to Apple devices such as the iPhone, iPad, and iPod, purchase and download music, movies, and TV shows from the iTunes Store, and access the internet radio stations.
Here's a step-by-step guide on how to transfer MP3 to iPod using:
Step 1. Connect your iPod to your computer using the USB cable.
Step 2. Add your MP3 files to iTunes. Click on the File menu in iTunes and select Add File to Library depending on the version of iTunes you're using. Locate the MP3 files on your computer and select them. Once you've added the MP3 files to iTunes, they will be available to transfer to your iPod.
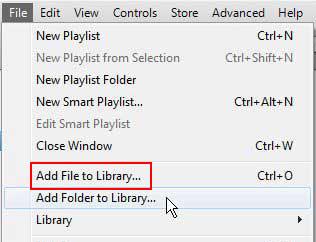
Step 3. Create a playlist. Click on the File menu and select New Playlist. Give your playlist a name, and then drag the MP3 files you want to transfer to your iPod into the playlist.
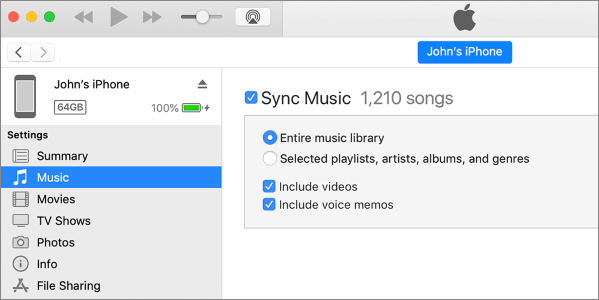
Step 4. Sync your iPod. Click on the Music tab. Check the box next to Sync Music and select the playlist you created from the dropdown menu. Click on the Apply button to start syncing your iPod.
Further Reading: 2 Ways to Transfer Music from iTunes to iPad [Free]
Q: What is the maximum number of MP3 files I can transfer to my iPod?
A: The maximum number of MP3 files you can transfer to your iPod depends on the storage capacity of your iPod. For example, if your iPod has a storage capacity of 16GB, you can transfer approximately 4000 MP3 files with an average file size of 4MB.
Q: Can I transfer MP3 files to my iPod without a computer?
A: No, you cannot transfer MP3 files to your iPod without a computer. You need to connect your iPod to a computer to transfer files.
Q: Do I need to convert my MP3 files before transferring them to my iPod?
A: No, iPods are compatible with MP3 files, so you do not need to convert them before transferring them to your device.
Although transferring MP3 files can seem daunting to new users, this guide provides step-by-step instructions that make it easy to transfer MP3 files to an iPod using different methods. Overall, iOS Music Transfer is an easy-to-use software that makes transferring MP3 files to your iPod a breeze. With just a few clicks, you can add your favorite songs to your iPod and enjoy them on-the-go. Give it a try and see how easy it is to manage your music library with iOS Music Transfer.
Related Articles:
How to Transfer Music from iPhone to Computer Effectively? (4 Tips)
How to Transfer Music from One iPad to Another? 5 Useful Ways
How to Transfer Photos from iPod to Computer (PC & Mac)?
How to Transfer Music from PC to iPad Without iTunes: A Step-by-Step Guide