"Got a new MacBook Pro with a Retina display and only has 256 GB of space. My iTunes library is close to 1TB. I have it on a hard drive, but it won't work as an external device when I try to set it up under Advanced Preferences. I also have a copy of my songs on an iPod. Can I back up my iPod to an external hard drive to use it as my iTunes library source? How do I do this?"
- Excerpted from Apple Support Communities
In our daily use, the iPhone is not only a communication device but also a portable music player. As the amount of music increases, the storage space on the iPhone becomes more and more limited. Backing up music to an external hard drive not only frees up space on the device but also allows for better management and preservation. However, due to Apple's system restrictions, directly copying music is not as simple as copying photos (How to transfer photos from iPhone to external hard drive?). Therefore, mastering the correct method becomes especially important. Don't worry, this article will guide you in detail on how to transfer music from iPhone to an external hard drive.
iTunes allows you to transfer purchased songs from iPad/iPhone to an external hard drive, and it supports MP3, M4A, AIF, AAC, WAV, AIFF, M4R, and M44B formats. Below is what you can do with iTunes.
Here is how to copy music from iPad/iPhone to an external hard drive via iTunes:
Step 1. Ensure that the latest version of iTunes is installed on your computer and run iTunes.
Step 2. Connect your iPhone or iPad to the computer and tap "Trust" on your device if asked.
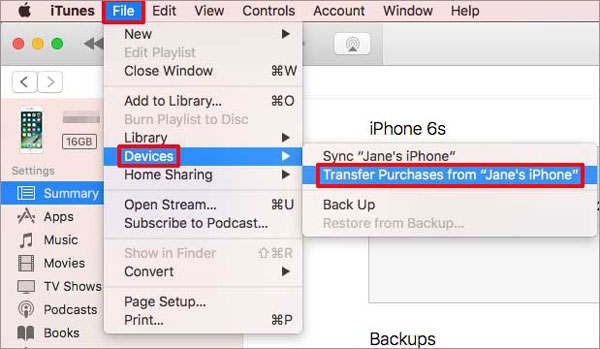
Step 3. Tap "Account" > "Authorization" > "Authorize This Computer". Later, click "File" in the iTunes window > "Devices" > "Transfer Purchases from [Your iPhone's name]" > pick "Recently Added" to view your songs.
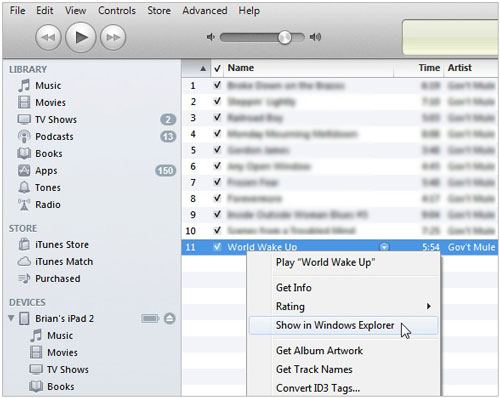
Step 4. Pick any song you want to transfer and tap the "Download" button to save it to your computer. If you don't see the Download button, right-click the song > select the "Show in Windows Explorer" option to open the music location. You will need to save each music one by one.
Step 5. Plug your external hard drive into your computer and copy & paste your songs to the external hard drive.
Do you wish to directly transfer multiple songs from your iPhone/iPad to an external hard drive, whether they are purchased or not? Coolmuster iOS Assistant is the best way to go. With this app, you can preview and transfer desired songs in batches. Besides, it enables you to copy the selected songs to your external hard drive directly without saving them onto the computer first. (How to transfer music from iPhone to computer?)
The highlights of iOS Assistant:
How do I transfer music from my iPhone/iPad to an external hard drive via iOS Assistant? Here are the steps:
01Install and launch Assistant on your computer.
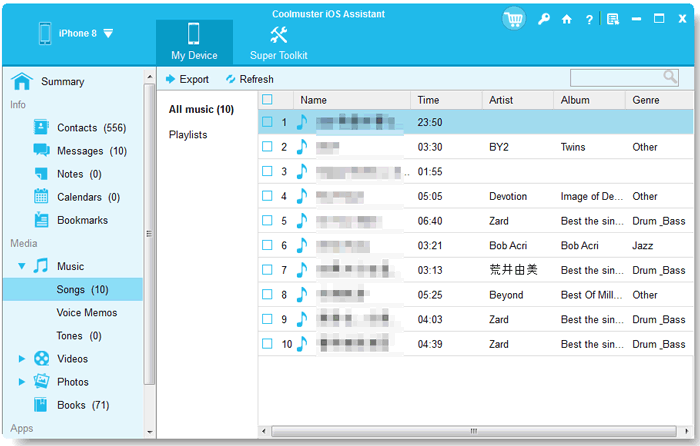
02Connect your iDevice to the computer via a USB cable and trust the computer on your iDevice when prompted. Then, plug your external hard drive into the computer. When the computer detects your devices, you will see the following interface.

03Choose "Music" on the left panel, preview and check the songs you wish to copy, and hit the "Export" button on the top. Choose the external hard drive as the storage location on the pop-up window, and follow the on-screen prompts to finish saving them onto the external hard drive.
Video Tutorial:
We hope this tutorial will help you transfer music from your iPhone to an external hard drive handily. For users who only have purchased music, iTunes is a free solution. However, if you want to fully manage all the music on your iPhone, Coolmuster iOS Assistant is undoubtedly a more efficient and flexible choice. Try it now to easily back up your music and free up space on your phone!
Related Articles:
How to Back Up iPhone to External Hard Drive on Windows or Mac
How to Transfer Music from iPhone to iTunes? [2 Effective Ways]
[Solved] How to Use iPhone as USB Drive in a Few Simple Steps


 Free Download for PC
  Free Download for Mac

