iPods have become a popular choice for music lovers worldwide. However, one common challenge that iPod users often face is transferring their music from the device to a Mac computer. Whether you're upgrading to a new Mac, replacing a lost music library, or simply looking to create a backup, knowing how to transfer music from iPod to Mac is essential.
We will explore various methods and tools that enable you to seamlessly transfer your music from your iPod to your Mac in this guide. Whether you have an iPod classic, iPod touch, or any other iPod model, this guide will provide you with the knowledge to safely and conveniently transfer your cherished music files to your Mac computer.
Transferring iPod music to Mac can be made easy and efficient by using Coolmuster iOS Assistant. This powerful software provides a seamless way to transfer not only music but also other data between iOS devices and computers.
Key Features:
Here's a step-by-step guide on how to transfer music from your iPod to your Mac via Coolmuster iOS Assistant:
01Download and Install Coolmuster iOS Assistant. Launch the Coolmuster iOS Assistant software on your Mac and connect your iPod to the computer using a USB cable. Make sure to unlock your iPod and tap Trust.
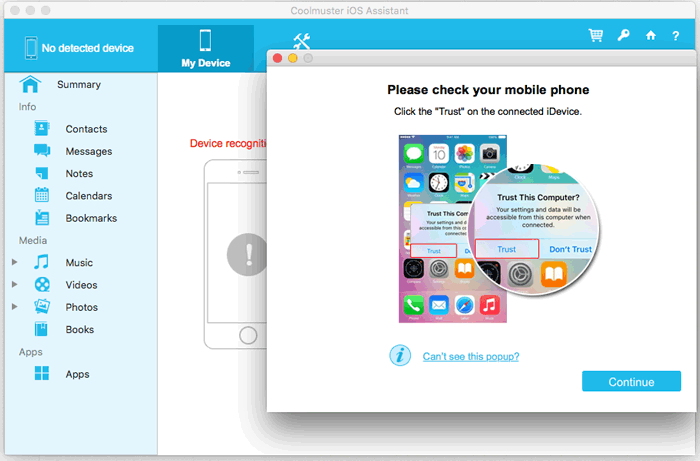
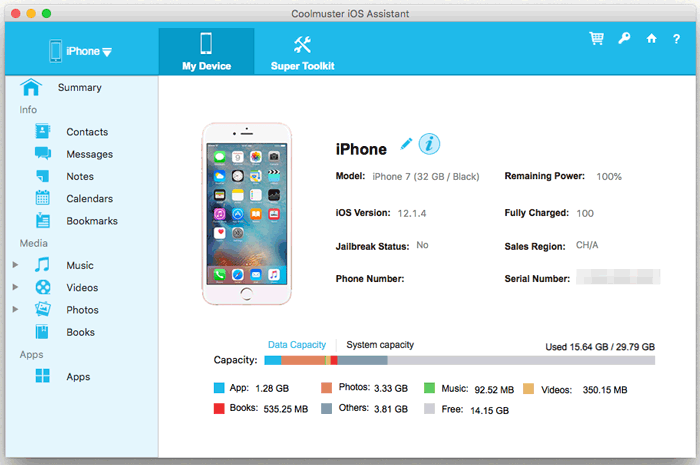
02Once your iPod is successfully connected, you will see the main interface of Coolmuster iOS Assistant.
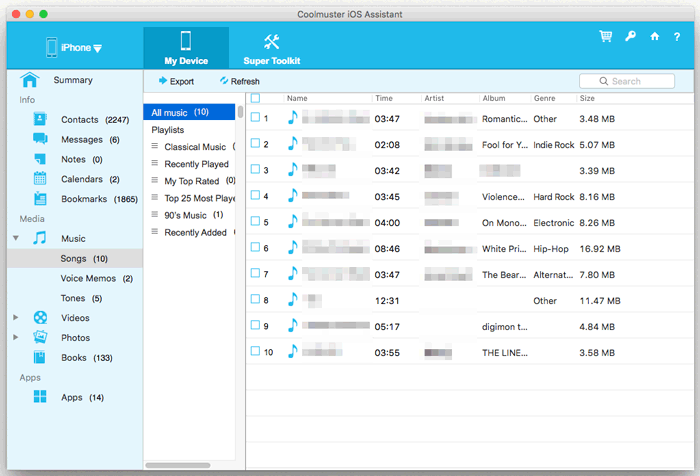
03From the left-hand panel, click on the Music category to display all the music files stored on your iPod. Browse through the list of music files and select the desired songs that you wish to transfer to your Mac. After selecting the desired music files, click on the Export button positioned at the top of the interface.
To transfer iPod music to your Mac, another option is to use iTunes. With a few adjustments to the settings, you can complete the task quickly. However, it's worth noting that iTunes may not be the most user-friendly option, as it lacks the ability to select specific songs and transfer non-purchased music from external sources.
Here's how to copy music from iPod to Mac via iTunes:
Step 1. Start by ensuring that you have the latest version of iTunes installed on your Mac. If not, visit the Apple website and download the latest version, then proceed with the installation.
Step 2. Connect your iPod to your Mac using the USB cable that came with it. Once connected, iTunes should automatically launch. If it doesn't, manually open iTunes.
Step 3. In iTunes, click on the device icon for your iPod, which should located in the upper-left corner of the iTunes window. From the top-left corner of the iTunes window, click on the File section. In the drop-down list that appears, select Devices. Choose the option Transfer Purchased from [Device Name].
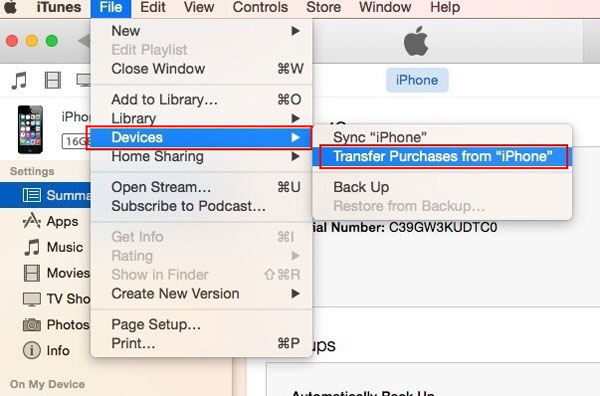
Step 4. Sit back and let iTunes handle the process. It will transfer all of your purchased music from the iPod to your Mac.
If your intention is to transfer songs from your iPod to your Mac computer, you can use the Finder app that comes with macOS. Transferring songs from an iPod to a Mac using Finder is slightly different from using iTunes.
Here's how to transfer iPod music to Mac using Finder:
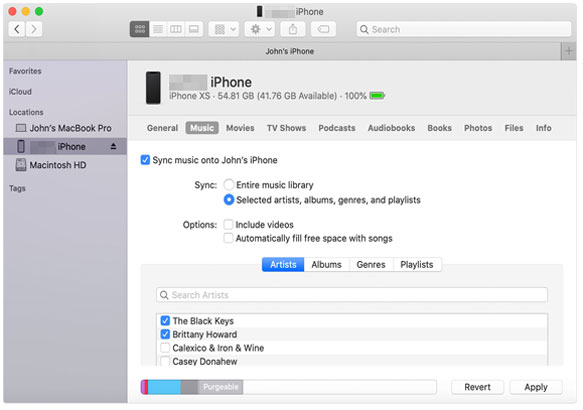
Step 1. Connect your iPod to your Mac using the USB cable that came with it. Open Finder and select your iPod from the sidebar under Locations.
Step 2. Once you've accessed your iPod's contents in the Finder window, navigate to the Music folder.

Step 3. Select what you prefer to synchronize your entire music library or specific playlists, artists, albums, and genres.
Step 4. Click Apply to start syncing your music.
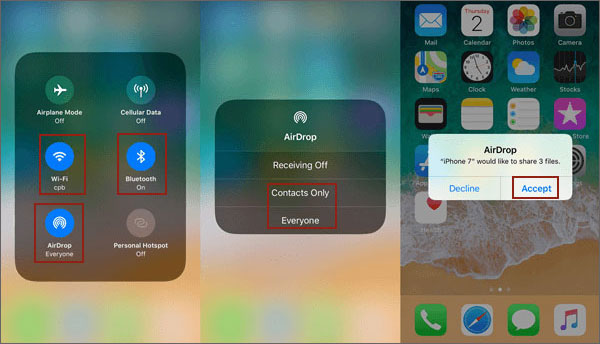
AirDrop is a built-in feature on Apple devices that allows you to easily share files wirelessly between supported devices.
We'll guide you through the steps to move your iPod music to your Mac using AirDrop:
Step 1. Ensure that both your iPod and Mac are connected to the same Wi-Fi network. Tap the AirDrop icon (looks like concentric circles) to enable AirDrop on your iPod.
Step 2. On your Mac, click the Finder icon in the Dock to open a Finder window. In the sidebar of the Finder window, locate and click on AirDrop.
Step 3. On the AirDrop window, make sure Allow me to be discovered by is set to Everyone or Contacts Only.
Step 4. On your iPod, open the Music app and navigate to the songs you want to transfer to your Mac. Tap and hold the song you wish to transfer until a menu appears.
Step 5. From the menu, tap on the Share option. On the Share sheet that appears, tap on the AirDrop icon.
Step 6. Your Mac should now appear in the list of available devices. Click on your Mac's icon. On your Mac, a prompt will appear asking if you want to accept the incoming content from your iPod. Click Accept.
If you have an Apple Music subscription or iTunes Match, you can use iCloud Music Library to sync your music across your devices. This means you can download music from your iPod to your Mac without using any cables or third-party software.
Here are the steps to do it:
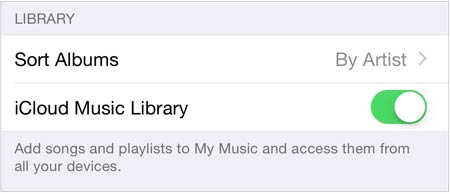
Step 1. Navigate to Settings on your iPod and access the Music section. Enable the iCloud Music Library option. If prompted, sign in with your Apple ID and enter your password.
Step 2. On your Mac, open iTunes and go to Preferences > General and check the box for iCloud Music Library. Click OK to confirm.
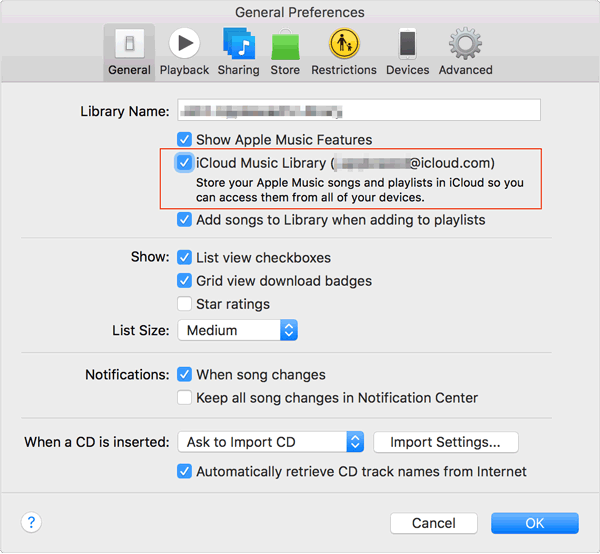
Step 3. Your iPod's music library will now begin syncing with your iCloud Music Library. Once the syncing is complete, you should see your iPod's music library available in iTunes on your Mac. You can navigate through the library using the sidebar or the various library views.
If you have purchased music from the iTunes Music Store, you can sync your iPod's purchases to your Mac using Apple Music. However, please note that this method does not support the transfer of non-purchased songs. If you need to transfer non-purchased songs, please refer to the solution provided in Part 1.
Here, we will introduce the steps on how to transfer music from iPod to Mac without software using Apple Music:
Step 1. Open the Music app on your Mac. Click on Account in the menu bar at the top of the screen. From the drop-down menu, select Purchased.
Step 2. Next, click on Not in My Library to view the songs that are available for download but not currently in your library.
Step 3. Browse through the list of songs and select the ones you want to download to your Mac.
In this comprehensive guide, we have explored various methods and tools that enable you to seamlessly transfer your music collection from your iPod to your Mac. We have covered options such as using Coolmuster iOS Assistant, iTunes, Finder, AirDrop, iCloud Music Library, and Apple Music.
Coolmuster iOS Assistant simplifies the process of transferring music from your iPod to your Mac, providing a user-friendly interface and reliable transfer capabilities. By following the instructions provided in each method, you can choose the one that best suits your needs and preferences. These methods will empower you to regain control over your music library and enjoy your favorite tunes on your Mac.
Related Articles:
How to Transfer Music from iPhone to Computer Effectively? (4 Tips)
How to Transfer Music from iPod to Computer [7 Easy Ways]
How to Transfer Music from Computer to iPod [Fast Transfer]
How to Fix the Issue iPod Won't Sync with iTunes in Every Possible Way?


