For users who enjoy collecting music, iTunes is a classic and practical music management tool. However, sometimes users may want to copy music from iTunes to a flash drive for easy playback on car stereos, TVs, or other devices. Can you transfer songs from iTunes to a flash drive? Of course, you can. This article will provide a detailed guide on how to transfer music from iTunes to flash drive, helping you easily back up and carry your music.

Regardless of whether you're using Windows 11/10/8, or a Mac, you can easily transfer songs directly from the iTunes music library to a flash drive.
Here is how to transfer music from iTunes to flash drive:
Step 1. Open the iTunes app on your computer.
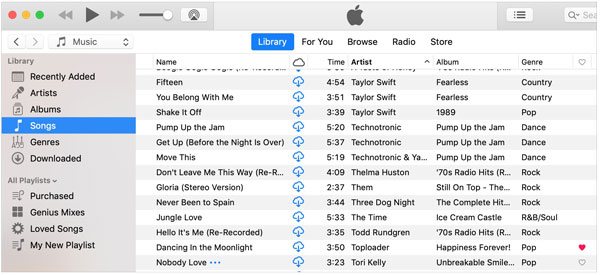
Step 2. Go to your music library or playlist. On Windows, make sure the "Music" tab is selected in the upper-left corner, then navigate to "Library" > "Songs" to view all your tracks. On macOS, click the "Music" icon and head to the "Playlists" tab.
Step 3. Plug in your USB flash drive and open it. Once connected, open the flash drive's folder and ensure the iTunes window is also open on your desktop.
Step 4. Choose the songs you want to transfer in iTunes, then drag them into the flash drive's folder. On Windows, hold down the "Ctrl" or "Shift" key to select multiple tracks at once, then drag and drop them to the USB drive. On macOS, use the "Command" key to do the same.
You can also export the entire playlist or library from iTunes, then saving it to the flash drive. If your player only supports MP3 or another specific format, you'll need to convert the file to the required format first.
Here is how to do it:
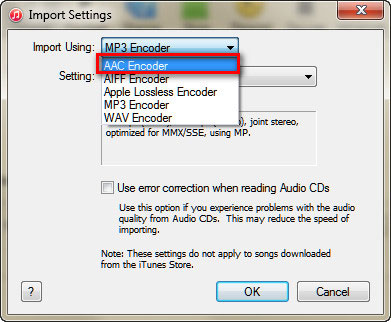
Step 1. Open iTunes, then go to the menu bar and select "Edit" > "Preferences" > "General". Click on "Import Settings", choose "MP3 Encoder" under the "Import Using" option, and click "OK" twice to save the settings and return to your library.
Step 2. Plug the USB into your computer and create a new folder.
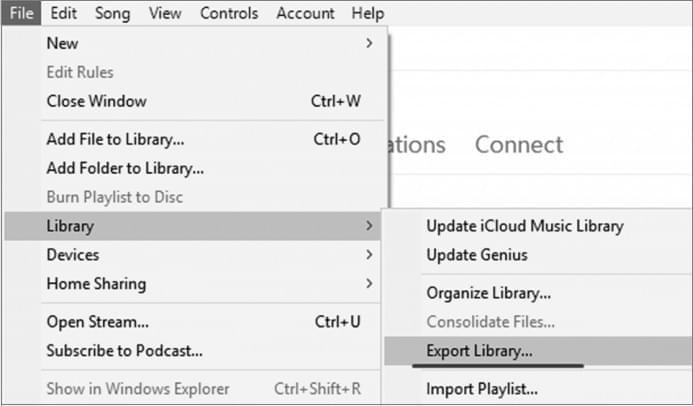
Step 3. Next, open iTunes, select the playlist you want to transfer, then go to "File" > "Library" > "Export Library".
Step 4. In the file browser, choose the USB as the destination to save the playlist file.
In addition to directly transferring iTunes music to your USB drive, you can also locate the "iTunes Media" folder on your computer where iTunes songs are stored and copy them to the USB drive.
Here is how to transfer music from iTunes to USB flash drive from the iTunes Media folder:
Step 1. Open iTunes, then click "Edit" > "Preferences". A new window will pop up.
Step 2. Check both "Keep iTunes Media folder organized" and "Copy files to iTunes Media folder when adding to library", then click "OK".
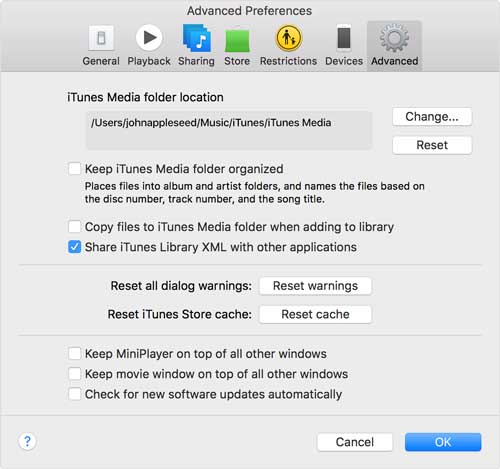
Note: If you want to change the location of your iTunes Media folder, click "Change..." and select a new location.
Step 3. Go to "File" > "Library" > "Organize Library...", check "Consolidate files", and click "OK".
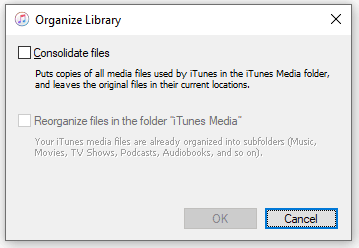
Step 4. After completing these steps, all media files will be saved in the iTunes Media folder. You can then go to that folder, drag, and drop the playlists to your USB drive.
What if your music is not in iTunes, but stored on your iPhone? In this case, if you want to directly export it to a USB drive, you can use third-party tools. Coolmuster iOS Assistant is a professional iOS device management software that allows you to export music, photos, contacts, messages, and other data from your iPhone to your computer or USB drive. It's easy to use and suitable for all users.
Highlights of iOS Assistant:
Here is how to transfer music from iPhone to a flash drive using iOS Assistant:
01Download and install this tool on your computer. Connect your iPhone to your computer using a USB cable, and plug in your USB flash drive.
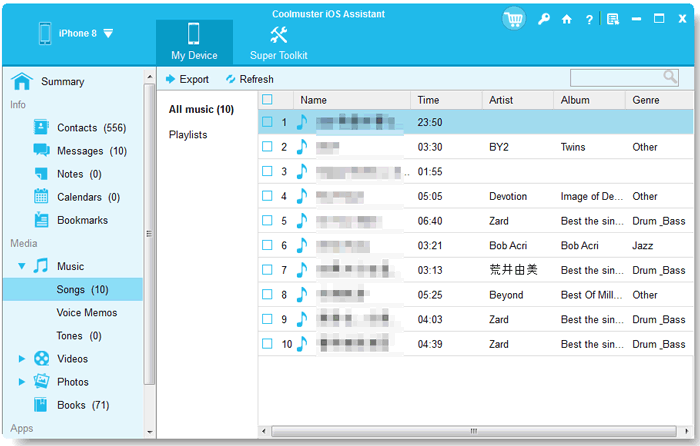
02Once your iPhone is detected, tap "Trust" on your phone, then click "Continue" in the program to establish the connection. After that, you will see the main interface as shown below. As you can see, all the different file folders are organized on the main screen.

03Click on the "Music" section to view your song list. You can either choose individual songs or select the entire music folder, depending on what you wish to transfer. Then, click the "Export" button, select your USB flash drive as the destination, and save the chosen music files to the drive.
Video Tutorial:
Whether you're transferring music for car playback, backing up your collection, or sharing it with friends, the methods outlined above for transferring iTunes music to a flash drive are simple and practical. You just need to choose the method that works best for you to easily complete the transfer.
However, if your music files are stored on your iPhone, Coolmuster iOS Assistant is the ideal tool for the job. It allows you to quickly export music and also manage other data on your phone, all in one convenient solution.
Related Articles:
2 Simple Ways to Back Up iPhone to Flash/USB/Thumb Drive [Reassuring Guide]
6 Proven Techniques to Transfer Music from iPhone to Computer for Free
How to Transfer Videos from iPhone to USB Stick with or without a Computer?
How to Transfer Songs from iTunes to iPhone in 4 Reliable Ways


 Free Download for PC
  Free Download for Mac

