"I have a 2 TB hard drive and would like to copy a bunch of photos off my phone and onto there. What would be the most efficient way to do this?"
- from Reddit
High-quality photos and videos taken with an iPhone can take up a lot of storage space, leading to insufficient device storage. If you want to free up space on your iPhone while safely backing up important photos, transferring iPhone photos to an external hard drive is a great option. Can you transfer photos from iPhone to external hard drive? Of course. This guide will explain in detail how to transfer photos from iPhone to external hard drive, with suitable solutions whether or not you use a computer.
If you want to transfer photos from iPhone 12 to an external hard drive, using a computer is a great option. Here are two methods that can help you easily transfer photos from iPhone to an external hard drive, whether you are a Windows or Mac user.
Wish to transfer all or just several photos from your iPhone to an external hard drive in one click? If the answer is yes, you can choose Coolmuster iOS Assistant. It is the best app to transfer photos from iPhone to external hard drive. It can automatically scan the iPhone images and show the thumbnail pictures on the interface. You can preview the pictures, select the ones you want, and export them onto the external hard drive directly. If you wish to back up all photos from your iPhone to the external hard drive, you can do it with one click.
Key features of iOS Assistant:
Here is how to back up iPhone photos to external hard drive in one click using iOS Assistant:
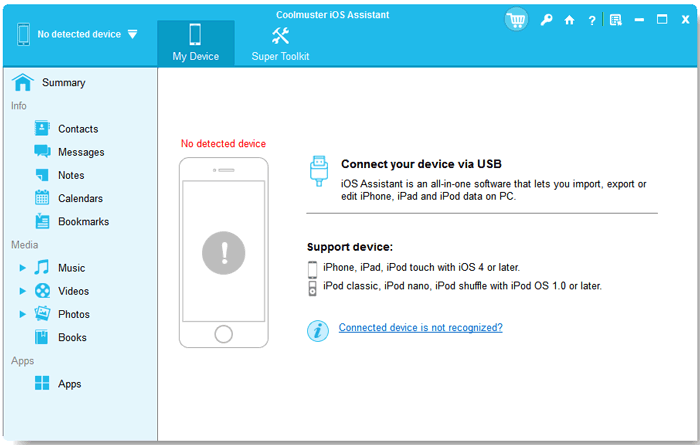
01Download and install iOS Assistant on your computer. Next, launch it, and you will see the interface below.
02Connect your iPhone to the computer using a suitable USB cable, tap "Trust" on your iPhone, and click "Continue" on the software to move on. After that, insert the external hard drive into the computer's USB slot.

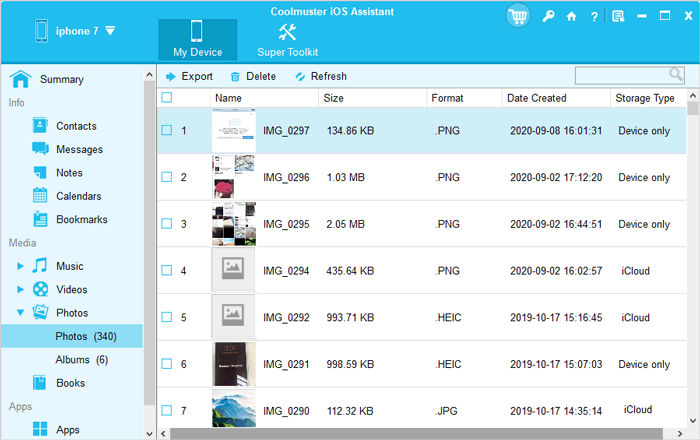
03Once successfully connected, click "Photos" from the left panel, preview & tick the desired photos, and hit the "Export" button on the top menu. Finally, choose the external hard drive from the pop-up window to save them to it.
If your iPhone photos are already synced to iCloud, you can download the photos from the iCloud website on your computer and then store them on the external hard drive. However, this way is not always recommended, for it will take longer to sync or download the large photos.
The following tips show you how to get pictures off iPhone to external hard drive via iCloud.
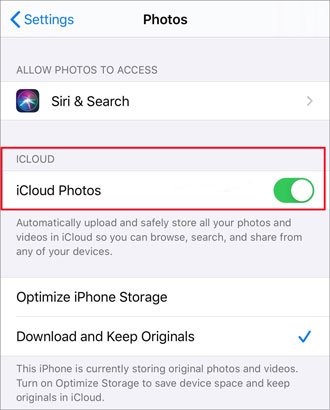
Step 1. Check if you have enabled "iCloud Photos" on your iPhone. You can navigate to iPhone's "Settings" > "iCloud" > "Photos" to have a look and turn it on. (iCloud photos not syncing?)
Step 2. Visit iCloud.com on your computer and sign in with the same Apple ID you use on your iPhone.
Step 3. Click "Photos", choose the photos you like, and click "Download" selected items in the upper-right corner. After that, wait for a while until all the photos are finished downloading.

Step 4. Link the external hard drive to your computer, double-click it, and copy & paste the saved photos from the computer to the external hard drive.
For Windows users, you can use built-in tools such as the Photos app or File Explorer to transfer iPhone photos to an external hard drive. These methods do not require additional software, are easy to use, and are ideal for users who prefer not to install third-party applications.
The built-in Photos app on Windows can import and manage iPhone photos and allows users to choose the storage location, directly saving the photos to an external hard drive.
Here is how to store iPhone photos on external hard drive using the Windows Photos app:
Step 1. Connect your external hard drive to your Windows computer using a USB cable or any other suitable connection.
Step 2. Connect the iPhone to the Windows computer using a USB cable, unlock the iPhone, and click "Trust This Computer".
Step 3. Type "Photos" in the Windows search bar and open it.
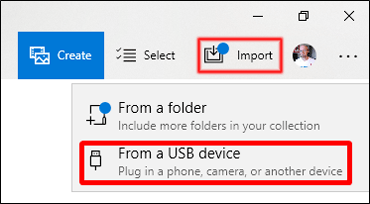
Step 4. Click "Import" > "From a USB device", and select your iPhone.
Step 5. In the pop-up window, select the external hard drive as the storage location.
Step 6. Click "Import selected" to begin the transfer, and after it's finished, disconnect the device.
You can also transfer photos from iPhone to external hard drive using File Explorer on Windows. To achieve that, simply follow the steps below:
Step 1. Connect your iPhone to your Windows computer with a USB cable. Then, unlock your iPhone and, if prompted, tap "Trust" on your device to establish a connection with your computer.
Step 2. Open the File Explorer on your Windows computer by pressing the "Windows" + "E" keys.
Step 3. In File Explorer, find your iPhone under "This PC" (It should be listed as a portable device). Double-click on your iPhone to open its internal storage.
Step 4. Navigate to the "DCIM" folder ( This is where your photos are stored) and select the photos you want to transfer.
Step 5. Copy the selected photos and paste them to the location where you want to store them on your external hard drive.

If you want to transfer photos from your iPhone to your Windows PC, you can read this step-by-step guide.
How to Transfer Photos from iPhone to PC Windows 10/11 in MinutesIf you are a Mac user, here are two built-in tools you can use to import iPhone photos to an external hard drive.
The built-in "Photos" app on Mac is a convenient tool for managing and importing iPhone photos, allowing users to directly import iPhone photos to the Mac and choose an external hard drive as the storage location.
Here is how to import photos from iPhone to external hard drive using Mac via the Photos app:
Step 1. Connect your iPhone to your Mac and unlock your iPhone. If prompted, tap "Trust" on your device to establish a connection with your Mac.
Step 2. Launch the "Photos" app on your Mac.
Step 3. In the Photos app, look for your connected iPhone in the sidebar under "DEVICES" and click on your iPhone to view the photos to transfer.
Step 4. Select the photos you want to copy to the external hard drive and click on the "Import Selected" button. This will copy the selected photos to your Mac's Photos library. (Can't import photos from iPhone to Mac?)
Step 5. Connect the external hard drive, then drag and drop the photos from the Mac to the hard drive.
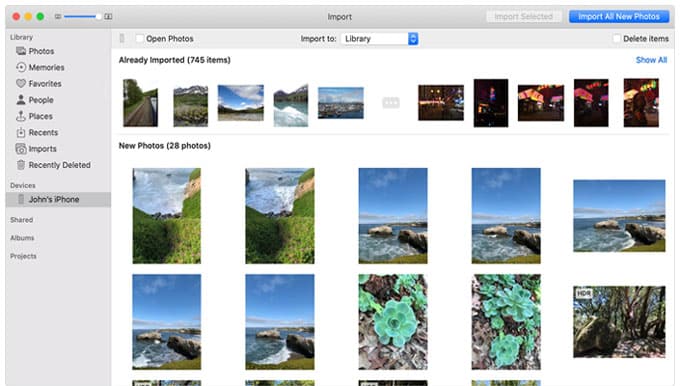
Image Capture is another way to transfer photos from iPhone to external hard drive using Mac. Here's a step-by-step guide on how to save iPhone photos to external hard drive using Image Capture:
Step 1. Connect your iPhone to your Mac and unlock your iPhone. If prompted, tap "Trust" on your device to establish a connection with your Mac.
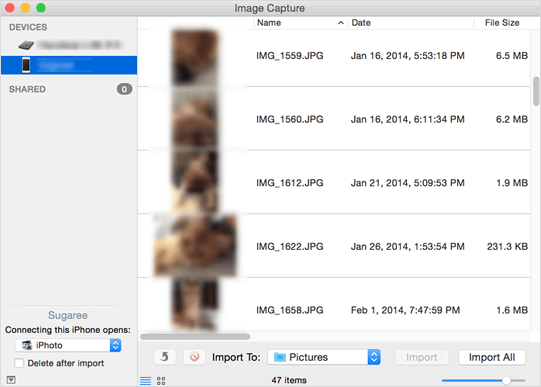
Step 2. Open the "Image Capture" application on your Mac. Your connected iPhone should appear in the "DEVICES" list on the left side of the window. Select your iPhone from the list.
Step 3. At the bottom of the Image Capture window, you'll see an option labeled "Import To". Click on the drop-down menu next to it and select your external hard drive as the destination.
Step 4. In the main Image Capture window, you'll see a preview of the photos on your iPhone. Select the photos you want to transfer to the external hard drive by clicking on them.
Step 6. Click the "Import" button to transfer the selected photos to the destination you specified on your external hard drive.
Sometimes, you don't have a computer at hand. Can you transfer photos from iPhone directly to external hard drive? Sure. Let's see how to transfer photos from your iPhone to the external hard drive directly:
Step 1. Make sure you have either an external hard drive designed for iPhones or a lightning-to-USB adapter. These accessories allow for a direct connection between your iPhone and the external hard drive.
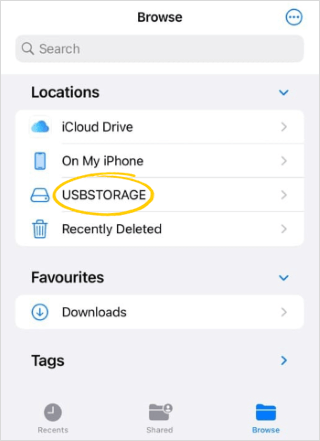
Step 2. Go to iPhone's "Files" app, and tap "Browse" to see if you have successfully attached the external hard drive. Afterward, run the "Photos" app, click the images you want to copy, and press the "Share" option.
Step 3. Tap "Save to Files" > "On My iPhone" and choose the external hard drive. This will easily transfer photos from iPhone to the external hard drive without a computer.
The above methods can help you easily transfer iPhone photos to an external hard drive, preventing insufficient storage on your iPhone. If you need a more efficient and stable solution, we recommend using Coolmuster iOS Assistant. It supports batch transfers and is perfect for users who need to manage iPhone photos frequently.
If you need technical support when transferring, please tell us in the comments anytime. Our support team will assist you in no time.
Related Articles:
How to Export iPad Photos to External Drive with/without Computer?
How to Back Up iPhone to External Hard Drive on Windows or Mac
How to Transfer iCloud Photos to External Hard Drive with Ease
2 Easy Ways to Transfer Music from iPhone/iPod to an External Hard Drive


 Free Download for PC
  Free Download for Mac

