
[Full Guide] How to Transfer Photos from iPhone to PC Wirelessly?

We store a large number of photos on our iPhones, and transferring these photos to a PC can help us back them up and free up space on the device. Typically, when you want to transfer photos from your iPhone to your computer, you would think of using a USB cable to connect the device and transfer the data. But what if you don't have a USB cable or your computer doesn't recognize your iPhone? In this case, wireless data transfer would be the best solution. So, how to transfer photos from iPhone to PC wirelessly? This article will provide the answer.
iCloud is Apple's cloud storage service that automatically syncs photos from your iPhone to the cloud and allows you to download and view them on your computer. This method is ideal for users who regularly back up their photos. However, iCloud offers limited free storage—only 5GB—and additional storage requires a paid plan. (How to free up iCloud storage?)
Here is how to transfer photos from iPhone to Windows laptop wirelessly via iCloud:
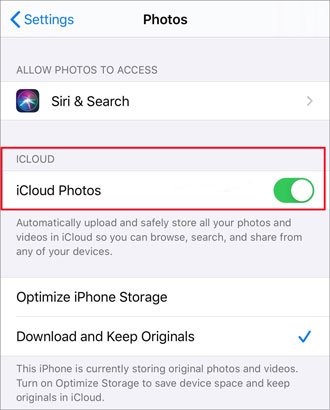
Step 1. Open the "Settings" app on your iPhone, tap your Apple ID, and go to the "iCloud" settings page. Find the "Photos" option and make sure the "iCloud Photos" toggle is turned on. This will automatically upload your photos to iCloud.
Step 2. On your computer, open a browser and go to iCloud.com, then sign in with your Apple ID.
Step 3. Once logged in, click on the "Photos" icon and find the photos you want to download. Select the photos and click the download icon to save them to your computer.

If you need to transfer only a small number of photos, email is a convenient method. However, it is suitable only for transferring a few photos, as email attachments have size limitations and are not ideal for transferring large numbers of photos.
Here is how to transfer photos from iPhone to laptop wirelessly with email:
Step 1. Open the "Photos" app on your iPhone, find and select the photos you want to send.
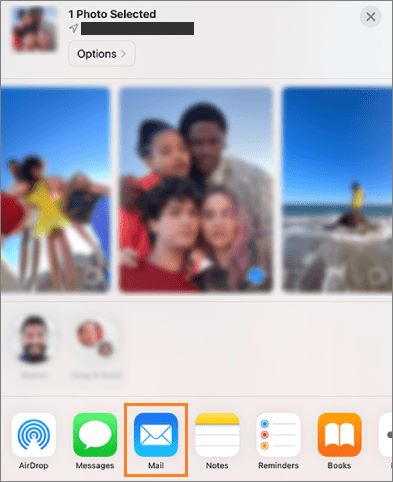
Step 2. Tap the "Share" button at the bottom of the screen, and choose "Mail" from the menu that pops up. Enter your email address and tap "Send".
Step 3. Open your email account on your computer, find the email, and download the photos from the attachment.
AirDrop is exclusive to Apple devices, so it can't be used with Windows computers. However, you can still transfer images from your iPhone to your PC without USB using apps that work similarly to AirDrop. There are several AirDrop alternatives for Windows, and here we'll use Snapdrop as an example.
Here is how to transfer pictures from iPhone to computer wirelessly using Snapdrop:
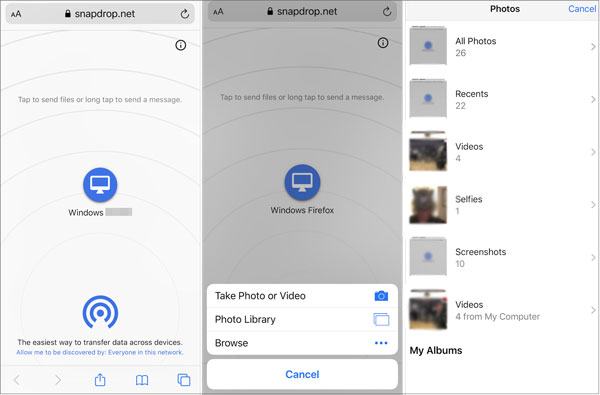
Step 1. Open snapdrop.net in the browser on both your iPhone and your computer.
Step 2. Tap the icon on your iPhone screen, and you'll see three options: "Photo Library", "Take Photo or Video", and "Browse".
Step 3. Select "Photo Library" to choose the pictures you want to transfer.
Step 4. On your PC, click the "Download" button to save the pictures.
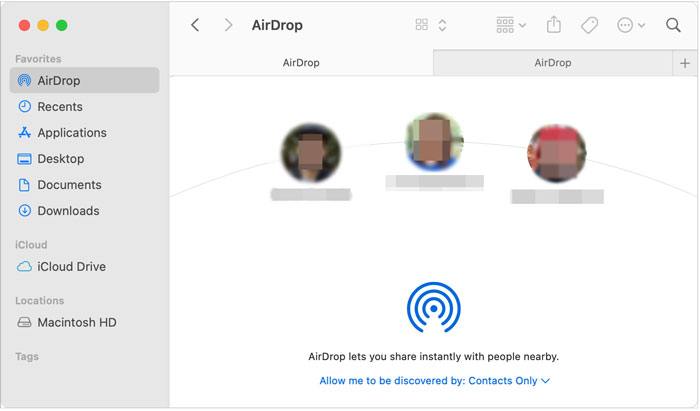
If you want to transfer photos from your iPhone to your Mac wirelessly, AirDrop is the best choice. Here is how to transfer photos from iPhone to Mac wirelessly via AirDrop:
Step 1. On your iPhone, open the "Settings" app, select "General", then find and tap on "AirDrop". Choose either "Everyone" or "Contacts Only" based on your preference.

Step 2. On your Mac, open "Finder" and click on the "AirDrop" icon in the sidebar. In the AirDrop window, make sure the option "Allow me to be discovered by" is enabled, then select either "Everyone" or "Contacts Only".
Step 3. Open the "Photos" app on your iPhone and select the photos you want to transfer.
Step 4. Tap the "Share" button, choose "AirDrop", find your Mac's name, and click to transfer.
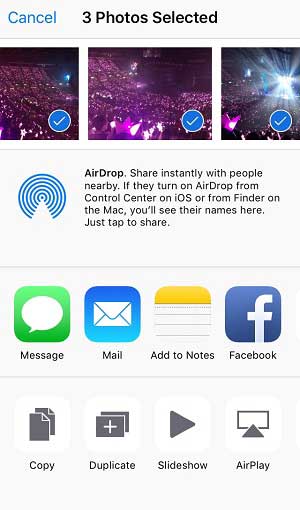
Step 5. A prompt will appear on your Mac to accept the transfer. Click "Accept" to save the photos.
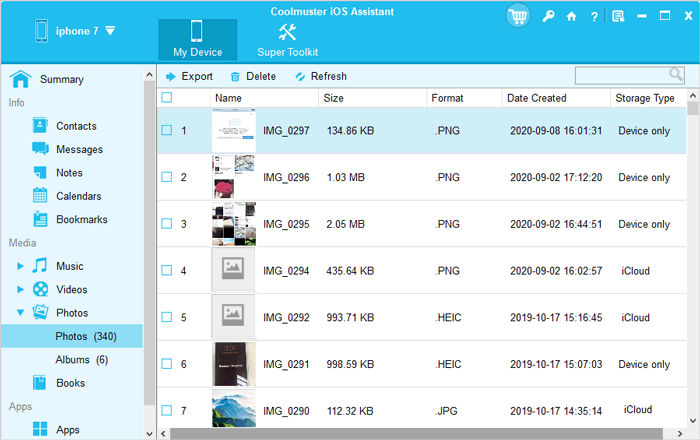
Sometimes, wireless transfer can be affected by factors such as network speed and file size, especially when transferring a large number of photos or videos, which can result in slower performance. In contrast, transferring via USB is faster and more reliable. Coolmuster iOS Assistant is a professional data management software that not only allows users to quickly export iPhone photos to a computer but also helps manage other types of files on the iPhone. It's ideal for users who want a complete backup solution.
Key features of Coolmuster iOS Assistant:
Here is how to transfer photos from iPhone to computer using iOS Assistant:
01Download the correct version of the software for your computer's operating system, then connect your iPhone to the computer using a USB cable.
02When a pop-up window appears, click "Trust" on your device. Once the connection is successful, the main interface will be displayed.

03Go to the "Photos" folder to view more detailed file information. While previewing, select the photos you wish to export to your computer, then click the "Export" option to begin the process.
Video Tutorial:
The above outlines several methods for transferring photos from iPhone to PC wirelessly, including iCloud, email, and wireless transfer apps like Snapdrop. For bulk photo transfers, Coolmuster iOS Assistant offers an efficient transfer experience via USB connection, making your backup process more convenient and efficient.
Related Articles:
4 Reliable Ways to Transfer Files from iPhone to PC Wirelessly
[Newest] How to Transfer Photos from iPhone to PC Without iTunes?
How to Transfer Photos from Android to iPhone Wirelessly [Guide in 2024]
Comprehensive Guide on How to Transfer Files from PC to Android Wirelessly


