
[Step-by-Step Guide] How to Transfer Videos from Mac to iPhone?

In daily life, we often need to transfer videos from a Mac to an iPhone for watching on the go or sharing with friends. Well, If you have any trouble with how to transfer videos from Mac to iPhone, now you can release your mind. Today, we are going to teach you to know 5 methods to transfer videos from Mac to iPhone. With more options provided, you can select the best solution to move a video from Mac to iPhone.
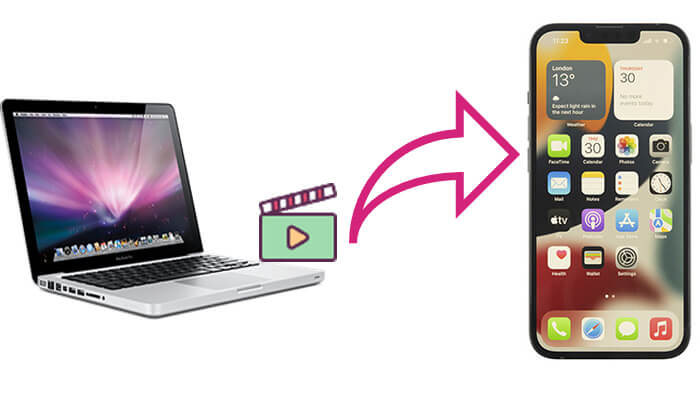
The most efficient way to transfer videos from a Mac to an iPhone is by using iPhone Video Transfer. It is a professional iOS data transfer tool that allows you to quickly move video files between devices with just a few clicks, without the need for iTunes. Unlike traditional methods, it won't overwrite existing data on your iPhone and is compatible with a wide range of file formats, making it an ideal choice for users looking to transfer files seamlessly.
Key features of iPhone Video Transfer:
Here is how to send video from Mac to iPhone using iPhone Video Transfer:
01Make sure that you have downloaded the right version of iPhone Video Transfer. After successfully downloading, run the software on your Mac and connect your iPhone to a USB cable. Then, the software will detect your iOS device automatically. And look through all the files on your iPhone by visiting the different files.
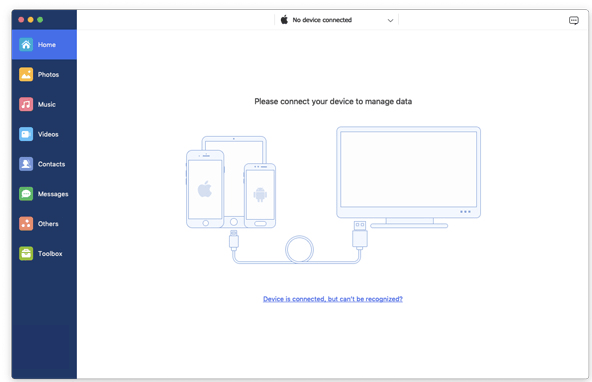
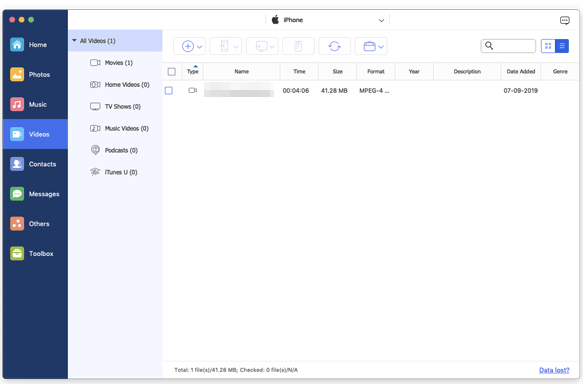
02Click on "Videos" on the left side of the main interface. After a few seconds, all your multimedia files will be loaded into the program. Next, go to the top menu and click the "+" button. Then, browse for the videos on your Mac that you want to transfer and upload them to your iPhone.
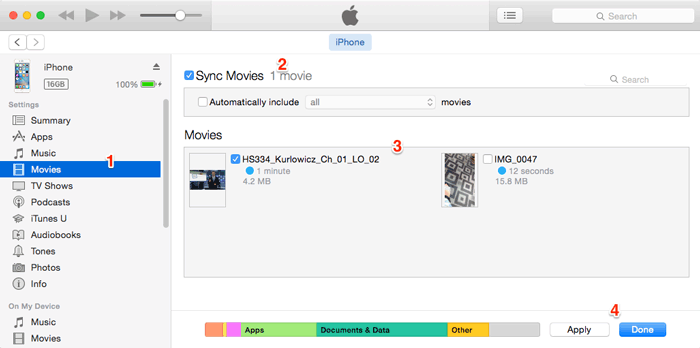
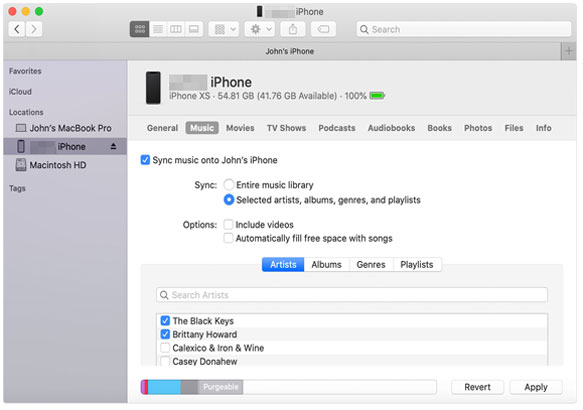
iTunes (or Finder) is the official tool provided by Apple, allowing users to sync files, such as videos, from a Mac to an iPhone. However, the process can be somewhat complex, and using this method may overwrite existing data on your iPhone, so it's important to proceed with caution.
To transfer video from Mac to iPhone using iTunes:
Step 1. Connect your iPhone to your Mac using a USB cable, and open iTunes if it doesn't launch automatically.
Step 2. Click the device icon and select "Movies".
Step 3. Check the box next to "Sync Movies" and choose the movies you want to transfer to your iPhone.
Step 4. Click "Apply" to begin syncing the selected videos from your Mac to your iPhone.
To transfer video from Mac to iPhone using Finder:
Step 1. Connect your iPhone to your computer and open Finder.
Step 2. In Finder, select your device and choose "Movies".
Step 3. Check the box for "Sync movies to iPhone [your iPhone's name]" and click "Apply". Confirm the sync when prompted.
Step 4. Once the sync is complete, you can view the videos on your iPhone.
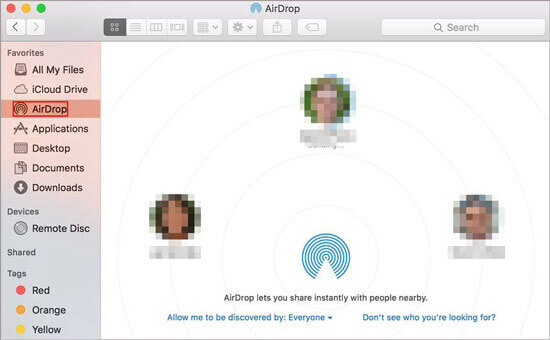
AirDrop is a convenient wireless transfer tool for Apple devices, especially suited for transferring small files. No data cables or app installations are required—just enable Wi-Fi and Bluetooth, and you can easily transfer various data, including videos, from a Mac to an iPhone.
Here is how to get videos from Mac to iPhone via AirDrop:
Step 1. On your Mac, open Finder, and in the left sidebar, select "AirDrop". Ensure that AirDrop is set to "Everyone" or "Contacts Only" to make your Mac discoverable.
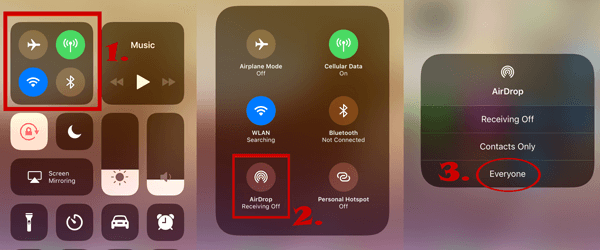
Step 2. On your iPhone, swipe down from the top-right corner to open the Control Center. Press and hold the "AirDrop" icon, then select "Everyone" or "Contacts Only" to make your iPhone discoverable. (AirDrop not working on iPhone?)
Step 3. Find the video you want to transfer on your Mac, right-click the video file, select "Share" > "AirDrop", and then click on your iPhone's name to start the transfer.

Step 4. The popup window will remind you with a message on your iPhone. Click the "Accept" button to receive the file to your device automatically.
Dropbox is a widely used cloud storage service that supports cross-platform file transfers, including video transfers from Mac to iPhone. It has a user-friendly interface and is easy to use, making it suitable for users across different systems. However, its free storage space is limited to 2GB.
Here is how to move a video from Mac to iPhone using Dropbox:
Step 1. Pay a visit to dropbox.com to create an account on your Mac. If you have already had one, just log in.
Step 2. Click on "Upload files" in the Dropbox interface to upload the video to your Dropbox storage from your Mac.

Step 3. When the videos have been uploaded to the site, download the Dropbox app and install it on your iOS device. Sign in to the account, choose the videos you have uploaded and download them to your iPhone.
If you want to back up your iPhone to Dropbox, you can read this step-by-step guide to learn how to do it.
How to Back Up iPhone to Dropbox? [Full Guide & Alternative]Sending a video via email is a simple and direct method that requires no additional tools, as it can be done using your email account. However, keep in mind that the size of a single video file usually cannot exceed the email attachment limit (e.g., 25MB).
Here is how to transfer videos from Mac to iPhone using email:
Step 1. Open the mail client on your Mac, create a new email, and attach the video file.
Step 2. Send the email to the email account associated with your iPhone.
Step 3. On your iPhone, open the Mail app, locate the email, and download the attachment.

The above introduces 5 methods for transferring videos from Mac to iPhone, each suitable for different scenarios. If you need a quick, efficient, and lossless video transfer, we recommend using iPhone Video Transfer. It is not only easy to use but also supports multiple file formats, meeting the needs of various users.
If you are looking for the best solution that transfers videos, select iPhone Video Transfer as your first option!
Related Articles:
How to Transfer Files from Mac to iPhone? Solved in 5 Proven Ways
How to Transfer Photos from Mac to iPhone? [6 Easy Ways]
How to Transfer Videos from Mac to iPad? (Step-by-step Tutorial)


