
Simplify Your Life: The Ultimate Guide on How to Manage iCloud Photos

Have you ever felt frustrated while searching for a specific photo because it's buried among thousands of photos on your phone? Or are you worried about running out of storage space on your device? Don't worry, this article will teach you how to manage iCloud photos, so your photos are organized and easily accessible whenever you need them.
iCloud Photos is a cloud-based photo storage and syncing service provided by Apple Inc., designed to help users effortlessly manage their photo and video collections. With iCloud Photos, users can securely store their photo and video libraries on Apple's cloud servers and access this content anytime, anywhere, from any internet-connected device. Whether you've captured photos on your iPhone, iPad, or Mac computer or accessed them through the iCloud Photo Library via the web, you can easily view, share, and edit your photos.
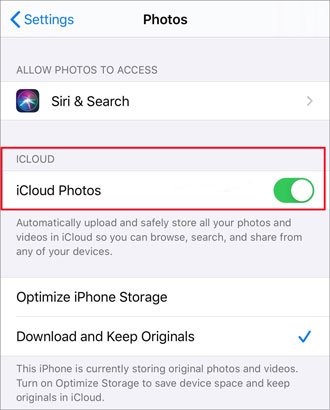
Enabling iCloud Photos is the first step to utilizing this service, allowing your photos and videos to automatically back up and sync to iCloud. Here are the steps to enable iCloud Photos on iOS devices and Mac computers:
On iOS devices:
Step 1. Open the "Settings" app.
Step 2. Tap on your Apple ID, then select "iCloud".
Step 3. In the iCloud settings page, locate and tap on the "Photos" option.
Step 4. Toggle the "iCloud Photos" switch to the on position.
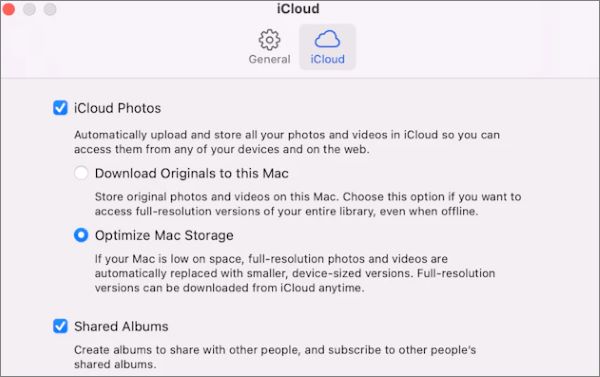
On Mac computers:
Step 1. Open "System Preferences" from the Apple menu or by searching for it using Spotlight.
Step 2. Click on "Apple ID" (or iCloud, depending on your macOS version) at the top right corner of the System Preferences window.
Step 3. If prompted, enter your Apple ID and password.
Step 4. In the Apple ID preferences window, click on "iCloud" on the left sidebar.
Step 5. Check the box next to "Photos" to enable iCloud Photos.
You May Like:
[Answered] How to Turn Off iCloud Photos Without Deleting Everything
Unveiling the Mystery: What Happens If I Turn Off iCloud Photos?
In your iCloud Photo Library, there are numerous ways to help you organize, edit, and share your photos and videos. Here are some key steps and techniques for managing photos in iCloud.
To upload iPhone photos to iCloud, activate the iCloud Photos feature within your iCloud settings. This will automatically sync all your captured photos to your iCloud account. Alternatively, you can manually upload photos and videos to iCloud using the steps below:
Step 1. Access a web browser and navigate to iCloud.com. Input your Apple ID and corresponding password to successfully log into your iCloud account.
Step 2. After signing in, click on the "Photos" icon. This will open the iCloud Photos interface.
Step 3. Within the iCloud Photos interface, locate the "Upload" button, typically positioned in the upper right corner. Click on this button to proceed.
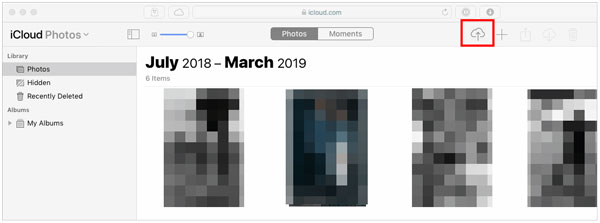
Step 4. Select the files you want to upload.
You have the flexibility to download your photos and videos from the iCloud Photo Library to your device whenever you wish. Whether it's a single image or multiple ones, you can retrieve them from your iCloud account simultaneously. Here's how:
Step 1. Access a web browser and navigate to iCloud.com. Input your Apple ID and corresponding password to successfully log into your iCloud account.
Step 2. After signing in, click on the "Photos" icon. This will open the iCloud Photos interface.
Step 3. Navigate through your photo library on iCloud and choose the specific photos or videos you wish to download. To select multiple items, hold down the "Command" key (on Mac) or the "Ctrl" key (on Windows) while clicking on each desired item.
Step 4. Once you've selected the desired items, click on the download icon (usually represented by a cloud with an arrow pointing downwards).

Step 5. Once you've made your selections, the chosen photos or videos will be automatically downloaded to your computer.
Further Reading:
iCloud Storage Full? Here's What You Can Do to Wipe iCloud Data
How to Restore Photos from iCloud? Successfully Resolved in 6 Ways
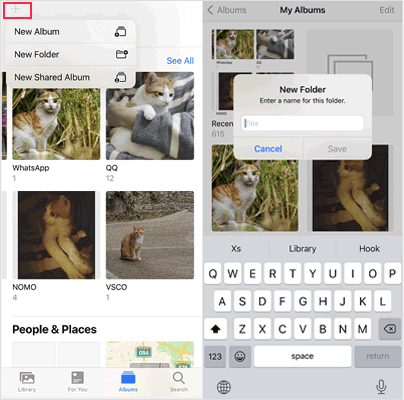
Albums are an effective way to organize related photos and videos. You can create new albums in the iCloud Photo Library and add relevant content to them. Here is how to create an iCloud photo album:
Step 1. Launch the "Photos" app on your iPhone.
Step 2. Navigate to the "Albums" tab located at the bottom of the screen.
Step 3. Tap the "+" icon positioned at the top left corner.
Step 4. Choose either "New Album" or "New Shared Album" from the menu.
Step 5. Assign a name to the album by typing in your desired title.
Step 6. Confirm by selecting "Save" at the top right corner.
Step 7. Select the photos you want to include in the album by tapping on them.
Step 8. Click "Done" at the top right corner of the screen to confirm the selection.
You can edit and manage your albums anytime, adding or removing photos and videos, adjusting the order of photos, and even sharing albums with others. Launch the "Photos" app on your iPhone > navigate to the "Albums" tab > tap "See All" > select "Edit".
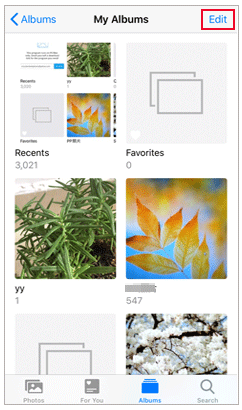
To rename the album: Tap on the album name, then enter the new name in the provided field.
To remove the album: Simply tap on the "-" icon to delete it directly. If you're interested in discovering additional methods to delete albums on your iPhone, click here to explore further.
To rearrange the album: Simply press and hold the album thumbnail, then drag it to your desired location for repositioning.
Learn More:
How to Transfer iCloud Photos to External Hard Drive with Ease
[Comprehensive Guide] How to Delete All Photos from iPhone
To organize the iCloud Photo Library, you can adopt the following strategies:
1. Organize Photos and Videos:
Keeping your photo library neat and orderly is a good management practice. You can regularly tidy up by removing unwanted photos and videos, deleting duplicates or blurry content, and tagging or adding descriptions to photos for easier identification and retrieval.
2. Utilize Smart Albums and Search Functionality:
The iCloud Photo Library also provides smart albums and powerful search functionality to help you quickly locate and find specific photos or videos. You can create smart albums based on criteria such as date, location, people, etc., or use the search bar for keyword searches.
3. Make the Most of Tags and Descriptions:
Adding tags and descriptions can help you better organize and manage your photo library. You can add keyword tags or descriptions to each photo so that you can quickly find specific content when needed.
Q1. My iCloud Photo Library shows insufficient space; what should I do?
If your iCloud Photo Library is running out of space, you can try the following solutions:
Q2. My device's photos haven't synced to iCloud; what should I do?
First, ensure that all your devices are logged in with the same Apple ID and that iCloud Photo Library is enabled. Then, check if your device is connected to a Wi-Fi network, as iCloud Photos typically require Wi-Fi for syncing. If the issue persists, try restarting your device.
Q3. Can I choose not to upload certain photos to iCloud?
iCloud Photo Library automatically syncs all photos and videos from your device. If you don't want certain photos to be uploaded, you can keep them in your device's "Local Albums" instead of iCloud Photo Library.
Also Read:
13 Solutions to Fix iCloud Photos Not Syncing on iPhone/iPad/Mac
How to Transfer iCloud Photos to Google Photos: A Step-by-Step Guide
If you want to manage your iPhone photos on your computer, you can try this software - Coolmuster iOS Assistant. Coolmuster iOS Assistant is a data management tool specially designed for iOS devices. It helps users easily manage data on iPhone, iPad, and iPod touch, including photos, contacts, messages, music, videos, and applications.
Key features of Coolmuster iOS Assistant:
Follow the steps to transfer photos from iPhone to computer using iOS Assistant:
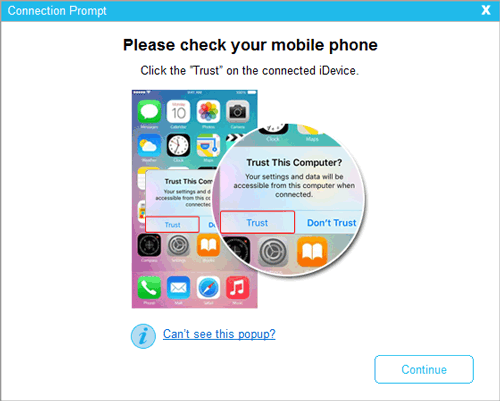
01Launch the software and connect your iPhone to your computer using a data cable. Trust your device to securely establish the connection.
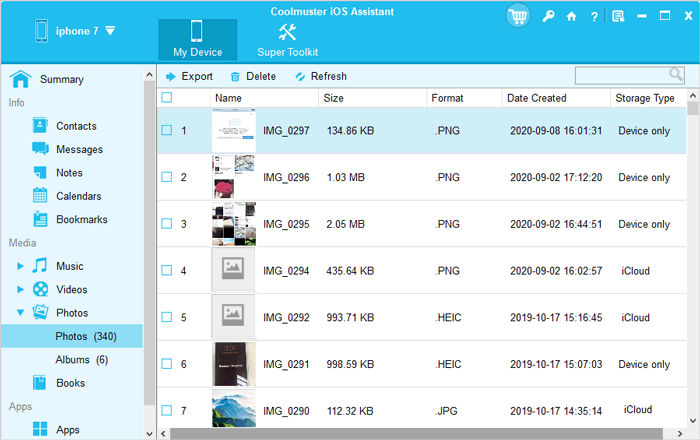
02Once your device is recognized, you'll be directed to the main interface, providing easy access to all features.

03Access the "Photos" folder, preview the files, select the ones you wish to transfer, and then initiate the process by clicking on "Export".
That's all about how to manage iCloud photos. By following the methods mentioned above, you can effectively manage your iCloud photos, keeping your photo library organized and secure. Remember to regularly check your photo storage space, ensure timely backups, and clean out any unnecessary photos so that you can continue to cherish wonderful memories captured in your photos.
Related Articles:
iPhone Says Not Enough iCloud Storage But There Is? Find the Fix Here!
How to Move Photos from iPhone to iCloud? [2024 Update]
Deciphering the Query: Does iCloud Backup Include Photos?
6 Tips to Get Photos/Pictures off iPhone without Any Hassle


