
How to Restore iPhone 15 from Backup Efficiently? [4 Techniques]

If you've recently upgraded to the latest iPhone 15 or encountered an unexpected issue with your device, knowing how to restore iPhone 15 from backup can be a valuable skill. Whether you've lost important data, want to transfer your information to a new device, or simply need to recover your iPhone's settings, this guide will walk you through the step-by-step process of how to restore an iPhone 15 from a backup.
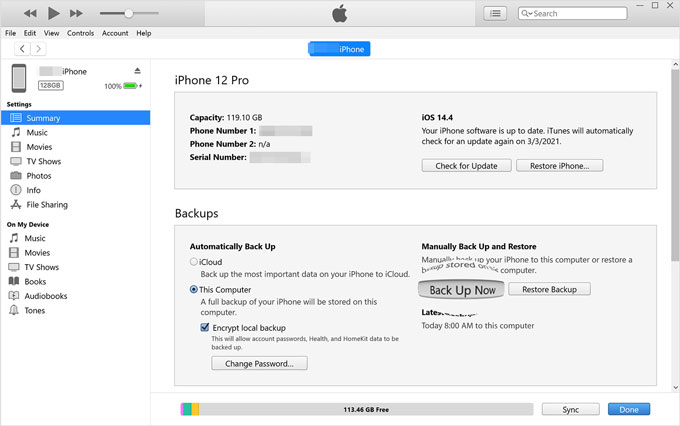
One way to restore an iPhone from a backup is via iTunes. iTunes is a software that can help in managing data on iOS devices. With iTunes, you can back up your data and restore it when needed. To restore iPhone from computer backup, follow the below steps.
Step 1. Ensure that you have the latest version of iTunes installed on your computer. Use a USB cable to connect your iPhone to your computer.
Step 2. Launch iTunes if it doesn't open automatically when you connect your iPhone.
Step 3. In iTunes, you should see your iPhone icon near the upper-left corner of the window. Click on it to select your device.
Step 4. Under the Backups section, click on the Back Up Now button to begin the backup process. iTunes will start creating a full backup of your iPhone, including your apps, settings, and content.
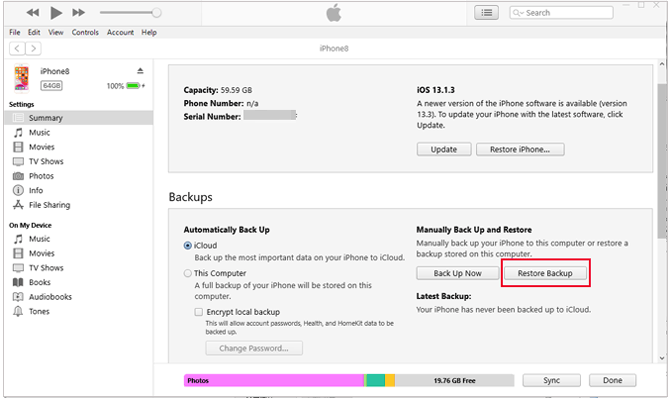
Step 1. Use a USB cable to connect your iPhone 15 to a computer with iTunes installed.
Step 2. Launch iTunes if it doesn't open automatically.
Step 3. Click on your iPhone icon in the upper-left corner of the iTunes window. Under the Backups section, click on Restore Backup.
Step 4. Choose the backup from the list of available backups. Ensure that it's the correct one containing your desired data.
Step 5. Click Restore and wait for the process to complete. iTunes will notify you when it's finished.
You May Like: How long does it take to restore an iPhone, and how to speed it up? Here is the answer.
When compared to iTunes, many users will prefer iCloud for iPhone data backup and restore. This is due to the fact that it is more convenient. However, iCloud isn't up to scratch in some aspects. You cannot restore all iPhone account passcodes from an iCloud backup. Besides, Wi-Fi is needed, and 5GB storage isn't enough to restore the backup. Lastly, it does not back up and recover large amounts via iCloud.
Remember, when restoring an iPhone from iCloud, you need to factory reset your device. This will erase all your files saved on your phone after the last backup. Therefore, ensure you have backed up all important files.
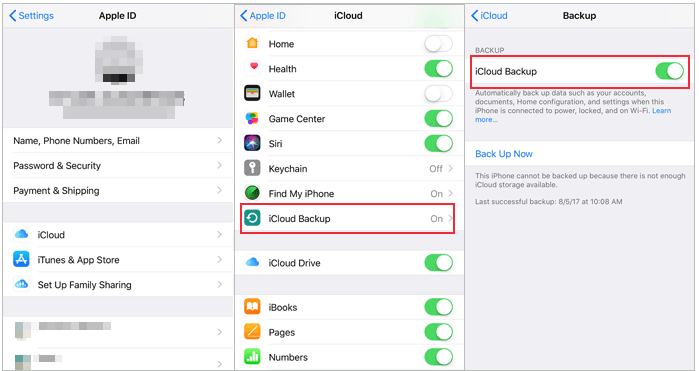
Step 1. Open the Settings app on your iPhone. At the top of the Settings menu, you'll see your Apple ID profile. Tap on it.
Step 2. Scroll down and tap on iCloud. In the iCloud settings, select iCloud Backup.
Step 3. Toggle the iCloud Backup switch to the On position. When enabled, your iPhone will automatically back up to iCloud when it is connected to Wi-Fi, locked, and plugged into a power source.
Step 1. Go to Settings > General > Reset > Erase All Content and Settings. Confirm your decision by entering your passcode.
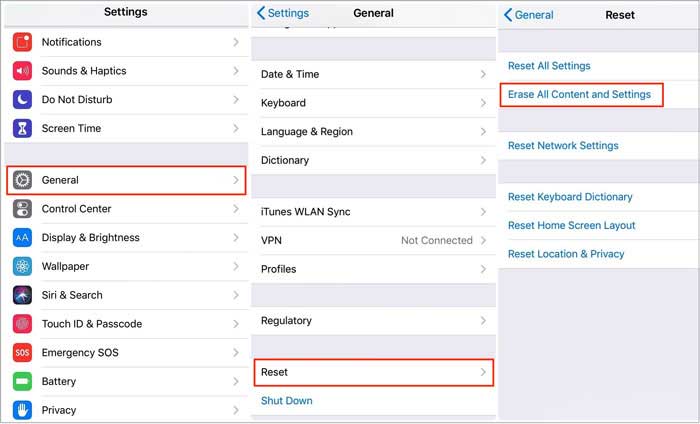
Step 2. After your iPhone restarts, follow the on-screen instructions until you reach the Apps & Data screen. Choose Restore from iCloud Backup.
Step 3. Enter your Apple ID and password associated with the iCloud backup you want to restore from.
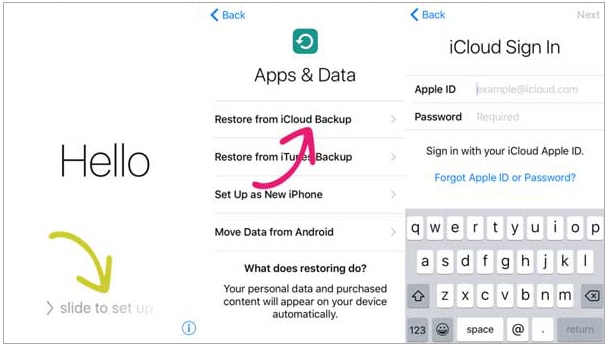
Step 4. Select the desired backup from the list of available backups. Be sure to choose the one that contains the data you want to restore.
Apart from iCloud, you can also use third-party apps to back up your data to the cloud. If you have used Google Drive to back up data, you can restore your iPhone using a backup. Here are steps to recover an iPhone from Google Drive backup:
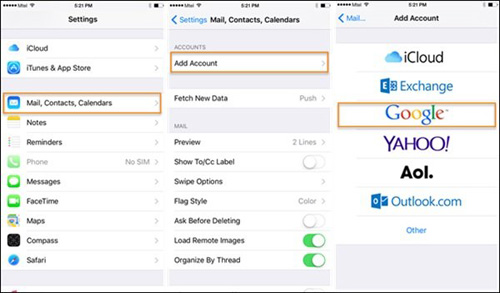
Step 1. Head to iPhone Settings and locate the Mail, Contacts, Calendars option. From there, click on Accounts and Add Account.
Step 2. Select Google and key in your Gmail login credentials. All files saved to the Google account will sync automatically and be imported to the iPhone.
See More: Go through this guide to learn how to restore from iCloud backup without reset.
Even though the methods mentioned above can help you restore a backup, you cannot extract only those files you want from a backup. Therefore, if you want to recover only what is needed without deleting the current data on your iPhone, we recommend Coolmuster iOS Assistant. This is a powerful iOS data manager that transfers and organizes iOS data easily. It doesn't matter the amount of files you've saved on your iPhone.
Key Features:
Click the download button to download the Coolmuster iOS Assistant.
01Launch the software on a PC and connect your iPhone using USB. Once your device has been successfully detected by the software, navigate to the Super Toolkit section.

02Locate and click on the iTunes Backup & Restore tab within the interface. Select the Backup option from the drop-down menu, and choose your device for backup.
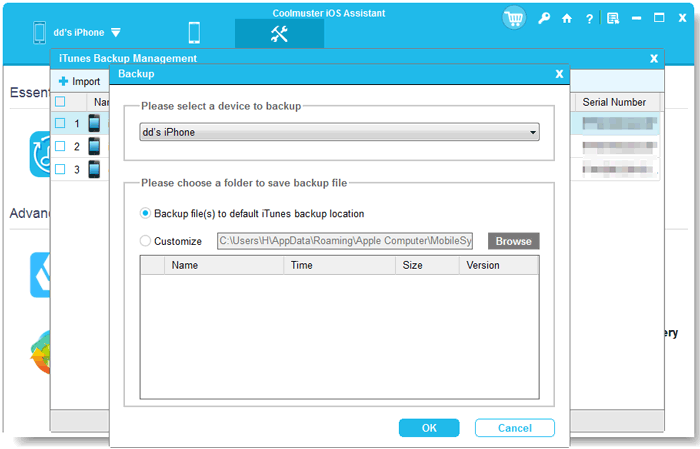
03You can opt to save the new backup files in either the default iTunes backup location or any preferred location on your computer. To specify a custom location, click the Browse option, then confirm your selection by clicking the OK button to commence the iOS data backup process.
01Go to the Super Toolkit section and click on the iTunes Backup & Restore tab. From there, select the Restore option within the software.
02In the drop-down menu, pick the device from which you wish to restore the iTunes backup. Next, choose a specific backup file from the list for restoration and click the OK option.
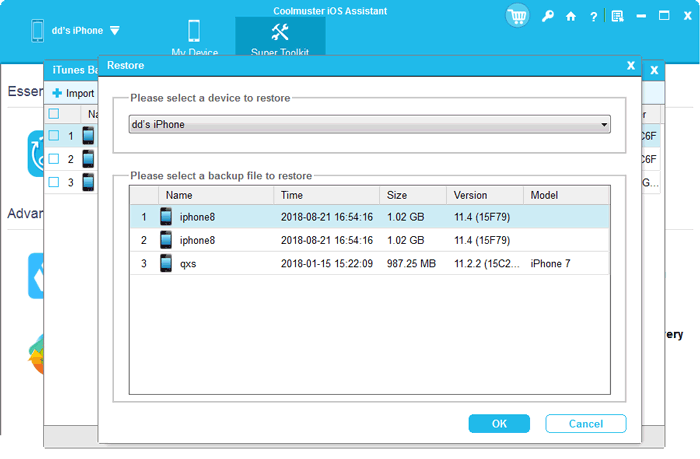
03After reviewing the notes provided in the pop-up window, click OK once more to commence the iTunes backup restoration to your iOS device.
Video Tutorial:
At this point, nothing should prevent you from resting your iPhone 15 device. These are some of the best options available to ensure you get back your files. The methods are easy, but the easiest is the Coolmuster iOS Assistant app. The tool is apt for all your data backup and restoration needs.
Related Articles:
Easily Restore iPhone from Backup [Contain iTunes and iCloud Backups]
What Does Restore iPhone Mean? How to Restore iPhone? [Answered]
Back to the Future: The Most Efficient Ways to Restore iCloud Backup
10 Tricks for the Issue Cannot Restore Backup to This iPhone Because the Software Is Too Old


