
How to Share Contacts on iPhone? [6 Effective Methods]

Sharing contacts on your iPhone is a quick and easy way to exchange information with others. Whether you need to send a phone number to a colleague, share an email address with a friend, or give your contact information to a new acquaintance, your iPhone has several ways to help you share contact information seamlessly. We'll show you how to share contacts on iPhone using different methods in this article.
Sharing contacts on your iPhone is an essential feature that can save you time and trouble when exchanging information with others. One of the easiest ways to share a contact on your iPhone is through the Contacts app.
The following are the steps to share contacts on iPhone through the Contacts app:
Step 1. Open the Contacts App
The first step to sharing a contact on your iPhone is to open the Contacts app. You can find the Contacts app on your iPhone's home screen. The Contacts app icon looks like a silhouette of a person's head and shoulders.
Step 2. Select the Contact You Want to Share
Once you've opened the Contacts app, scroll through your contacts until you find the person you want to share. Tap on the contact's name to open their contact card.
Step 3. Tap the "Share Contact" Button
Once you're on the contact's card, look for the "Share Contact" button at the bottom of the screen. Tap on this button to proceed.
Step 4. Choose How You Want to Share the Contact
After tapping the "Share Contact" button, you'll see a list of options for sharing the contact. You can choose from several methods, including Messages, Mail, and more.
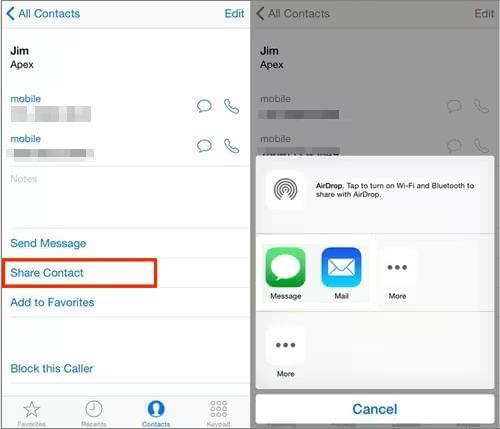
Step 5. Share the Contact
After selecting your preferred method of sharing, follow the prompts to share the contact. Depending on the method you choose, you may need to confirm the recipient's information or add a message to the contact before sending it.
Coolmuster Mobile Transfer, as a phone to phone transfer tool, allows you to transfer everything between mobile devices with ease, including contact list.
Here are some of its features:
Click on the button below to download Coolmuster Mobile Transfer.
A step-by-step guide to sharing contacts on iPhone via Coolmuster Mobile Transfer:
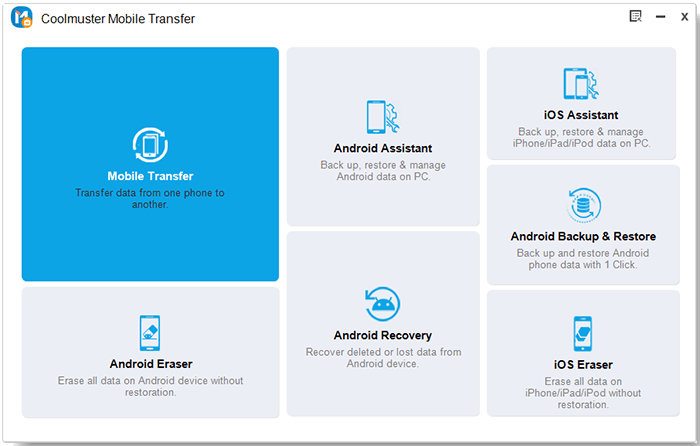
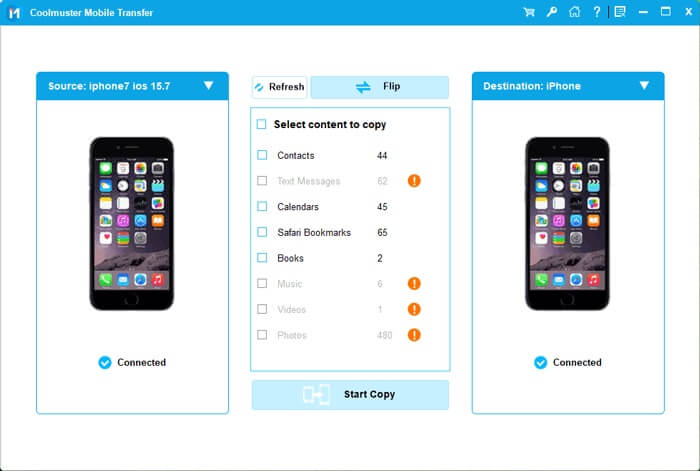
01Install Coolmuster Mobile Transfer on your computer by downloading it. Then enter "Mobile Transfer" module to continue.
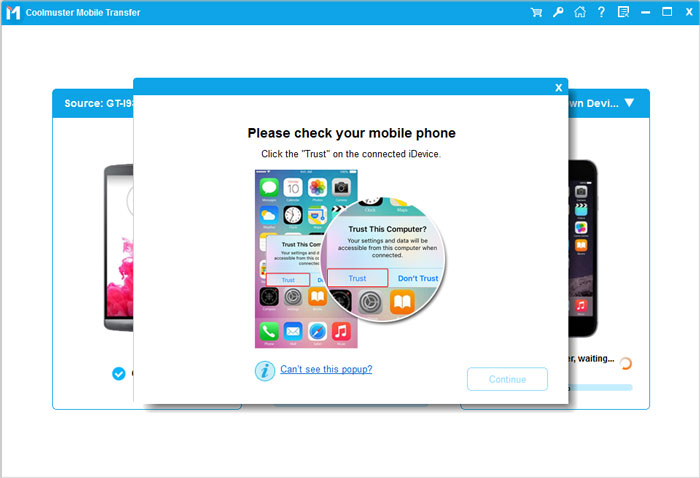
02Connect both iPhones to your computer using USB cables. Tap "Trust" and confirm with your password to grant the computer access to your iPhone's settings and data while connected.
03Select the Contacts option and choose the contacts you want to share. Click "Start Copy" button, and transfer the contacts.
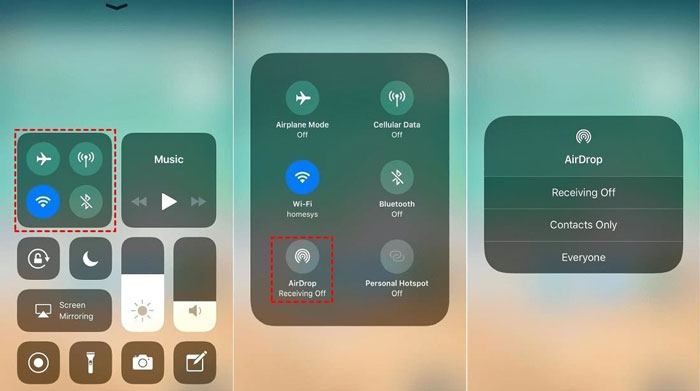
AirDrop is an excellent way to share contacts between iPhones quickly. Here's how you can do it:
Step 1. Make sure that AirDrop is enabled on your iPhone. To do this, swipe up from the bottom of the screen to open Control Center and tap the AirDrop icon. Choose either "Contacts Only" or "Everyone".
Step 2. Open the Contacts app and select the contact you want to share.
Step 3. Tap the "Share Contact" option at the bottom of the screen.
Step 4. Choose AirDrop from the list of options.
Step 5. Select the recipient's device from the AirDrop list. Once they accept the transfer, the contact will appear in their Contacts app.
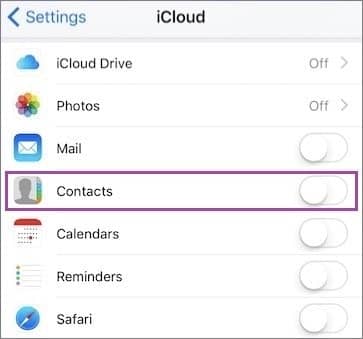
iCloud is Apple's cloud-based storage and synchronization service that allows users to store their data, including contacts, on Apple's servers. iCloud enables effortless synchronization of your contacts across all your Apple devices, such as iPhones, iPads, and Macs. Next, we'll show you how to share contacts between iPhones using iCloud.
Step 1. Enable iCloud on Both iPhones
The first step is to ensure that both iPhones have iCloud enabled. To do this:
Step 2. Merge Contacts
If you have multiple contacts on each iPhone, you'll want to merge them to avoid duplicate entries. To do this:
Step 3. Wait for iCloud to Sync
Once you've enabled iCloud on both iPhones and merged your contacts, you'll need to wait for iCloud to sync the contacts between the two devices. This may take some minutes, depending on how many contacts you have.
Step 4. Verify that Contacts are Synced
To verify that the contacts have been synced, go to the Contacts app on each iPhone and make sure that all the contacts are present. You can also make changes to a contact on one iPhone and verify that the changes are reflected on the other iPhone.
Step 5. Keep iCloud Synced
To ensure that your contacts stay synced between the two iPhones, you'll need to make sure that iCloud is always enabled on both devices.
Additionally, any changes made to a contact on one iPhone should be made on the other iPhone as well to keep the contacts consistent.
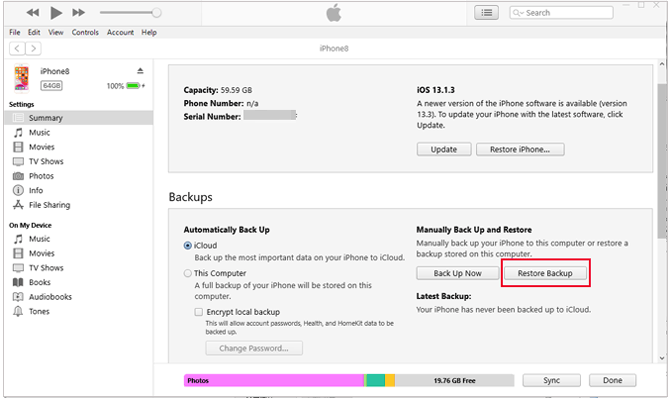
iTunes offers you the solution to transfer files between Apple devices. You can follow the instructions below to transfer all your contacts from iPhone to iPhone.
Step 1. Connect your old iPhone to computer and then run iTunes.
Step 2. Tap the device icon and then tap Summary.
Step 3. Select "This Computer" and then click "Back Up Now". After the process is finished, you can eject your iPhone from computer.
Step 4. Connect your new iPhone to computer and then click the device icon and tap "Summary".
Step 5. Click "Restore Backup" and then select the backup that was created just now to restore to your new iPhone.
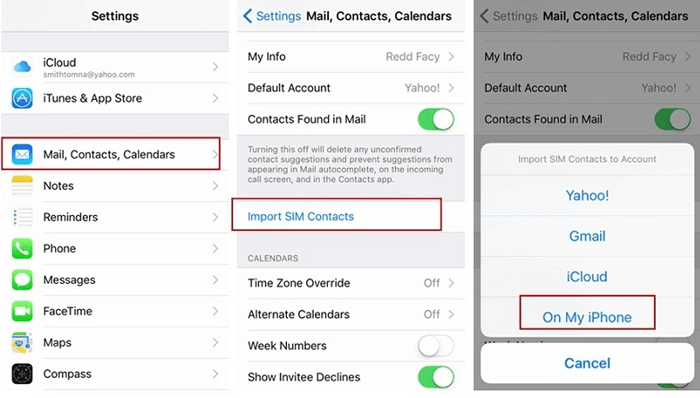
If you have some contacts stored on your SIM card, here's how to import contacts from SIM card to your iPhone:
Step 1. On your iPhone, open the Settings app > tap "Mail, Contacts, Calendars".
Step 2. Tap "Import SIM Contacts".
Step 3. Save the contacts to the location you want.
In conclusion, sharing contacts on your iPhone is a breeze, and there are several ways to do it. Among all these methods, Coolmuster Mobile Transfer is the best way to share all contacts on iPhone. The speed is very fast and you can see the transferring bar during the process. By following the steps outlined in this article, you can quickly and easily share contact information with anyone you want.
Related Articles:
How to Transfer Contacts from iPhone to Android [Full Guide]
14 Amazing Tricks to Fix iPhone Contacts Missing Names (Comprehensive Guide)
How to Transfer Contacts from One Apple ID to Another without Trouble


