
How to Transfer Music from iPod to iPad? 6 Easy & Quick Ways

The iPad is a more advanced and popular device than the iPod because it has a larger screen and better video and photo functions. Do you have a new iPad but don't want to part ways with the music collection on your old iPod? How to transfer music from an iPod to an iPad? This is one of the commonly asked questions by Apple users.
That's why we have prepared this article to give you some insights on transferring music from iPod to iPad. With just a few easy steps, you can transfer all your beloved tunes to your iPad and wallow in those thrilling melodies. Read on to learn how to sync iPod music to an iPad.
The first hassle-free way to copy iPod music to iPad is by using iPod to iPad Transfer. This app allows you to move music files between your iOS devices. Besides, it's a superb data management tool worth your time. For instance, you can transfer music to your computer, sync between iOS devices, and manage them freely between iDevices with just a click of a button.
Apart from music, iPod to iPad Transfer can also back up all your important files, such as photos, contacts, music, messages, calendars, videos, eBooks, notes, Safari, and call logs with just a few clicks. Unlike traditional methods like iTunes, this tool offers an effortless way to transfer files between your iPhone, iPad, iPod, computer, and iTunes. The key features of iPod to iPad Transfer are as follows:
Click the button below to download a free trial.
Here's how to use iPod to iPad Transfer to copy iPod music files and move them to iPad:
01Download, install, and launch iPod to iPad Transfer on your PC/Mac. Then, use a USB cable to connect iPod and iPad devices to the computer.
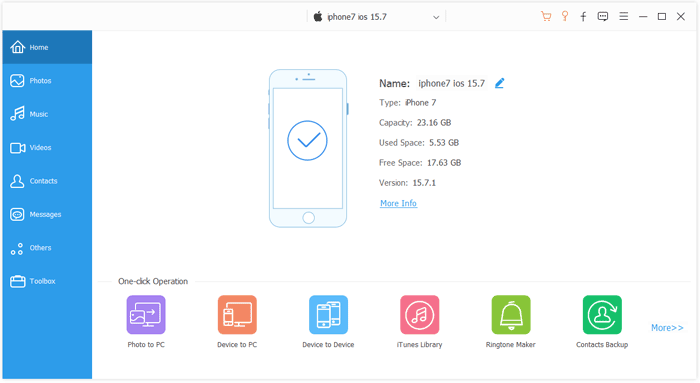
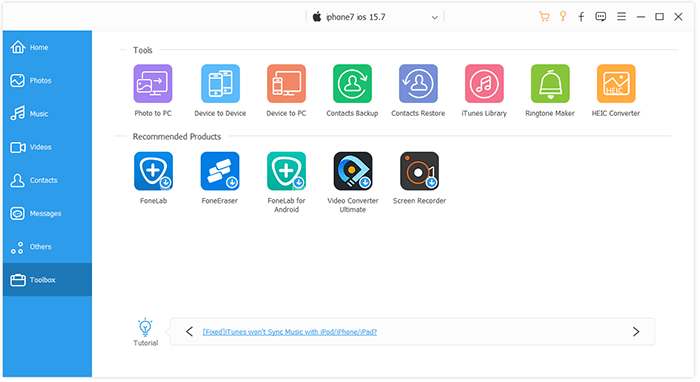
02Choose the "Toolbox" option on the left panel and select "Phone to Phone".
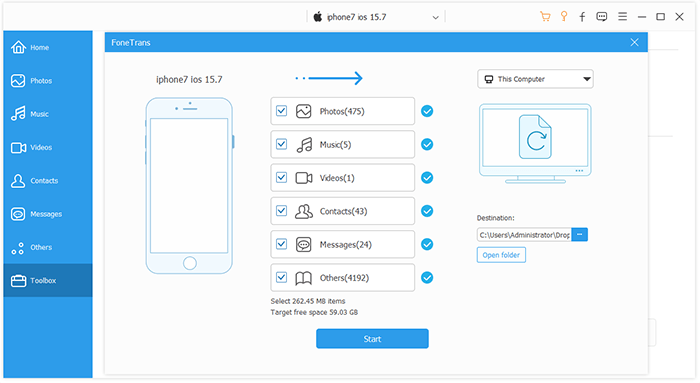
03Next, tick the Music file to export to iPad. Choose the destination location and folder. After that, hit the "Start" button and export all music files to iPad.
Have you been looking for a way to transfer your favorite tunes from your iPod to your iPad without a computer but can't get your hands on a good approach? You can opt for wireless data transfers. One way to do that is to use AirDrop. Not only is it free, but it's an efficient way to share a few songs. However, if you've got a whole music library to transfer, be prepared to spend more time. Here's a step-by-step guide to getting your iPod music transferred to your iPad through AirDrop:
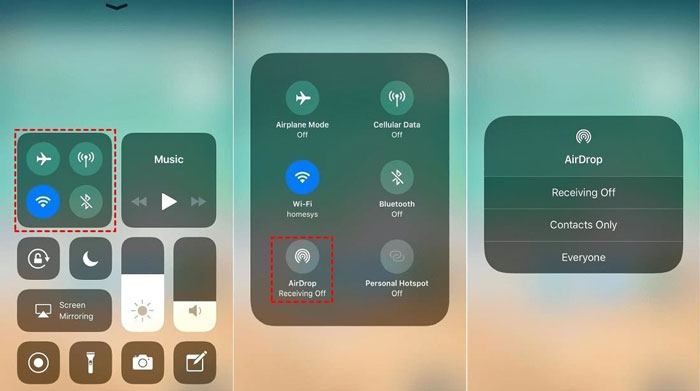
Step 1. Locate the AirDrop feature on your devices. Start by swiping from the bottom of the screen to bring down the Control Center. Now, turn on the AirDrop option. This will automatically enable Bluetooth and WiFi on both devices.
Step 2. To share your favorite song using AirDrop, open the music application on your iPod and choose the song you want to move.
Step 3. Now tap on the three dots button and see the song detail. Choose "Share Song" and select "AirDrop" app as a feature option.
Step 4. Select the device to receive.
Step 5. To receive music, click "Accept" on your iPad device. Remember, you must follow this process to share more music files.
Note:However, only music purchased from the Apple music store can be transferred through AirDrop.
Another convenient way to get the purchased songs from iPod to iPad is to use the iTunes Store. The process is quick and only requires a few taps on your devices. Once you successfully share the files, you can enjoy listening to your entire music library on your new iPad device. Before you start, ensure you've logged into your devices with the same account you used to purchase music from iTunes Store. After that, sit back and wait for the sync process to complete. It's that easy. Here are the steps to follow:
Step 1. Log into your iPad with the Apple ID used on your iPod.
Step 2. Next, open the iTunes Store application, click on the three-dot menu at the screen's lower right, and choose "Purchased".
Step 3. Click "Music" and choose "Not On This iPod".
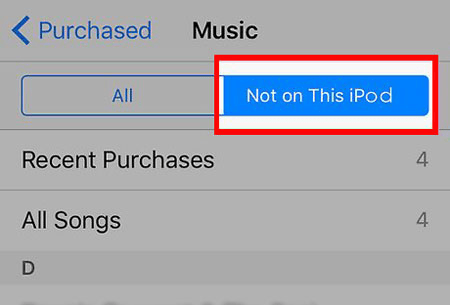
Step 4. To download songs to your iPad, choose your preferred playlist or song and click the "All Songs" button. After that, click on the download tab.
Are you an avid Apple Music listener? You'll be thrilled to know that transferring your songs from your old iPod to a new iPad is now a breeze, thanks to the magical syncing powers of the music library. You'll hardly have to lift a finger; you only have to ensure the settings are correctly set up. But you should use the same Apple ID on both devices to allow the files to copy from Apple Music. Here are the steps you can use to copy iPod music to iPad using Apple Music:
Step 1. Before you start, ensure you've subscribed to Apple Music on your iPod.
Step 2. Sign into your iPad using the Apple ID that was used to purchase an Apple Music subscription.
Step 3. To transfer your music to your iPad, make sure to turn on the "iCloud Music Library" or "Sync Library" in the "Settings" and "Music" sections of both your devices.
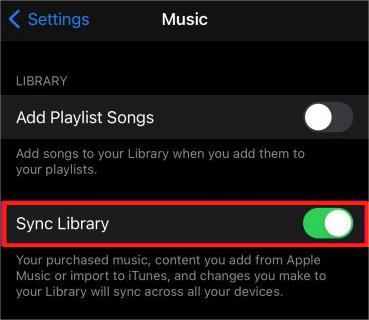
Step 4. Once syncing is completed, you can open the Music app to view the songs.
Certain cloud-based storage services allow for the transfer of music between iOS devices. One such service is Dropbox, which can be accessed using an iPod touch and iPad. You can use Dropbox to copy songs from iPod to iPad without using iTunes. Here's how:
Step 1. Install Dropbox on both devices and sign in using the same account.
Step 2. Open the Dropbox app on iPod and click on "Add Files". Select the songs you want to transfer and click "Upload".
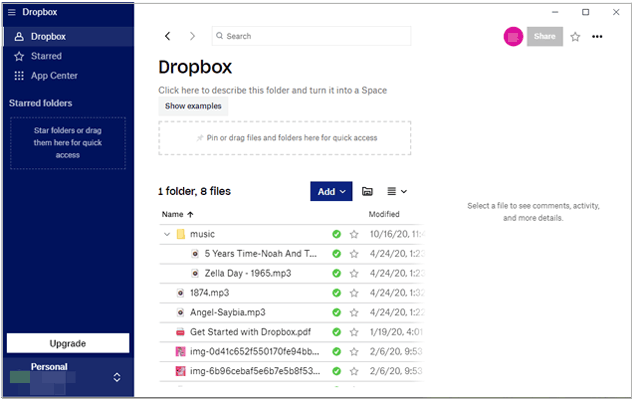
Step 3. Launch Dropbox on your iPad, then wait for the songs to appear in the folder. You can now start listening to music and save when you want to.
There are some ways to transfer music from iPad to iPod. If needed, you can click the below link.
How to Transfer Music from iPad to iPod [Simple & Reliable]Another way to move some of your favorite tunes from your iPod to your iPad in iTunes. It's an easy process that requires little input. You must sync your iPod songs to iTunes and then sync that music onto your iPad. Just keep in mind that your iPad's iOS version has to be higher than your iPod's. Your iTunes version should be up to date, and Find My iPhone should be disabled. When the conditions are met, the next procedure will be smooth sailing.
Step 1. Launch iTunes and head to the Store menu. Select "Authorize This computer".
Step 2. Find the "Devices" option and click "Transfer Purchases from iPad" to transfer your iPod purchases to the iTunes library.
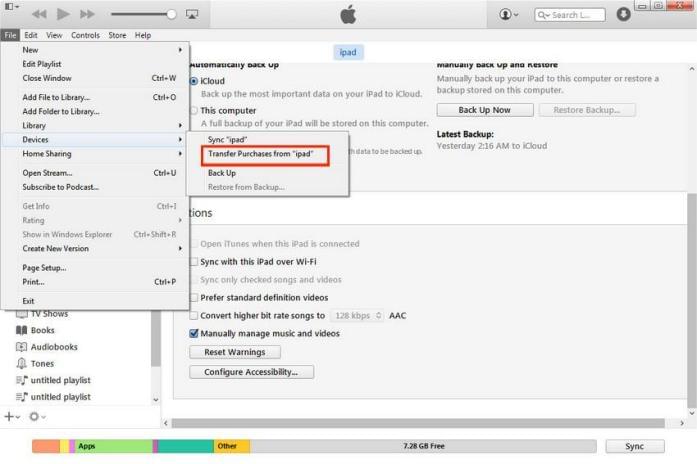
Step 3. Since you have migrated the iTunes purchases to the iTunes library, now connect your iPad to your computer and plug it in to sync iTunes purchases to your iPad.
How can I transfer my music from iPod to iPad? Nothing should frustrate you now when migrating music files from iPod to iPad. You have enough methods to help you migrate iPod tunes to iPad. There are alternative methods that are sure to make the process easier and more efficient. Plus, these methods can also help you download music files from your iPod to your computer for backup.
For optimal results, use iPod to iPad Transfer. It simplifies the process of file transfer thanks to its simple-to-use interface. Besides, it comes with file size limits, and you are sure to transfer all your songs to your iPad in just one touch.
Related Articles:
How to Transfer Music from iPod to Computer [7 Easy Ways]
How to Put Music on iPod without iTunes? (4 Effective Ways)
How to Transfer Music from iPod to iPhone Easily? (3 Simplest Ways)
10 Best iPod Transfer Software to Transfer Files from iPod to PC with Ease