
How to Transfer Ringtones from iPhone to iPhone? (iPhone 16 Included)

The iPhone 16 is coming. While switching from your old iPhone to the iPhone 16, you may want to transfer ringtones to your new iPhone. Then, iTunes may occur to you when it comes to sending ringtones to your iPhone. In the past, iTunes did this job. However, since it updated to iTunes 12.7, transferring ringtones to iPhone has not been available on iTunes. So, you have to find other ways to transfer ringtones from iPhone to iPhone. In this post, we offer you 5 effective ways. Besides, you will also learn how to make a custom ringtone for your iPhone by yourself.
iPhone Music Transfer is the best way to share ringtones from iPhone to iPhone. It is an efficient mobile data transfer tool that supports the transfer of various file types, not just ringtones. Whether they are purchased or unpurchased ringtones, this software can easily transfer them. Furthermore, it provides 100% data security during data transmission.
What can iPhone Music Transfer do for you?
How do you transfer ringtones from iPhone to iPhone? Follow the guide:
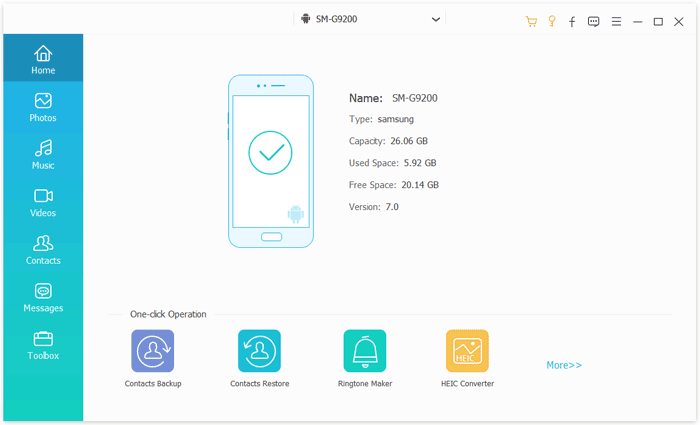
01After downloading and installing the program on your computer, connect both iPhones to your PC using USB cables. The app will then automatically recognize your devices and display their information on the interface.
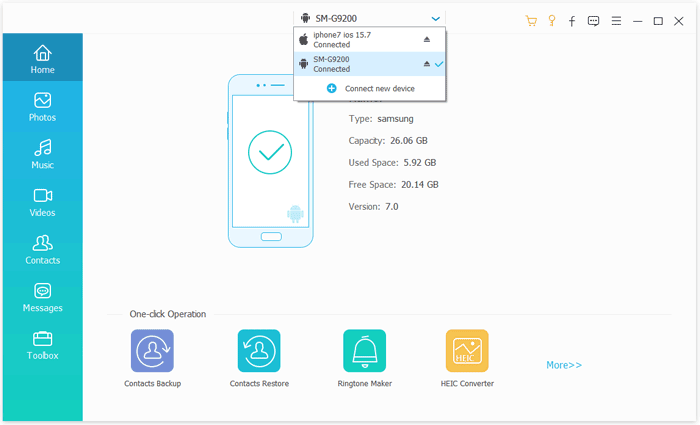
02Make sure your source phone is displayed in the middle of the top Device list. If not, simply click the dropdown list to select your source phone.
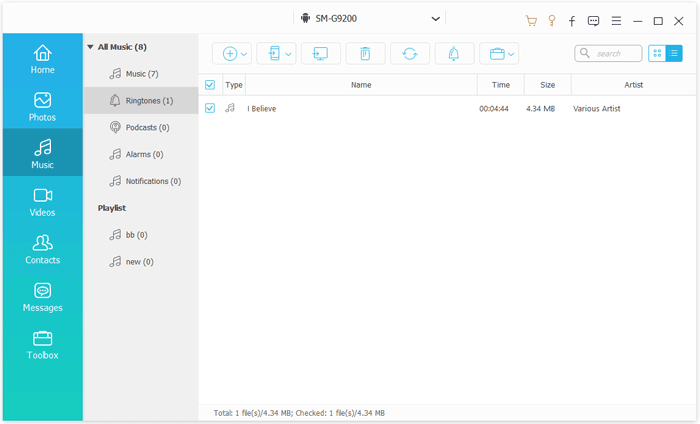
03Select the broad category of "Music", then the subcategory of "Ringtones", and choose the ringtones you wish to transfer. Afterward, click "Export to Device" and select the new iPhone from the list. The transfer task will be completed shortly.
Airdrop is a convenient Apple feature that allows you to share files wirelessly between Apple devices. It needs to enable Bluetooth and Wi-Fi to find and connect the two devices. If you do not mind its slowness in transferring, you can select this way.
The steps are as below:
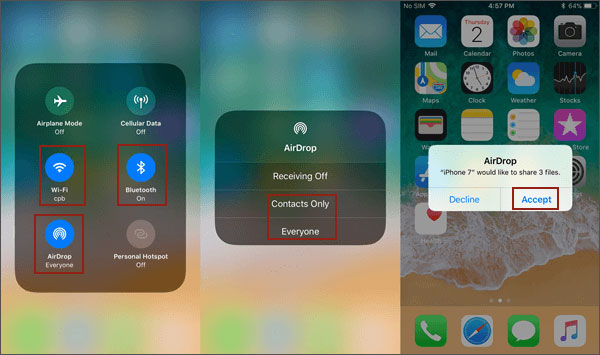
Step 1. Place both iPhones close and enable Bluetooth, Wi-Fi, and AirDrop from the Control Center: Swipe up (or down on some iOS versions) to launch the "Control Center" > Tap the "Wi-Fi", "Bluetooth", and "AirDrop" icon to enable them > Select "Contacts Only" or "Everyone" from the pop-up window.
Alternatively, you can also turn on the three features from "Settings" > "General" > head over to "Bluetooth", "Wi-Fi", and "AirDrop" in turns and toggle them on.
Step 2. Open the Music app on the source iPhone, select the ringtones, and tap the "Share" button to display the ringtones' detailed information.
Step 3. Next, hit the target iPhone's name and send it over. Click the "Accept" option on the target iPhone to receive the ringtones.
Read More: If you want to transfer songs from iPhone to iPhone using AirDrop, here are some tips for you.
If you still use the old versions of iTunes on your computer, you can easily sync music from iPhone to iPhone with iTunes. However, managing ringtones has been removed from iTunes 12.7 and higher versions forever. Before you start the process, please note that this way only supports purchased ringtones. What's more, the syncing process will erase the existing media files on the target iPhone, like ringtones, music, videos, etc.
How to transfer ringtones on iPhone by iTunes?
Step 1. Start your computer, launch iTunes, and click the "Edit" option on the Apple menu.
Step 2. Next, click "Preferences" > "Devices" > "Prevent iPods, iPhones, and iPads from syncing automatically".
Step 3. After setting up, connect the source iPhone to the computer via a USB cable.
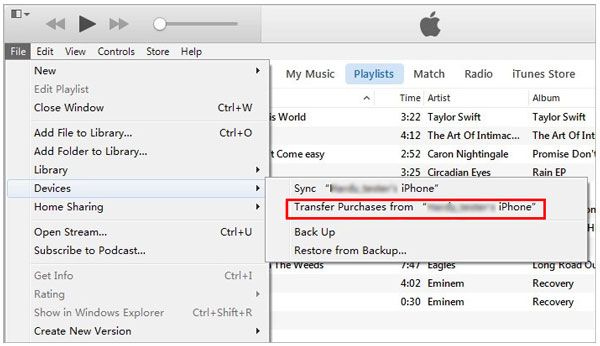
Step 4. Then, tap the "File" option from the upper-left corner > "Device" > "Transfer Purchases from iPhone" > Hit the "Apply" option in the lower-right corner. iTunes will sync the purchased ringtones and other media files to the iTunes library. After that, disconnect the source iPhone from the computer.
Step 5. Connect the target iPhone to the computer and click the "iPhone" icon at the top left corner of the iTunes interface. Then, select the "Tones" option from the left panel > tick the "Sync Tones" option > choose to sync "All tones" or "Selected tones" > Hit the "Apply" button below.
If you wish to transfer ringtones from iPhone to iPhone wirelessly, you can select one cloud service, like Dropbox or Microsoft OneDrive. To use this way, you can also back up ringtones to the cloud safely. Here, we are introducing how to do it with OneDrive.
Follow these tips to share ringtones from iPhone to iPhone directly:
Step 1. Install Microsoft OneDrive from the App Store and sign in to it on both iPhones.
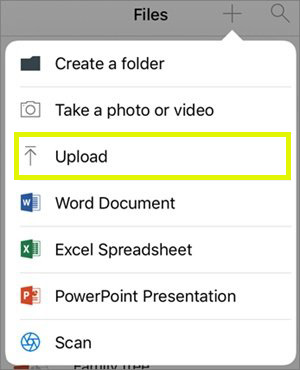
Step 2. Open OneDrive on the source iPhone, tap the "+" icon > "Upload", and select the ringtones you want to transfer from the device storage. After selection, tap the "Upload" icon to begin the transfer process.
Step 3. Run OneDrive on the target iPhone and refresh the interface. Then, navigate to the file to which you uploaded the ringtones and download the ringtones to the local storage on the target iPhone.
Emailing ringtones as attachments is another feasible option, but it can result in reduced sound quality if not done correctly. Here are these steps:
Step 1. Open the Mail app on the old iPhone, create a new email, and add the ringtone file as an attachment.
Step 2. Send the email to your own mailbox.
Step 3. Open the email on the new iPhone and download the ringtone file in the attachment.
Now you know how to transfer ringtones from iPhone to iPhone. If you discover other beautiful music and wish to make it your ringtone, you can select either way below to make a custom ringtone for your new iPhone.
The official way to set a custom ringtone on an iPhone is through GarageBand, a digital music creation software developed by Apple.
Step 1. Download GarageBand from the App Store, open the app, tap the "+" icon in the top-right corner, and then double-tap on the "AUDIO RECORDER" interface.
Step 2. Tap the "View" button, select "Loop Browser", and click on "Music" to choose your song.
Step 3. Drag the song to the timeline, trim, and edit it to create a 30-second ringtone.
Step 4. Tap the inverted triangle icon, choose "My Songs" to save it, press on your song, hit the "Share" button, and then select "Ringtone".
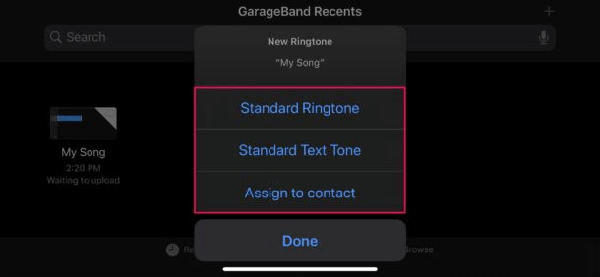
Step 5. Name your ringtone, tap "Use Sound as.."., choose between "Standard Ringtone", "Standard Text Tone", or "Assign to contact", and then tap "Done".
To create a custom ringtone with iTunes, you will need to make sure that your favorite music is already in your iTunes library. If it isn't, you can sync the music to the iTunes library first. (Launch iTunes > click the "File" option on the Apple menu > tap "Add to iTunes Library" > select your favorite music > hit "Open".)
Then, you can try these steps:
Step 1. Run iTunes on your computer.
Step 2. Find the song you want in the iTunes library > right-click it > hit "Get Info" (or "Show Info") > select "Options" > check the "Start" and "Stop" options and enter the time when you want to start or stop > tap "OK".
Step 3. After that, ensure that the track is still selected, then click "File" > "Convert" > "Create AAC Version" > right-click the new track in iTunes and select "Show in Windows Explorer" to locate the new AAC file on your computer > head to "View" > "File Name Extensions" to make the file extensions appear in the File Explorer.
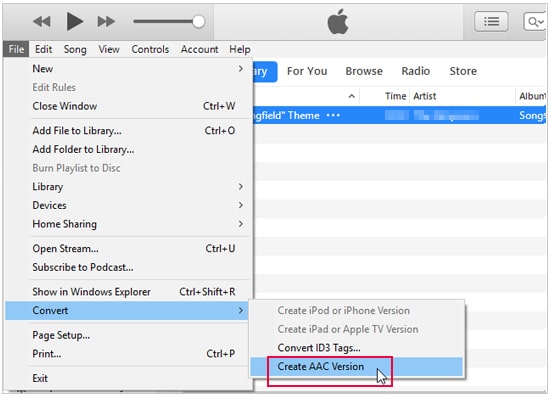
Step 4. Right-click the track and select "Rename", and you will see the file extension. Note that .m4r is for iPhone use, and .ogg is for Android use. At last, you can send this ringtone to your iPhone. That's done!
Now you have got to know how to transfer ringtones from iPhone to iPhone. To fast transfer ringtones to your new iPhone with the minimum steps, we highly recommend you use iPhone Music Transfer. It's easy and safe. You can give it a try. If you run into difficulties when using, please leave a comment below.
Related Articles:
How to Transfer Ringtones from iPhone to Computer with/without iTunes?
How to Add Ringtones to iPhone without iTunes & Make a Custom Ringtones on iPhone
How to Add Ringtones to iPhone 16/15/14/13/12 from Computer (Best Ever)
[SOLVED] How to Make MP3 Ringtones on iPhone 16/15/14/13/12/11/X Easily?