
5 Ways to Make Picture File Size Smaller without Quality Loss

Sharing and storing images has become an integral part of our lives. However, there is one common challenge that we all face when it comes to sharing images: the size of the picture files. Large image files can be cumbersome to send and may even cause issues when uploading to websites or sending them through email. It is crucial to make picture file size smaller.
By reducing the size of picture files, you can enjoy numerous benefits, including faster uploads, reduced storage requirements, and improved website loading times. This article will explore the various methods of how to make picture file size smaller, ensuring that you can easily manage and share your images without compromising on quality. (Want to share your iPhone photos with your friends?)
Q1. What are the benefits of making picture file sizes smaller?
Reducing the file size of pictures offers several advantages. Firstly, it allows for faster uploads, making it easier to share images on social media platforms or via email. Additionally, smaller file sizes consume less storage space, enabling you to store more images on your devices or cloud storage. Lastly, optimizing file sizes can enhance website loading times, ensuring a smooth user experience for visitors.
Q2. What is the relationship between file size and image quality?
While it is essential to reduce file sizes, it is equally important to maintain image quality. The relationship between file size and image quality is often a delicate balance. Compression techniques can be employed to reduce file sizes, but excessive compression can result in a loss of image detail and clarity. Therefore, it is crucial to choose appropriate methods and tools that minimize file size while preserving image quality.
Read More: Your image is overly compressed? Here are the troubleshooting tips.
Reducing the size of picture files is an essential step in optimizing images for various purposes, such as web pages, email attachments, or storage limitations. In this second part of the guide, we will delve into the process of reducing the size of picture files, exploring different techniques and tools that can be employed.
If you're using Windows as your operating system, you can easily reduce the file size of your images using the built-in Windows Photos app. Windows Photo provides a simple and effective way to reduce picture file sizes without compromising quality. Windows Photos indeed provides three ways to process images, including directly cropping the desired part, resizing the image, and changing the format. Here's a brief explanation of these three methods:
Option 1. Crop Desired Part
Step 1. From the context menu, select "Open with" and choose "Photos". Then select "Edit & Create".
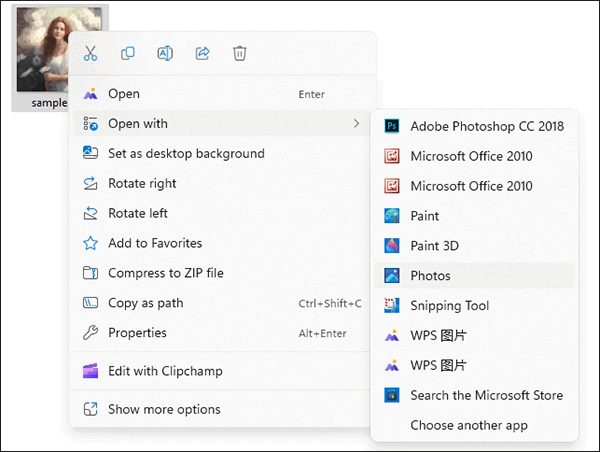
Step 2. Choose the "Crop" option and then adjust the size and position of the cropping box to select the part you want to keep.
Step 3. Click "Save a copy" to save the cropped image.
Option 2. Resize the Image
Step 1. Open your image and select "Edit & Create".
Step 2. Choose the "Resize" option, and then you can select different predefined sizes or customize the dimensions.
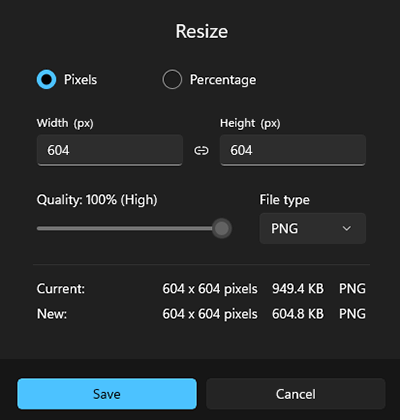
Step 3. Click "Save" to save the resized image.
Option 3. Change the Format
Step 1. Open the image and tap three dots.
Step 2. Select the option "Save as" and subsequently choose the desired target format, such as switching from JPEG to PNG or another supported format.
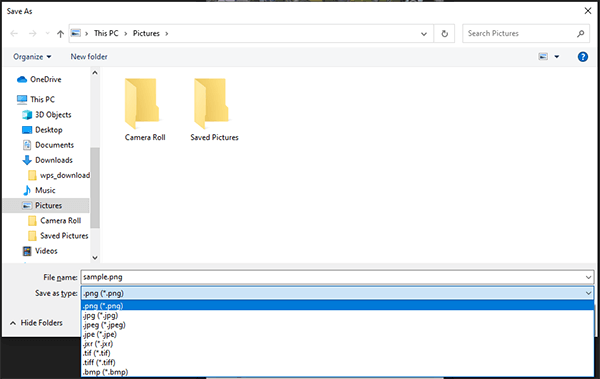
Step 3. To preserve the image in the modified format, select the "Save" option.
Windows Paint, another native Windows application, can be used to reduce the file size of images through resizing and saving in an optimized format. Here's how to make a photo a smaller file size:
Option 1. Resize the Image
Step 1. Open the image you want to edit using Windows Paint. Go to the "Home" tab in the top menu. Click on "Resize", and a dialog box will appear.
Step 2. In the "Resize and Skew" dialog box, adjust the dimensions of the image. Be sure to maintain the aspect ratio by checking the "Maintain aspect ratio" box. You can specify a percentage by which you want to reduce the image's size or enter custom dimensions in pixels.
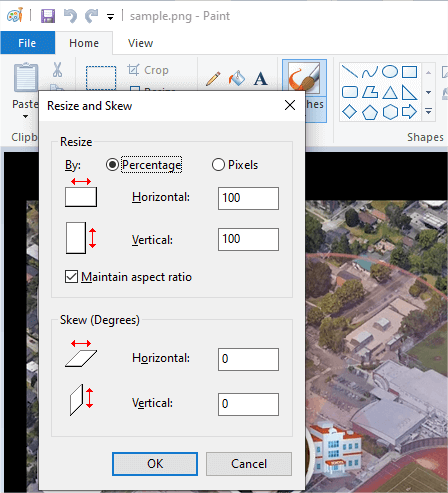
Step 3. After resizing, click the "File" menu and select "Save" or "Save as". Specify the location where you want to save the smaller image and click "Save".
Option 2. Change the Format
Step 1. Open the image you want to edit in Windows Paint. Navigate to the menu labeled "File" and choose the option "Save as".
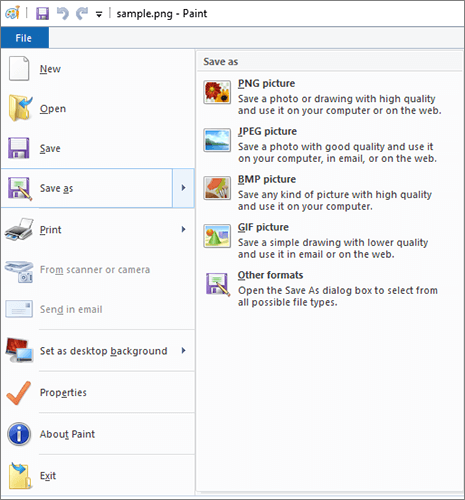
Step 2. Choose a different file format that supports compression, such as JPEG.
Step 3. Specify the location where you want to save the image in the new format and click "Save".
Can't Miss: Do you intend to copy Android photos to your computer for file size reduction? Click the link for solutions.
On a Mac, Preview is a powerful image viewing and editing tool that offers several ways to reduce the size of image files. It offers you control over dimensions, formats, and image quality to help you strike the right balance between size and image quality for your specific needs. Here are some common methods of how to make photos file size smaller:
Option 1. Adjust Image Dimensions
Step 1. Locate the image on your Mac, right-click on it, select "Open With", then choose "Preview".
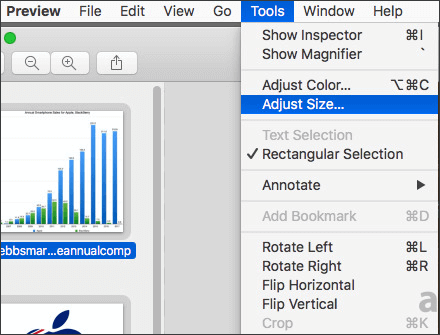
Step 2. Go to the "Tools" menu and select the "Adjust Size" option.
Step 3. In the pop-up window, you can manually input new dimensions or choose from various preset sizes. Typically, reducing the image dimensions decreases file size.
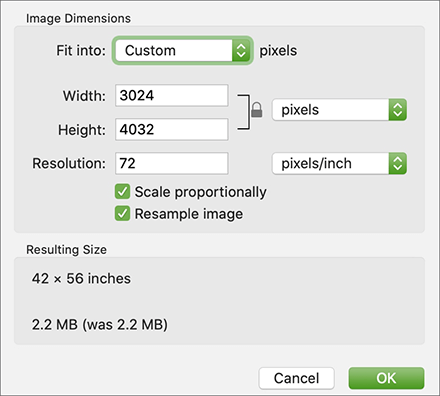
Step 4. Tap "OK" to save the smaller file.
Option 2. Export in Different Formats
Step 1. Open the image and select "File" > "Export" > "Export As".
Step 2. In the pop-up dialog, choose a different file format, often a lossy format like JPEG, which can significantly reduce file size.
Step 3. Adjust format-specific options, then click "Save".
Option 3. Adjust Image Quality
Step 1. Once the image is open in Preview, go to the "File" menu and select "Export" > "Export As".
Step 2. In the export dialog box, choose the format you want to save the image in. For example, you can select "JPEG" from the Format drop-down menu.
Step 3. Next to the Quality option, you'll see a slider. Drag the slider left to decrease the quality and reduce the file size, or drag it right to increase the quality and file size. As you move the slider, you'll typically see a preview of how the image quality will be affected.
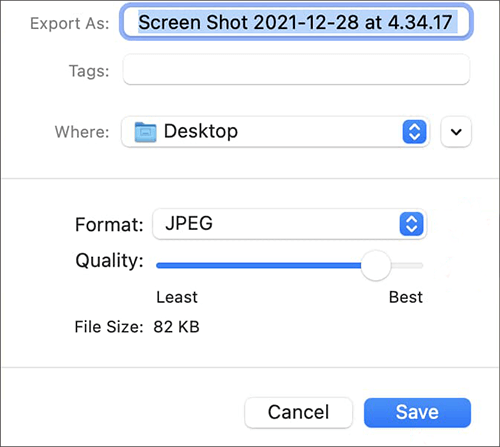
Step 4. After adjusting the image quality to your preference, choose the location where you want to save the image and provide a new name if necessary. Then, click "Save".
Adobe Photoshop, a professional image editing software, provides advanced tools to reduce picture file sizes while maintaining exceptional image quality. This method involves utilizing Photoshop's compression techniques and exporting options. Adobe Photoshop offers four methods to make images smaller: cropping, resizing, changing the format, and compressing. Here's how to make a picture a smaller file size using Adobe Photoshop:
Option 1. Crop the Image
Step 1. Open your image in Adobe Photoshop.
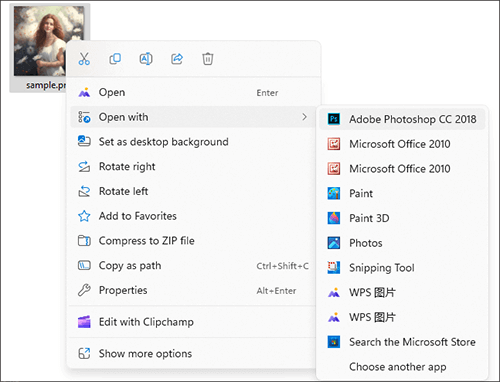
Step 2. Use the Crop Tool to select the portion of the image you want to keep, removing unnecessary areas.
Step 3. Once you've defined the crop area, press "Enter" to apply the crop.
Step 4. Save the cropped image by going to "File" > "Save".
Option 2. Resize the Image
Step 1. Open your image in Adobe Photoshop. Go to the "Image" menu and select "Image Size".
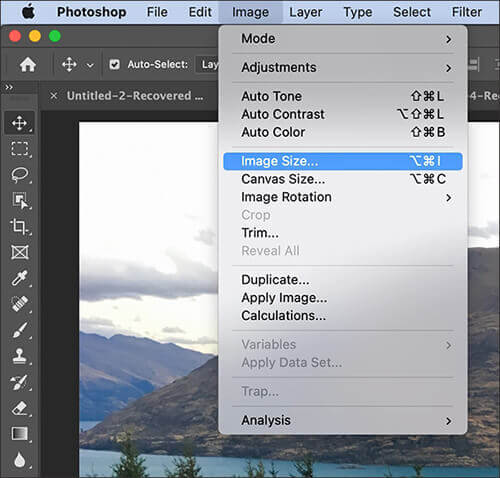
Step 2. In the "Image Size" dialog, adjust the dimensions to reduce the image's size while maintaining the aspect ratio.
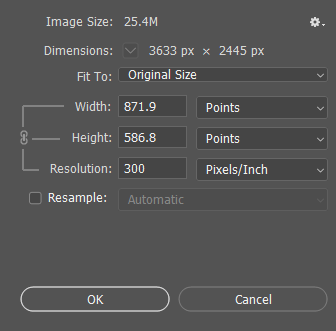
Step 3. Click "OK" to apply the resizing and save the resized image.
Option 3. Change the Format
Step 1. Open your image in Adobe Photoshop. Go to the "File" menu and select "Export" > "Save for Web".
Step 2. In the "Save As" dialog, select a different format (e.g., from PSD to JPEG).
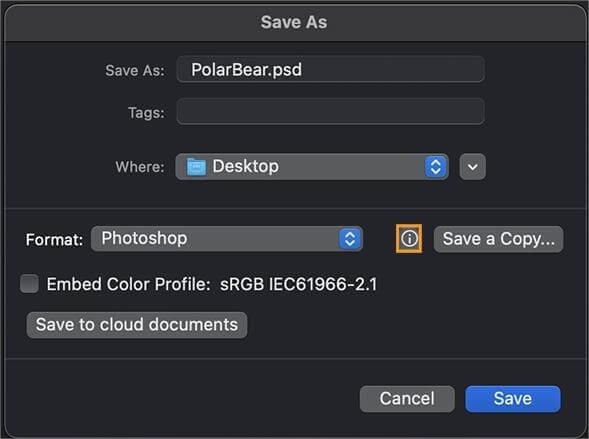
Step 3. Adjust format-specific settings and click "Save" to save the image in the new format.
Option 4. Compress the Image
Step 1. Open your image in Adobe Photoshop. Go to the "File" menu and "Export" > "Save for Web".
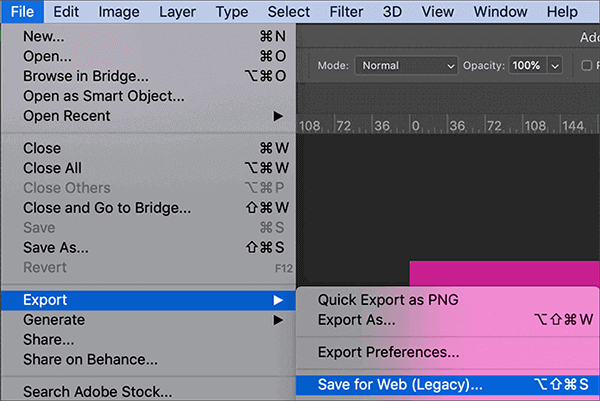
Step 2. In the "Save for Web" dialog, select the desired format (e.g., JPEG) and adjust the compression settings. Lowering the quality or increasing compression will reduce the file size.
Step 3. Preview the image with the chosen settings, and then click "Save" to save the compressed image.
In addition to the versatile tools mentioned earlier that can make images smaller, numerous online tools can achieve this goal, such as TinyPNG, Img2Go, Compress2Go, and others. Let's take TinyPNG as an example.
TinyPNG is an online tool that specializes in compressing and reducing the file size of images while maintaining good quality. Here's how you can make a picture file size smaller using TinyPNG:
Step 1. Open your web browser and go to the TinyPNG website. Click on the "Drop your WebP, PNG or JPEG files here!" box or simply drag and drop your image file onto the webpage.

Step 2. TinyPNG will automatically compress the uploaded images, reducing its file size. You'll see a progress bar indicating the compression process.
Step 3. Once the compression is complete, TinyPNG will display the original and compressed file sizes. It will also provide a download button. Click the "Download" button to save the compressed image to your computer.
In conclusion, making picture file sizes smaller is essential for efficient online sharing and storage. Whether you are a Windows or Mac user, by resizing, compressing, converting formats, cropping, and using optimization tools, you can significantly reduce image file sizes without sacrificing quality. Experiment with these methods and find the one that works best for your specific needs. With the right techniques, you can strike the perfect balance between a small file size and an image that retains its visual appeal.
Related Articles:
8 Popular Methods to Compress JPEG Files Easily [Online/Offline]
How to Compress Photo on iPhone? 5 Proven Ways to Reduce Image Size
Top 12 Best HEIC to JPG Converter on Windows/Mac/Online [Latest Update]
How to Convert Photo to PDF: 3 Online and 3 Offline Methods Unveiled