Losing important files on your MacBook can be a frustrating and stressful experience. Whether it's due to accidental deletion, system crashes, or hardware failures, the loss of critical data can be overwhelming. Fortunately, MacBook users have multiple methods to recover lost data, ranging from built-in recovery options to professional data recovery software. This guide explores MacBook data recovery, ensuring you have the best chance to retrieve your valuable files.

Yes, it is possible to recover data from a MacBook. The success rate of data recovery depends on several factors, including the type of data loss, the time elapsed since the loss, and the condition of the MacBook's storage drive. In many cases, even if you've deleted files or formatted your drive, the data may still be recoverable using the right tools and techniques.
Here are the best methods to recover lost data from your MacBook Pro:
One of the easiest ways to recover deleted files is by checking the Trash Bin. When you delete a file on macOS, it doesn't immediately disappear but is instead moved to the Trash, where it remains until emptied. Here is how it works:
Step 1. Click the Trash icon in the dock to open it.

Step 2. Browse through the deleted files and locate the one you need.
Step 3. Right-click on the file and select "Put Back". This will restore the file to its original location.
If you have already emptied the Trash, this method won't work, and you'll need to try other recovery options.
Does Mac have built-in data recovery? Time Machine is a built-in backup feature in macOS that allows users to restore lost files easily. If you have been using Time Machine, you can recover lost data by following these steps:
Step 1. Connect your Time Machine backup drive to your MacBook.
Step 2. Click the "Time Machine" icon in the menu bar and select "Enter Time Machine".

Step 3. Use the timeline on the right side of the screen to go back to a point before the file was lost.
Step 4. Locate the file or folder you want to restore.
Step 5. Select the file and click Restore. The file will be placed back in its original location.
Note: If Time Machine wasn't set up before the data loss, this method won't be helpful, and you'll need to try alternative recovery options.
If your files were stored in iCloud, you might be able to recover them using iCloud's built-in restoration feature. iCloud automatically syncs and stores your data, making it a potential recovery source.
Step 1. Open a web browser and go to iCloud.com.
Step 2. Sign in with your Apple ID and password.
Step 3. Click iCloud Drive and browse for your missing files. If you don't see the files in iCloud Drive, check the Recently Deleted folder.
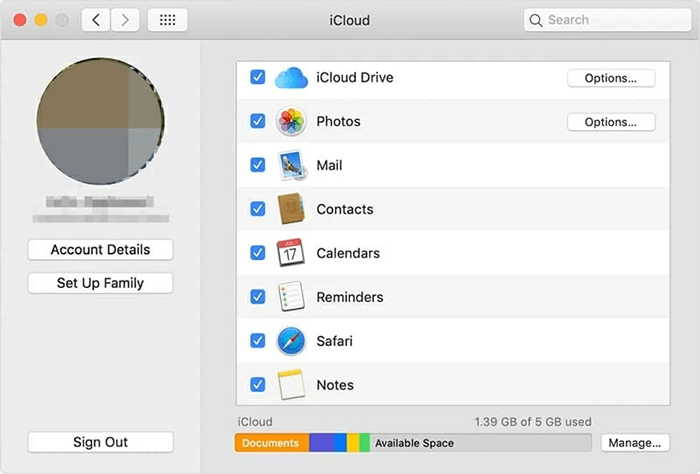
Step 4. Select the files you want to recover and click "Restore".
Note: Keep in mind that files in the Recently Deleted folder are permanently erased after 30 days, so act quickly to recover them.
If none of the built-in methods work, using professional recovery software like Coolmuster Data Recovery can be a reliable solution. Coolmuster Data Recovery is a potent tool that facilitates the recovery of lost files on both Mac and Windows systems. It conducts an in-depth scan of your entire laptop hard drive and robustly retrieves files from your notebooks, MacBooks, laptops, iBooks, and more within minutes.
Key features of Coolmuster Data Recovery:
How can I recover permanently deleted files from a Mac?
01After downloading and installing the recovery software on your Mac, launch the program and select a recovery mode from the main interface to begin the process. If you want to retrieve lost data from your Mac, you can try selecting the "Deleted Recovery" mode.
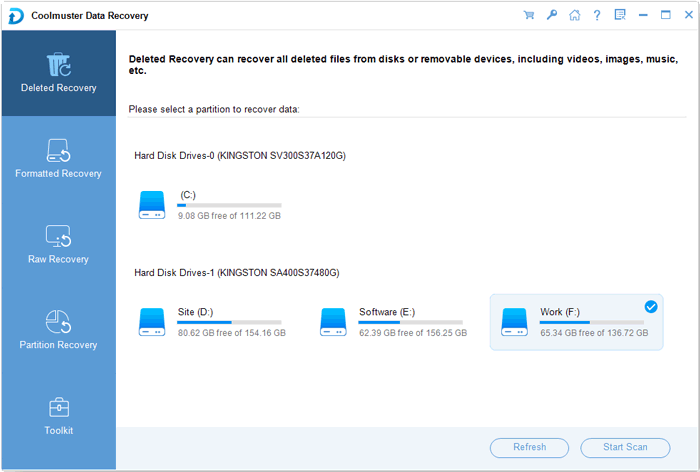
02The software will automatically detect and display all partitions on your MacBook. Simply choose the partition where the lost files were originally stored and click the "Start Scan" button to begin scanning for lost data.
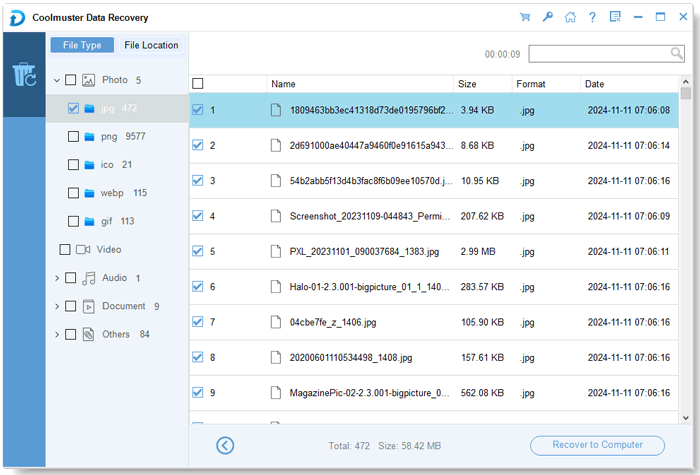
03After a short wait, the scanning process will be completed, and all found files will be displayed in categorized lists. You can preview the recovered files one by one to confirm which ones you need to restore.
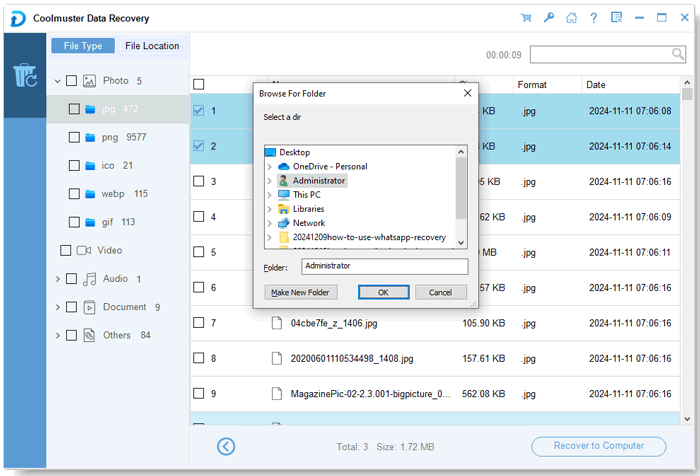
04Once you have selected the files to recover, click the "Recover to Computer" button to bring up the save path dialog. Choose a destination folder to store the recovered data, and the recovery process will begin. It is highly recommended to save the recovered files to a different partition instead of the original one to avoid overwriting lost data.
Video guide
1. How can I prevent data loss on my MacBook?
To minimize the risk of losing important files, follow these best practices:
2. What should I do immediately after losing a file?
If you realize you've lost a file, take the following steps to increase the chances of successful recovery:
Recovering lost data from a MacBook is possible with the right approach. Checking the Trash Bin, restoring from Time Machine, and using iCloud are simple built-in solutions that can help recover deleted files quickly. However, in cases where these methods do not work, Coolmuster Data Recovery offers an effective alternative for retrieving lost files from your MacBook's storage. To avoid future data loss, always maintain regular backups and be cautious when deleting files. By following these steps, you can recover important data and safeguard your MacBook against potential data loss in the future.
Related Articles:
How to Perform Laptop Data Recovery on Mac and Windows [Stepwise Guide]
[Can't-Miss] 4 Effortless Ways to Recover Deleted iMessages on Mac
[Ultimate Guide] How to Transfer Files Between iPhone and Mac
How to Transfer Photos from iPhone to Mac Using Cable or Wirelessly?


 Free Download for Mac
  Free Download for PC

