
How to Share Location on iPhone Easily? [Comprehensive Guide]

With the development of GPS technology, we can fast share location on iPhone with our family and friends. When you go outside, you can use the location sharing to let your parents and friends know you're safe. Moreover, it can also facilitate smooth communication. Besides, you can share your location on an iOS devicein different ways. Go ahead, and learn about the methods.
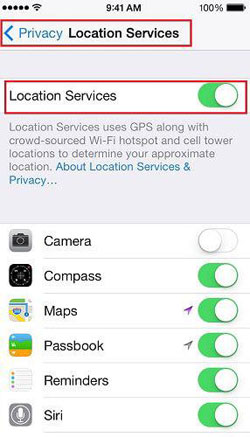
Before you can start sharing your location, ensure that Location Services are activated on your iPhone. Here's how you can do it:
Step 1. Open the "Settings" app on your iPhone.
Step 2. Scroll down and tap on "Privacy".
Step 3. Select "Location Services". Switch on the toggle at the top to enable Location Services if it's turned off.
There are different ways to share your location on an iPhone, depending on your preference and the situation. Let's explore eight popular methods:
To conveniently share your location with friends and family using Messages on an iPhone, follow these step-by-step instructions:
Step 1. Launch the "Messages" app on your iPhone. Start a new conversation by tapping the compose icon in the top-right corner or select the specific conversation with the person you want to share your location from your list of existing conversations.
Step 2. In the conversation thread, locate the "i" icon positioned in the top-right corner of the screen and tap on it. This will open the contact or conversation details. From the options that appear, select "Info".
Step 3. Scroll down on the following screen to locate the "Share My Location" option and tap on it.
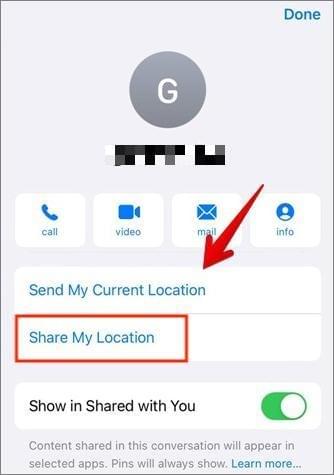
Step 4. A menu will display three options for sharing your location: "Share for One Hour", "Share Until End of Day", or "Share Indefinitely". Choose the desired duration based on how long you want to share your location.
Step 5. After selecting the duration, tap "Done" in the top-right corner of the screen.
Sharing your location on an iPhone through contact is a convenient way to let someone know where you are. Below is a detailed guide outlining the step-by-step process:
Step 1. Open the "Contacts" app on your iPhone. Choose the recipient with whom you want to share your location.
Step 2. Tap on the contact's name to open their details.
Step 3. Scroll down to find the "Share My Location" option and tap on it.
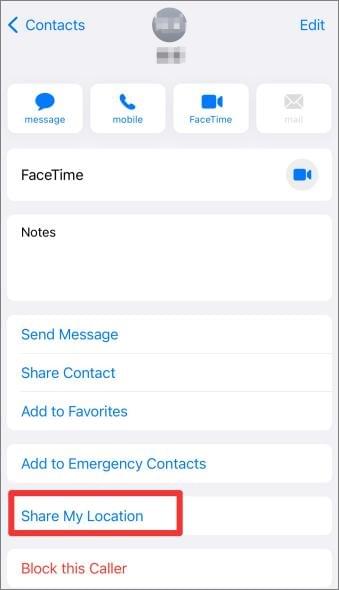
Step 4. Choose the duration for which you want to share your location with the contact (e.g., indefinitely, 1 hour, until end of day).
Step 5. Confirm your selection by tapping "Send" or a similar option.
Sending your location directly from the Apple Maps app on your iPhone is a quick and efficient way to share your precise location with someone. Here is a detailed step-by-step guide:
Step 1. Open the "Maps" app from your home screen.
Step 2. Use the search bar at the top to enter the location you want to share. You can type in an address, a point of interest, or even search for a specific business name.
Step 3. Once the location is displayed on the map, tap and hold on the map at the exact spot you want to share.
Step 4. A compact information box will emerge at the bottom of the screen, presenting details about the location. Tap on the information box to expand it.
Step 5. In the expanded information box, you will see the name of the location, its address, and various options. Look for the "Share" button and tap on it.

Step 6. A sharing menu will appear with different sharing options. You can choose to share your location through Messages, Mail, AirDrop, or other compatible apps installed on your iPhone. Select the app or method through which you want to share your location.
Sharing your location on iPhone via Google Maps is a useful alternative for users who prefer Google's mapping service. Even though Apple Maps is the default navigation app on iOS devices, you can still share your location using Google Maps by following these steps:
Step 1. Ensure Google Maps is installed on your iPhone. Download from App Store if needed.
Step 2. Launch the Google Maps app on iPhone. To determine your current location, tap on the "Go" button located at the bottom right corner of the screen.
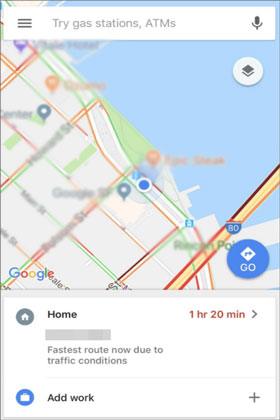
Step 3. Once your location is determined, tap the blue dot on the map to view your location details on a card at the bottom of the screen.
Step 4. Swipe up on the card to reveal additional options. Among the options, you'll see a "Share" button. Tap on it.
Step 5. A sharing menu will appear with various sharing options. Select the desired method of sharing, and a new message or email composition window will open with a link to your location in Google Maps.
Step 6. Enter the recipient's contact details or select a contact from your address book, and send the message or email.
Family Sharing allows you to share various aspects of your digital life, including your location. Here's a step-by-step guide on how to send your location using Family Sharing:
Step 1. Open the "Settings" app on your iPhone. Tap on your "Apple ID" located at the top of the settings page. Scroll down and select "Family Sharing".
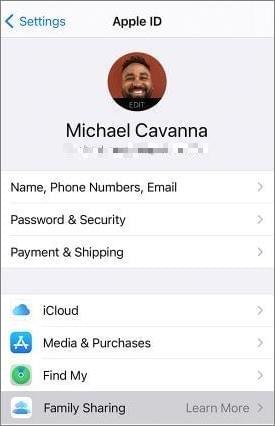
Step 2. From the list, select the friends or family members you wish to use Family Sharing with.
Step 3. Tap the blue arrow to send the invitations. The recipients will receive a text invitation to join Family Sharing.
Step 4. Once someone has accepted your invitation and you are sharing with them, go back to the "Settings" app > tap on your "Apple ID" > scroll down and select "Family Sharing" again.
Step 5. Tap on "Location Sharing" located at the bottom of the screen. You'll see an information panel about Family Sharing and your location. Tap on "Share Location".
Note: Family Sharing is compatible with other iPhones only.
To share your location on iPhone through the Find My app, you can follow these step-by-step instructions:
Step 1. Open the "Find My" app by tapping on its icon.
Step 2. At the bottom of the screen, you will see four tabs: "People", "Devices", "Items", and "Me". Tap on the "People" tab.
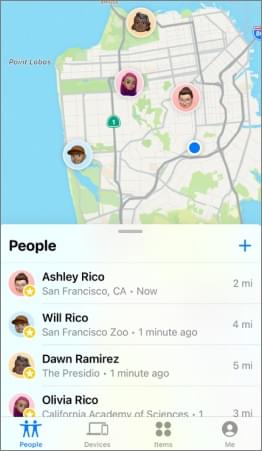
Step 3. You'll see a list of contacts who are part of your sharing circle. Locate the person you wish to share your location with and tap on their name.
Step 4. On the contact's profile page, you will find an option to share your location with them. If location sharing is already enabled, you can skip to the next step. Otherwise, tap on "Share My Location".
Step 5. Choose the desired duration for sharing your location: "Share for One Hour", "Share Until End of Day" or "Share Indefinitely". Once you've selected the sharing duration, your location will be shared with the selected contact.
Sharing your real-time location on iPhone via Facebook Messenger is an excellent method to keep your friends and family informed about your whereabouts. To share your live location through Facebook Messenger, follow these steps:
Step 1. Open the "Facebook Messenger" app from your home screen.
Step 2. Initiate a conversation with the person or group you intend to share your live location with.
Step 3. In the conversation thread, locate the "More" icon represented by four dots in the bottom toolbar and tap on it.
Step 4. From the options that appear, select "Location" from the menu.
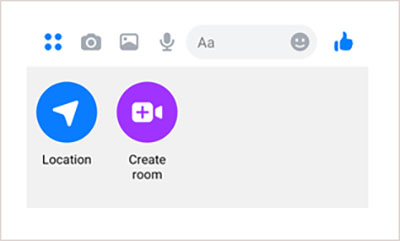
Step 5. A map will be displayed, showing your current location. Tap on the blue "Share Live Location" button at the bottom of the screen.
Step 6. A prompt will appear, requesting your confirmation to share your live location. Tap on "Share Live Location" to proceed.
Step 7. Set the duration for sharing your live location. You can choose "15 Minutes", "1 Hour", or "4 Hours" based on your preference. Facebook Messenger will now share your live location with the selected contact or group. They can see your location on the map in real-time during the specified duration.
Sharing your location with iPhone using WhatsApp is a straightforward and efficient way to inform your contacts about your whereabouts. To share your location using WhatsApp, follow these steps:
Step 1. Open the "WhatsApp Messenger" app on your iPhone.
Step 2. Start a chat with the person or group you wish to share your location with. You can either select an existing chat or create a new one.
Step 3. Tap the "+" icon located next to the text input field.
Step 4. From the menu, select "Location". On the location screen, you'll see a map with your current location marked by a red pin. You can drag the pin to adjust the exact location you want to share.
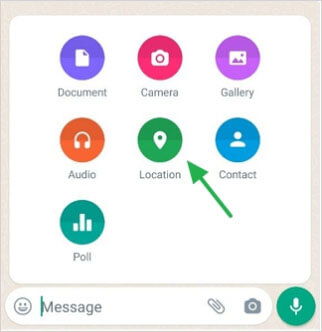
Step 5. Below the map, you have two options: "Send Your Current Location" and "Share Live Location". Select the desired option based on your preference. WhatsApp will then send your location or start sharing your live location with the recipient in the chat.
iOS Location Changer is a solution for safeguarding your privacy while sharing your location. It allows you to modify your GPS coordinates, ensuring control over your whereabouts. With this tool, you can choose any desired destination, enhancing privacy on social media platforms and other applications. Addressing safety concerns and the need for privacy, iOS Location Changer offers a convenient way to protect your real-time location.
Key features of iOS Location Changer:
To falsify your iPhone share location, you can follow these steps:
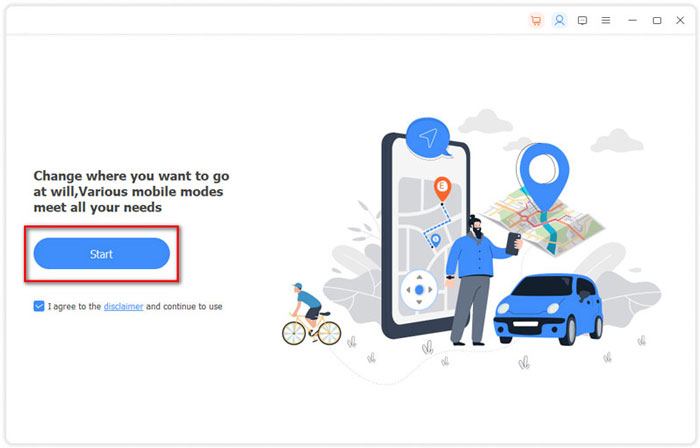
01Install and open the Location Changer software on your computer. Click "Start" to initiate the process.
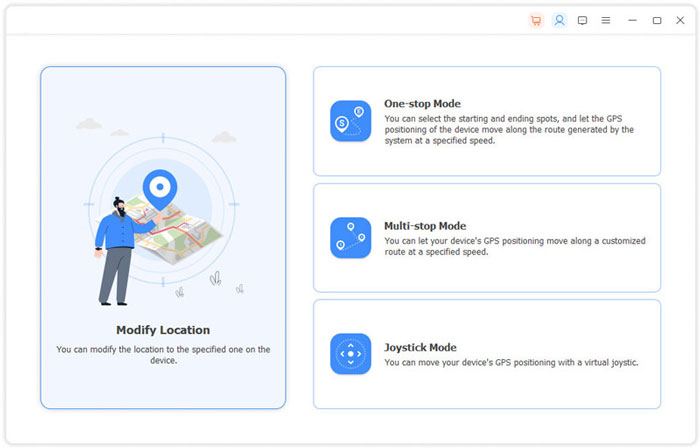
02Select the "Modify Location" option, and the map will load, showing your current location.
03Enter your desired destination in the search bar situated at the top left corner of the window. Once you locate the desired location, click "Confirm Modify" to apply the new location to your iPhone.
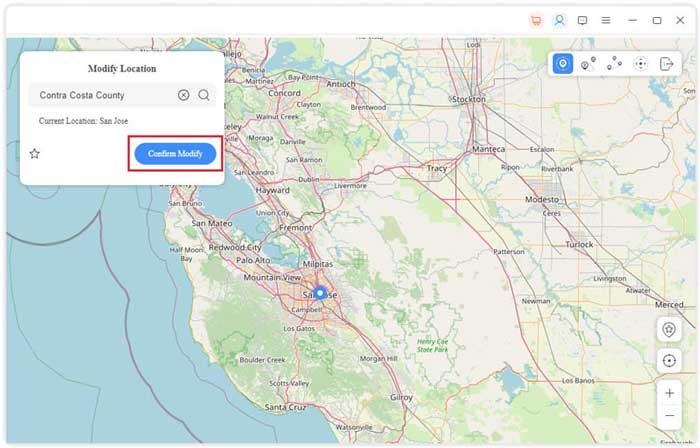
So, you can now share your location on your iPhone with ease. Furthermore, you can modify your real GPS inforamtion on your device with iOS Location Changer. This location spoofer can protect your safety, but please use it correct.
Related Articles:
How to Stop Sharing Location on iPhone Without Someone Knowing?
How to Share Location on Android with Your Family and Friends
Explore the World from Home: How to Fake Location on Snapchat Map
How to Check iPhone Location History and Protect You from Being Traced